
Related Manuals for GYS KRONOS 400T DUO


Summary of Contents for GYS KRONOS 400T DUO
- Page 1 KRONOS 01-32 400T DUO / 400T W Generator MIG/MAG - TIG - MMA 73502 17/11/2022 Find more languages of user manuals www.gys.fr...
- Page 2 Instrukcja obsługi KRONOS 400T DUO / 400T W Tłumaczenie instrukcji oryginalnej M6x12 (x10) M6 (x10) M8x12 (x8) M8 (x8) 400T W : Nie należy usuwać naklejki do czasu zmontowania kół. M6x12 (x7) M6x12 (x4)
- Page 3 Instrukcja obsługi KRONOS 400T DUO / 400T W Tłumaczenie instrukcji oryginalnej M4x10 (x6) PODPÓRKA DO BUTLI 400T DUO 400T W / 10 m / 10 m...
- Page 4 Instrukcja obsługi KRONOS 400T DUO / 400T W Tłumaczenie instrukcji oryginalnej PROCEDURA AKTUALIZACJI Klucz USB nie jest w zestawie. Oprogramowanie aktualizacyjne dostępne na stronie internetowej GYS, dział After sales. STOP M5x10 START Stal Aluminium 90950 Stal nierdzewna Rurka kapilarna Stalowa osłona...
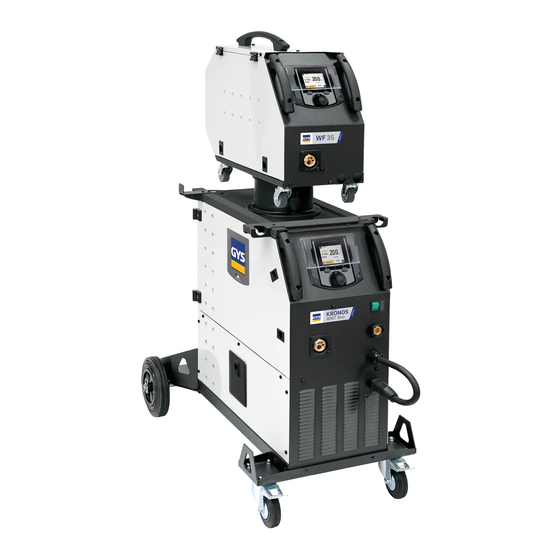
- Page 5 Instrukcja obsługi KRONOS 400T DUO / 400T W Tłumaczenie instrukcji oryginalnej 400T DUO 400T W 14 15...
- Page 6 Instrukcja obsługi KRONOS 400T DUO / 400T W Tłumaczenie instrukcji oryginalnej OSTRZEŻENIA - ZASADY BEZPIECZEŃSTWA WPROWADZENIE I OPIS OGÓLNY Niniejsza instrukcja musi być przeczytana i zrozumiana przed rozpoczęciem eksploatacji. Nie wolno przeprowadzać żadnych modyfikacji ani konserwacji, które nie zostały określone w ins- trukcji.
- Page 7 Instrukcja obsługi KRONOS 400T DUO / 400T W Tłumaczenie instrukcji oryginalnej Butle powinny być przechowywane w otwartych lub dobrze wentylowanych pomieszczeniach. Muszą one być w pozycji pionowej i utrzymywane na wsporniku lub na wózku. Spawania nie należy przeprowadzać w pobliżu smarów lub farb.
- Page 8 Instrukcja obsługi KRONOS 400T DUO / 400T W Tłumaczenie instrukcji oryginalnej spawania: • ułożyć kable spawalnicze razem – w miarę możliwości zamocować je za pomocą zacisku; • ustawić się (tułów i głowę) jak najdalej od obwodu spawania; • nigdy nie owijać przewodów spawalniczych wokół ciała;...
- Page 9 Instrukcja obsługi KRONOS 400T DUO / 400T W Tłumaczenie instrukcji oryginalnej Nigdy nie podnosić butli z gazem i źródła prądu spawania w tym samym czasie. Ich standardy transportowania są różne. Zaleca się usunięcie szpuli drutu przed podniesieniem lub transportem źródła prądu spawania.
- Page 10 Instrukcja obsługi KRONOS 400T DUO / 400T W Tłumaczenie instrukcji oryginalnej INSTALACJA - FUNKCJONOWANIE URZĄDZENIA Tylko doświadczony i wykwalifikowany przez producenta personel może przeprowadzać instalację. Podczas montażu należy upewnić się, że źródło prądu jest odłączone od sieci. Szeregowe lub równoległe połączenia źródła prądu są zabronione. W celu zapewnienia optymalnego połączenia zaleca się...
- Page 11 Instrukcja obsługi KRONOS 400T DUO / 400T W Tłumaczenie instrukcji oryginalnej UŻYWANIE PRZEDŁUŻACZY ELEKTRYCZNYCH Wszystkie przedłużenia muszą mieć odpowiedni rozmiar i napięcie odpowiednie do urządzenia. Używać przedłużacza zgodnie z przepisami krajowy- Napięcie prądu wejściowego Długość - Odcinek przedłużacza (Długość < 45m) 400 V 4 mm²...
- Page 12 Instrukcja obsługi KRONOS 400T DUO / 400T W Tłumaczenie instrukcji oryginalnej RYZYKO OBRAŻEŃ SPOWODOWANYCH PRZEZ RUCHOME ELEMENTY Rolki są wyposażone w ruchome części, które mogą chwycić dłonie, włosy, ubranie lub narzędzia, a tym samym spowodować poważne obrażenia! • Nie kłaść rąk na częściach obracających lub ruchomych czy też częściach napędowych! •...
- Page 13 Instrukcja obsługi KRONOS 400T DUO / 400T W Tłumaczenie instrukcji oryginalnej SPAWANIE PÓŁAUTOMATYCZNE ALUMINIUM (TRYB MIG) Urządzenie może spawać drut aluminiowy od Ø 0,8 do 1,2 mm (I-B). Zastosowanie aluminium wymaga specyficznego gazu - czysty Argon (Ar). Do wyboru gazu, należy zasięgnąć porady od dystrybutora gazu.
- Page 14 Dostęp do niektórych parametrów spawania zależy od wybranego trybu wyświetlania: Ustawienia/Tryb wyświetlania: Easy lub Expert. Więcej infor- macji na ten temat można znaleźć w rozdziale HMI. METODY SPAWANIA Aby uzyskać więcej informacji na temat synergii GYS i procesów spawalniczych, zeskanuj kod QR : TRYB ZGRZEWANIA PUNKTOWEGO • Spot Ten tryb spawania pozwala na wstępny montaż...
- Page 15 Instrukcja obsługi KRONOS 400T DUO / 400T W Tłumaczenie instrukcji oryginalnej Napięcie Wpływ na szerokość spoiny. Upslope Stopniowe zwiększanie natężenia prądu. Progresywna prędkość obrotowa drutu. Przed zajarzaniem, drut przybywa powoli, aby utworzyć pierwszy Prędkość zbliżania się kontakt bez powodowania szarpnięć.
- Page 16 Instrukcja obsługi KRONOS 400T DUO / 400T W Tłumaczenie instrukcji oryginalnej • Spot Ten tryb spawania pozwala na wstępny montaż części przed spawaniem. Zgrzewanie może być ręczne przez spust lub czasowe z predefiniowanym opóźnieniem wskazywania. Regulacja czasu spawania punktowego pozwala na powtarzalność i realizację punktów nieutlenionych.
- Page 17 Instrukcja obsługi KRONOS 400T DUO / 400T W Tłumaczenie instrukcji oryginalnej Czas utrzymania osłony gazowej po wyłączeniu łuku. Chroni obrabiany przedmiot i elektrodę przed Post Gas utlenianiem podczas chłodzenia. Pre-gas Czas oczyszczania palnika i tworzenia ochrony gazowej przed zajarzeniem. Czas zatrzymania Czas przebywania w stanie spoczynku jest fazą...
- Page 18 040915 OPCJONALNIE WF 35 DEVIDOIR Produkt KRONOS 400T DUO może być wyposażony w oddzielny podajnik WF 35 (opcja, nr ref. 075078) w celu szybkiego wykorzystania 2 rodzajów lub średnic drutu bez konieczności zmiany palników lub szpul. Połączenie pomiędzy tymi dwoma elementami odbywa się poprzez opcjonalną, dedykowaną wiązkę: Rodzaj chłodzenia palnika Długość...
- Page 19 Instrukcja obsługi KRONOS 400T DUO / 400T W Tłumaczenie instrukcji oryginalnej BŁĘDY, PRZYCZYNY, ROZWIĄZANIA PROBLEMÓW DYSFUNKCJA PRZYCZYNY ROZWIĄZANIA Wyczyść rurkę kontaktową lub wymień ją na Zgarniacze zatykające otwór wentylacyjny produkt zapobiegający przyleganiu. Prędkość podawania drutu spawalniczego nie Drut ślizga się na rolkach.
- Page 20 Instrukcja obsługi KRONOS 400T DUO / 400T W Tłumaczenie instrukcji oryginalnej Wydaje się, że pamięć USB nie jest 1- Włóż klucz USB do jego gniazda. rozpoznawana. Wyświetlacz dla kroku 5 2- Włącz generator. Problem z aktualizacją procedury aktualizacji nie pojawia się na 3- Naciśnij i przytrzymaj pokrętło HMI, aby...
- Page 21 Części zamienne KRONOS 400T DUO / 400T W SPARE PARTS / ERSATZTEILE / PIEZAS DE REPUESTO / ЗАПАСНЫЕ ЧАСТИ / RESERVE ONDERDELEN / PEZZI DI RICAMBIO 400T DUO...
- Page 22 Części zamienne KRONOS 400T DUO / 400T W 400T DUO Embase Texas Femelle / Female Texas socket 51478 Interrupteur bipolaire / Two-pole switch 52472 Poignée plastique / Plastic handle 56047 IHM / HMI E0123C Capteur de courant / Current sensor...
- Page 23 Części zamienne KRONOS 400T DUO / 400T W 400T W...
- Page 24 Części zamienne KRONOS 400T DUO / 400T W 400T W Embase Texas Femelle / Female Texas socket 51478 Raccord eau rouge / Red coolant connector 71695 Raccord eau bleu / Blue coolant connector 71694 Interrupteur bipolaire / Two-pole switch 52472 Poignée plastique / Plastic handle...
- Page 25 Schemat elektryczny KRONOS 400T DUO / 400T W CIRCUIT DIAGRAM / SCHALTPLAN / DIAGRAMA ELECTRICO / ЭЛЕКТРИЧЕСКАЯ СХЕМА / ELEKTRISCHE SCHEMA / SCEMA ELETTRICO 400T DUO...
- Page 26 Schemat elektryczny KRONOS 400T DUO / 400T W 400T W...
- Page 27 Specyfikacje Techniczne KRONOS 400T DUO / 400T W TECHNICAL SPECIFICATIONS / TECHNISCHE DATEN / ESPECIFICACIONES TÉCNICAS / ТЕХНИЧЕСКИЕ СПЕЦИФИКАЦИИ / TECHNISCHE GEGEVENS / SPECIFICHE TECNICHE 400T DUO 400T W Primaire / Primary / Primär / Primario / Первичка / Primaire / Primario Tension d’alimentation / Power supply voltage / Versorgungsspannung / Tensión de red eléctrica / Напряжение...
- Page 28 Specyfikacje Techniczne KRONOS 400T DUO / 400T W Facteur de correction de la puissance de refroidissement à 40°C / / Correction factor 40°C / Korrekturfaktor bei 40°C / Factor de 0.58 corrección a 40ºC / Коэффициент коррекции при 40°C / Correctiefactor bij 40°C / Ciclo di correzione a 40°C Pression maximale / Maximum pressure / Maximaler Druck / Presión máxima / Максимальное...
- Page 29 Piktogramy KRONOS 400T DUO / 400T W SYMBOLS / ZEICHENERKLÄRUNG / ICONOS / СИМВОЛЫ / PICTOGRAMMEN / ICONE Attention ! Lire le manuel d’instruction avant utilisation. Warning ! Read the user manual before use. ACHTUNG ! Lesen Sie diese Anleitung sorgfältig durch vor Inbetriebnahme des Geräts.
- Page 30 Piktogramy KRONOS 400T DUO / 400T W Matériel conforme aux exigences britanniques. La déclaration de conformité britannique est disponible sur notre site (voir à la page de couverture). Equipment in compliance with British requirements. The British Declaration of Conformity is available on our website (see home page).
- Page 32 GYS France GYS Italia Siège social / Headquarter Filiale / Filiale 1, rue de la Croix des Landes - CS 54159 Vega – Parco Scientifico Tecnologico di 53941 Saint-berthevin Cedex Venezia France Via delle Industrie, 25/4 30175 Marghera - VE www.gys.fr...
- Page 33 Utilisation et exploitation exclusivement avec les produits suivants KRONOS 250M KRONOS 250T KRONOS 320T KRONOS 400T DUO KRONOS 400T W WF 35 Version du logiciel Cette notice décrit les versions de logiciel suivantes : La version logicielle de l’interface est affichée dans le menu général : Système / Information...
- Page 34 Utilisation de l’interface machine Commande du générateur L’écran principal contient toutes les informations nécessaires avant, pendant et après le soudage. L’interface est configurable avec 2 modes d’affichage : Easy ou Expert. MIG-MAG Épaisseur Courant de soudage Procédé de soudage en cours Procédé...
- Page 35 Commande du générateur L’écran principal contient toutes les informations nécessaires avant, pendant et après le soudage. L’interface est configurable avec 2 modes d’affichage : Easy ou Expert. Courant de soudage Procédé de soudage en cours Horaire, Traçabilité Paramètres du procédé en cours Bouton-poussoir n°1 (BP1) Molette de navigation/réglage Appui court pour valider...
- Page 36 Utilisation de l’interface machine Menu général La navigation entre les différents blocs s’effectue grâce à la molette. À partir de l’écran principal, un appui long sur la molette permet d’accéder au menu général. Un appui court sur le bouton-poussoir n°1 ( ) permet de revenir au menu précédent ou d’accéder à l’écran principal. Proçédés Paramètres Système...
- Page 37 Paramètres Mode d’affichage - Easy : affichage simplifié adapté à la grande majorité des utilisateurs. - Expert : affichage complet adapté au soudeur expérimenté. Il permet d’ajuster les durées des différentes phases du cycle de soudage. Langue Choix du langage de l’interface (Français, Anglais, Allemand, etc). Unités de mesure Choix d’affichage du système des unités : International (SI) ou Impérial (USA).
- Page 38 *Cette fonctionnalité n’est pas activée par défaut. Il est possible de l’activer via le configurateur en ligne, disponible sur Planet GYS / Outils / Configuration produit. Pour l’activer, contacter votre distributeur. Cette interface de gestion de soudage permet de tracer/enregistrer toutes les étapes de l’opération de soudage, cordon par cordon, lors d’une fabrication industrielle.
- Page 39 Portabilité Import Config. Chargement de la configuration machine depuis la clé USB (répertoire : Disque amovible\PORTABILITY\CONFIG) vers la machine. Un appui long sur le bouton-poussoir n°1 ( ) permet de supprimer les configurations de la clé USB. Export Config. Exportation de la configuration machine vers la clé USB (répertoire : Disque amovible\PORTABILITY\CONFIG). Import Job Importation des Jobs selon les procédés présents sous le répertoire Disque amovible\PORTABILITY de la clé...
- Page 40 Utilisation de l’interface machine Contrôle du débit de gaz (MIG-MAG) Dans l’écran principal, un appui long sur le bouton-poussoir n°1 permet de régler son débit de gaz sur le manomètre sans dérouler de fil d’apport. La procédure une fois lancée est expliquée avec une animation sur l’écran.
- Page 41 Le tableau suivant présente une liste non exhaustive de messages et codes d’erreur qui peuvent apparaitre. Effectuer ces vérifications et contrôles avant de faire appel à un technicien spécialisé GYS agréé. Si l’utilisateur doit ouvrir son produit, il est obligatoire de couper l’alimentation en débranchant la prise électrique et d’attendre 2 minutes par sécurité.
- Page 42 Surcharge, Veuillez vérifier vos réglages gaz, torche, etc) Appuyer relâcher sur la gâchette pour effacer Si le problème persiste, faire une mise à jour (Via Planet GYS). Problème de démarrage du soudage Vérifier les réglages du générateur et l’installation (fil d’apport, galets, Veuillez vérifier vos paramètres de soudage...
- Page 43 For use and application to the following products only KRONOS 250M KRONOS 250T KRONOS 320T KRONOS 400T DUO KRONOS 400T W WF 35 Software version This manual covers the following software versions: The software version of the interface is displayed in the general menu: Système / Information...
- Page 44 Using the machine interface Control of the power source The main screen displays all the information needed before, during, and after welding. The interface is adjustable with 2 different display modes: Easy or Expert. MIG-MAG (GMAW/FCAW) (GTAW) Thickness Welding current Current welding process Current welding process Schedule, Traceability...
- Page 45 Control of the power source The main screen displays all the information needed before, during, and after welding. The interface is adjustable with 2 different display modes: Easy or Expert. (SMAW) Welding current Current welding process Schedule, Traceability Current process settings Push-button no.
- Page 46 Using the machine interface General menu The navigation between the different sections is done with the thumbwheel. From the home screen, a long press on the thumbwheel takes you to the main menu. Briefly pressing button no. 1 ( ) returns to the previous menu or accesses the main screen. Processes Settings System...
- Page 47 Settings Display mode - Easy: simplified display suitable for the vast majority of users. - Expert: comprehensive display suitable for more experienced welders. Allows you to adjust the durations of the different phases in the welding cycle. Language Choice of the interface language (French, English, German, etc). Units of measurement Choice of measurement units: International (SI) or Imperial (USA).
- Page 48 Using the machine interface Traceability *This feature is not activated as default. It can be activated via the online configurator, available on Planet GYS / Tools / Product configuration. To activate it, contact your distributor. This welding management interface is designed to trace/record all the steps of the welding operation, bead by bead, during manufacturing.
- Page 49 Portability Import Config. Loading the configuration from the USB stick (directory: Removable disk\Portability\Config) to the machine. Holding down on the push-button no. 1 ( ) deletes the configurations on the USB stick. Export Config. Export the machine configuration to the USB stick (directory : Removable disk\Portability\Config). Import Job Importing Jobs to the machine according to the processes available in the USB key’s Removable Disk directory.
- Page 50 Using the machine interface Wire loading (MIG-MAG) To unwind the wire in the MIG/MAG torch without using gas, please follow the procedure below: 1- Hold the trigger down in a non-welding position. 2- When the process is shown on the display, you can release the trigger. 3- The wire starts to feed.
- Page 51 The following table shows a non-exhaustive list of messages and error codes that may appear. Carry out these checks and inspections before calling in an authorised GYS technician. If the user needs to open the product, they must turn off the power supply by disconnecting the electrical plug from the socket, and wait two minutes for safety.
- Page 52 Overload, please check your settings lers, gas, torch, etc.) Press and release the trigger to erase If the problem persists, update the software (via Planet GYS). Problem with welding start-up Check the power source settings and installation (welding wire, rol- Please check your welding parameters lers, gas, torch, etc.)
- Page 53 Nutzung und Betrieb ausschließlich mit den folgenden Produkten KRONOS 250M KRONOS 250T KRONOS 320T KRONOS 400T DUO KRONOS 400T W WF 35 Software-Version In dieser Anleitung werden die folgenden Software-Versionen beschrieben: Die Software-Version des Bedienfelds wird im Menü „Allgemein“ angezeigt: System / Information...
- Page 54 Bedienung des Bedienfeldes Steuerung der Stromquelle Der Hauptbildschirm enthält alle Informationen, die Sie vor, während und nach dem Schweißen benötigen. Die Schnittstelle ist mit 2 Anzeigemodi konfigurierbar: Easy oder Expert. MIG-MAG Dicke Schweißstrom Laufendes Schweißverfahren Laufendes Schweißverfahren Uhrzeit, Rückverfolgbarkeit Uhrzeit, Rückverfolgbarkeit Aktuelle Einstellungen Aktuelle Einstellungen Steuerung des Gasdurchsatzes...
- Page 55 Steuerung der Stromquelle Der Hauptbildschirm enthält alle Informationen, die Sie vor, während und nach dem Schweißen benötigen. Die Schnittstelle ist mit 2 Anzeigemodi konfigurierbar: Easy oder Expert. Schweißstrom Laufendes Schweißverfahren Uhrzeit, Rückverfolgbarkeit Parameter des aktuellen Verfahrens Drucktaste Nr. 1 (BP1) Navigationsrädchen/Einstellung Langes Drücken zur Bestätigung Langes Drücken = Menü...
- Page 56 Bedienung des Bedienfeldes Menü „ Allgemein“ Die Navigation zwischen den verschiedenen Blöcken erfolgt mit dem Drehpoti. Vom Hauptbildschirm aus gelangt man durch langes Drücken auf das Drehpoti in das Menü „Allgemein“. Durch kurzes Drücken der Drucktaste Nr. 1 ( ) kehrt man zum vorherigen Menü zurück oder gelangt zum Hauptbildschirm. Verfahren Parameter System...
- Page 57 Parameter Anzeigemodus - Easy: vereinfachte Anzeige, die für die große Mehrheit der Benutzer geeignet ist. - Expert: vollständige Anzeige für den erfahrenen Schweißer. Sie ermöglicht die Einstellung der Dauer der verschie- denen Phasen desSchweißzyklus. Sprache Wahl der Sprache des Bedienfeldes (Französisch, Englisch, Deutsch, usw.). Messeinheiten Auswahl der Anzeige des Einheitensystems: International (SI) oder Imperial (USA).
- Page 58 *Diese Funktion ist standardmäßig nicht aktiviert. Sie kann über den Online-Konfigurator aktiviert werden, der unter Planet GYS / Tools / Produktkonfiguration verfügbar ist. Zur Aktivierung wenden Sie sich an Ihren Händler. Diese Schnittstelle zur Verwaltung des Schweißens erlaubt es, alle Schritte der Schweißvorgänge während der Fertigung zu speichern bzw.
- Page 59 Portability (Portabilität) Import Config. (Import von Konfigurationen) Laden der Konfiguration des Schweißgeräts von einem USB-Stick (Verzeichnis: Wechseldatenträger\PORTABILITY\ CONFIG) in das Schweißgerät. Ein langes Drücken auf die Drucktaste Nr. 1 ( ) erlaubt, alle Konfigurationen von dem USB-Stick zu löschen. Export Config. (Export von Konfigurationen) Export der Konfiguration des Schweißgeräts auf einen USB-Stick (Verzeichnis: Wechseldatenträger\PORTABILITY\ CONFIG).
- Page 60 Bedienung des Bedienfeldes Ladung des Drahts (MIG-MAG) Um Draht in einem MIG/MAG-Brenner abzuwickeln, ohne Gas zu verbrauchen, gehen Sie wie folgt vor: 1- Lange auf den Brennertaster drücken, in der Position außerhalb des Schweißens. 2- Wenn das Verfahren auf dem Bildschirm angezeigt wird, können Sie den Brennertaster loslassen. 3- Der Draht beginnt, sich abzuwickeln.
- Page 61 Die folgende Tabelle enthält eine nicht vollständige Liste von Meldungen und Fehlercodes, die möglicherweise erscheinen können. Führen Sie diese Prüfungen und Kontrollen durch, bevor Sie einen autorisierten Servicetechniker von GYS heran- ziehen. Wenn der Bediener sein Gerät öffnen muss, ist es zwingend vorgeschrieben, die Stromzufuhr durch Ziehen des Netzsteckers zu unterbrechen und zur Sicherheit 2 Minuten zu warten.
- Page 62 Zum Löschen, drücken Sie auf den Brennertaster Bleibt das Problem bestehen, führen Sie eine Aktualisierung durch und lassen Sie ihn los. (über Planet GYS). Probleme beim Starten des Schweißprozesses. Überprüfen Sie die Einstellungen der Stromquelle und der Installation Überprüfen Sie Ihre Schweißparameter (Schweißdraht, Rollen, Gas, Brenner usw.)
- Page 63 Gebruik uitsluitend met de volgende pro- ducten KRONOS 250M KRONOS 250T KRONOS 320T KRONOS 400T DUO KRONOS 400T W WF 35 Software versie Deze handleiding beschrijft de volgende software versies : De software versie van de interface wordt getoond in het algemene menu : Systeem / Informatie...
- Page 64 Gebruik van het bedieningspaneel van het apparaat Bediening van de generator Het hoofdscherm bevat alle informatie die u nodig heeft voor, tijdens en na het lassen. De bediening kan worden ingesteld met 2 weergave-modules : Easy of Expert. MIG-MAG Dikte Lasstroom In uitvoering zijnde lasprocedure In uitvoering zijnde lasprocedure...
- Page 65 Bediening van de generator Het hoofdscherm bevat alle informatie die u nodig heeft voor, tijdens en na het lassen. De bediening kan worden ingesteld met 2 weergave-modules : Easy of Expert. Lasstroom In uitvoering zijnde lasprocedure Tijd, Traceability Instellingen van de in gang zijnde procedure Drukknop n°1 (DK1)
- Page 66 Gebruik van het bedieningspaneel van het apparaat Algemene menu U kunt met het draaiwieltje door de verschillende blokken navigeren. Als u in het hoofdmenu bent, kunt u met een langere druk op het wieltje toegang krijgen tot het algemene menu. Met een korte druk op de drukknop n°1 ( ) kunt u terugkeren naar het vorige menu, of naar het hoofdscherm gaan.
- Page 67 Instellingen Weergave modules - Easy : eenvoudige weergave, geschikt voor de meeste lassers. - Expert : complete weergave, speciaal voor de meer ervaren lassers. Hierin kunt u de duur van de verschillende fases van de lascycli bijstellen. Taal Keuze van de taal van de interface (Frans, Engels, Duits enz.) Meet-eenheden Keuze weergave eenheden : Internationaal (SI) of Imperiaal (USA).
- Page 68 Traceability *Deze functie is standaard niet geactiveerd. De functie kan worden geactiveerd via de on-line configura- tor, beschikbaar op Planet GYS / Tools / Configureren product. Om dit te activeren kunt u contact opnemen met uw verkooppunt. Met deze interface-besturing kunnen alle stappen van een lasoperatie tijdens industriële processen, rups na rups, worden getraceerd en geregistreerd.
- Page 69 Portability Import Config. Laden van de machine-instelling vanaf een USB-stick (repertoire : USB stick\Portability\Config) naar het apparaat. Met een langere druk op de drukknop n°1 ( ) kunt u instellingen op de USB-stick wissen. Export Config. Exporteren van de instelling van het apparaat naar de USB-stick (repertoire : USB stick\Portability\Config). Import Job Importeren van Jobs volgens de procedures aanwezig onder het repertoire USB-stick\Portability van de USB stick naar het apparaat.
- Page 70 Gebruik van het bedieningspaneel van het apparaat Inbrengen van het lasdraad (MIG-MAG) Om het draad in een MIG/MAG toorts aan te voeren zonder gas te verbruiken kunt u de volgende proce- dure volgen : 1 - Druk de trekker langer in, zonder los te laten, buiten het lassen om. 2- Wanneer de procedure op het scherm getoond wordt kunt u de trekker loslaten.
- Page 71 De volgende tabel toont een (niet complete) lijst met meldingen en error codes die op uw apparaat kunnen ver- schijnen. Voer eerst de beschreven controles uit, voordat u een beroep doet op een door GYS erkende technicus. Wanneer de lasser het apparaat moet openen, moet eerst de stroom worden afgesloten en de stekker uit het stopcontact worden gehaald.
- Page 72 Druk op de trekker en laat weer los om te wissen Indien het probleem voortduurt moet u een update uitvoeren (Via Planet GYS) Controleer de instellingen van de generator en de installatie (draad, Probleem met het opstarten van het lassen...
- Page 73 Utilizzo e sfruttamente solamente con i seguenti prodotti KRONOS 250M KRONOS 250T KRONOS 320T KRONOS 400T DUO KRONOS 400T W WF 35 Versione del software Questo manuale descrive le versioni dei seguenti software: La versione software dell’interfaccia viene visualizzata nel menù generale: Sistema / Informazioni...
- Page 74 Utilizzo dell’interfaccia macchinaù Comando del generatore Il display principale contiene tutte le informazioni necessarie per il procedimento di saldatura prima, durante e dopo la saldatura. L’interfaccia è configurabile con 2 modalità di visualizzazione: Easy o Expert. MIG-MAG Spessore Corrente di saldatura Processo di saldatura in corso Processo di saldatura in corso Orario, Tracciabilità...
- Page 75 Comando del generatore Il display principale contiene tutte le informazioni necessarie per il procedimento di saldatura prima, durante e dopo la saldatura. L’interfaccia è configurabile con 2 modalità di visualizzazione: Easy o Expert. Corrente di saldatura Processo di saldatura in corso Orario, Tracciabilità...
- Page 76 Utilizzo dell’interfaccia macchinaù Menù generale La navigazione tra i diversi blocchi avviene con la rotella. Dalla schermata principale, premendo a lungo la rotellina si accede al menu principale. Premendo brevemente il pulsante n. 1 ( ) si torna al menu precedente o si accede alla schermata principale. Processi Parametri Sistema...
- Page 77 Parametri Modalità di visualizzazione - Easy : visualizzazione semplificata adatta alla grande maggioranza degli utenti. - Expert : display completo adatto al saldatore esperto. Consente di regolare i tempi delle diverse fasi del ciclo di saldatura. Lingua Scelta della lingua dell’interfaccia (Francese, Inglese, Tedesco, ecc...) Unità...
- Page 78 *Questa funzione non è abilitata di default. Può essere attivato tramite il configuratore online, disponibile su Pla- net GYS / Tools / Product configuration. Per attivarlo, contattare il distributore. Qusto interfaccia di gestione della saldatura permette di tracciare/registrare tutte le tappe dell’operazione di saldatura, cordolo per cordolo, durante una fabbricazione industriale.
- Page 79 Trasportabilità Import Config. Caricamento della configurazione macchina dalla chiavetta USB (repertorio : Disco mobile\Portability\Config) alla macchina. Una pressione prolungata sul pulsante n. 1 ( ) cancella le configurazioni della chiavetta USB. Export Config. Esportazione della configurazione macchina alla chiavetta USB (repertorio : Disco mobile\Portability\Config). Import Job Importazione dei Job a seconda dei procedimenti sotto il repertorio Disco mobile\Portability dalla chiavetta USB alla macchina.
- Page 80 Utilizzo dell’interfaccia macchinaù Controllo del flusso di gas (MIG-MAG) Nella schermata principale, una pressione prolungata sul pulsante n. 1 consente di regolare il flusso di gas sul manometro senza srotolare il filo d’apporto. Una volta avviata la procedura, viene spiegata con un’animazione sullo schermo.
- Page 81 La seguente tabella presenta una lista non esaustiva dei messaggi e codici di errore che possono apparire. Effettuare queste verifiche e controlli prima di ricorrere all’aiuto di un tecnico specializzato GYS autorizzato. Se l’utilizzatore deve aprire il suo prodotto, è obbligatorio staccare l’alimentazione scollegando la presa di corrente elettrica e aspettare 2 minuti per sicurezza.
- Page 82 Premere e rilasciare il pulsante torcia per can- rulli, gas, torcia, ecc) cellare Se il problema persiste, fare l’aggiornamneto (attraverso Planet GYS). Problema di avviamento saldatura Verificare le regolazioni del generatore e l’installazione (filo d’apporto, Verificare i vostri parametri di saldatura...
- Page 83 Stosowanie i eksploatacja tylko z następu- jącymi produktami KRONOS 250M KRONOS 250T KRONOS 320T KRONOS 400T DUO KRONOS 400T W WF 35 Wersja oprogramowania W niniejszej instrukcji opisano następujące wersje oprogramowania: Wersja oprogramowania interfejsu jest wyświetlana w menu ogólnym: System / Informacje...
- Page 84 Korzystanie z interfejsu maszyny Sterowanie źródła prądu Główny ekran zawiera wszystkie niezbędne informacje przed, podczas i po spawaniu. Interfejs jest konfigurowalny z 2 trybami wyświetlania: Easy lub Expert. MIG-MAG Grubość Prąd spawania Proces spawania w toku Proces spawania w toku Harmonogram, trasowanie Harmonogram, trasowanie Bieżące ustawienia...
- Page 85 Sterowanie źródła prądu Główny ekran zawiera wszystkie niezbędne informacje przed, podczas i po spawaniu. Interfejs jest konfigurowalny z 2 trybami wyświetlania: Easy lub Expert. Prąd spawania Proces spawania w toku Harmonogram, trasowanie Aktualne parametry procesu Przycisk 1 (BP1) Pokrętło nawigacyjne/ustawień Krótko naciśnij, aby potwierdzić...
- Page 86 Korzystanie z interfejsu maszyny Menu ogólne Nawigacja pomiędzy poszczególnymi blokami odbywa się za pomocą pokrętła. Z ekranu głównego, długie naciśnięcie na pokrętło przenosi nas do menu głównego. Naciśnięcie przycisku nr 1 ( ) powoduje krótki powrót do poprzedniego menu lub przejście do ekranu głównego. Procesy Parametry System...
- Page 87 Parametry Tryb wyświetlania - Easy : uproszczony wyświetlacz odpowiedni dla zdecydowanej większości użytkowników. - Expert : kompletny pokaz odpowiedni dla doświadczonego spawacza. Pozwala na regulację czasów poszczegól- nych faz cyklu spawania. Język Wybór języka interfejsu (francuski, angielski, niemiecki itp.). Jednostki miary Wybór wyświetlania systemu jednostek : International (SI) lub Imperial (USA).
- Page 88 Trasowanie *Ta funkcja nie jest domyślnie włączona. Można go aktywować za pomocą konfiguratora online, dostępne- go na stronie Planeta GYS / Narzędzia / Konfiguracja produktu. Aby go aktywować, należy skontaktować się z dystrybutorem. Ten interfejs zarządzania spawaniem umożliwia śledzenie/rejestrowanie wszystkich etapów operacji spawania, stopka po stopce, podczas produkcji przemysłowej.
- Page 89 Mobilność Import Config. Ładowanie konfiguracji maszyny z pamięci USB (katalog : Removable disk\Portability\Config) do urządzenia. Długie naciśnięcie przycisku nr 1 ( ) powoduje usunięcie konfiguracji z pamięci USB. Export Config. Eksportowanie konfiguracji maszyny do pamięci USB (katalog : Removable disc\Portability\Config). Import Job Importuj Jobs zgodnie z procedurami obecnymi w katalogu Removable Disk\Portability w kluczu USB do maszyny.
- Page 90 Korzystanie z interfejsu maszyny Ładowanie drutu (MIG-MAG) Aby odwijać drut w palniku MIG/MAG bez zużywania gazu, należy postępować zgodnie z poniższą procedurą: 1- Przytrzymaj spust w dół w pozycji bez spawania. 2- Gdy na ekranie pojawi się procedura, możesz zwolnić spust. 3- Drut zaczyna się...
- Page 91 Kody błędów Poniższa tabela przedstawia niewyczerpującą listę komunikatów i kodów błędów, które mogą się pojawić. Wykonać te sprawdzenia i kontrole przed wezwaniem autoryzowanego technika GYS. W przypadku konieczności otwarcia produktu przez użytkownika należy obowiązkowo odciąć zasilanie poprzez wyjęcie wtyczki elektrycznej i odczekać 2 minuty dla bezpieczeństwa.
- Page 92 Odłączanie USB Wystąpił wewnętrzny błąd systemu. Wyłączyć i ponownie włączyć produkt. Proszę zrestartować produkt Jeśli problem nadal występuje, dokonaj aktualizacji (Via Planet GYS) Błąd kalibracji Ponowna kalibracja kabli spawalniczych (menu «Kalibracja») Więcej miejsca w pamięci urządzenia Usuń zadania, aby zwolnić miejsce w pamięci wewnętrznej.
- Page 93 Použití a provoz pouze s následujícími výrobky KRONOS 250M KRONOS 250T KRONOS 320T KRONOS 400T DUO KRONOS 400T W WF 35 Verze softwaru Tato příručka popisuje následující verze softwaru: Verze softwaru rozhraní se zobrazuje v obecném menu: Systém / Informace...
- Page 94 Použití rozhraní stroje Ovládání zdroje Hlavní obrazovka obsahuje všechny potřebné informace před, během a po svařování. Rozhraní je konfigurovatelné se 2 režimy zobrazení: Standardní nebo Expert. MIG-MAG Tloušt’ka. Hlavní proud Probíhající svařování proces Probíhající svařování proces Časový plán, sledovatelnost Časový plán, sledovatelnost Aktuální...
- Page 95 Ovládání zdroje Hlavní obrazovka obsahuje všechny potřebné informace před, během a po svařování. Rozhraní je konfigurovatelné se 2 režimy zobrazení: Easy nebo Expert. Hlavní proud Probíhající svařování proces Časový plán, sledovatelnost Aktuální parametry procesu Tlačítko 1 (BP1) Navigační/nastavovací kolečko Krátké stisknutí pro potvrzení Dlouhé...
- Page 96 Použití rozhraní stroje Obecné menu Navigace mezi jednotlivými bloky se provádí pomocí kolečka. Na hlavní obrazovce se dlouhým stisknutím ovládacího kolečka dostanete do hlavní nabídky. Krátkým stisknutím tlačítka č. 1 ( ) se vrátíte do předchozí nabídky nebo přejdete na hlavní obrazovku. Procesy Parametry Systém...
- Page 97 Parametry Režim zobrazení - Standardní : zjednodušené zobrazení vhodné pro naprostou většinu uživatelů. - Expert: kompletní displej vhodný pro zkušené svářeče. Umožňuje nastavit časy jednotlivých fází svařovacího cyklu. Jazyk Výběr jazyka rozhraní (francouzština, angličtina, němčina atd.). Jednotky měření Volba zobrazení systému jednotek : International (SI) nebo Imperial (USA). Pojmenování...
- Page 98 Sledovatelnost *Tato funkce není ve výchozím nastavení povolena. Lze jej aktivovat prostřednictvím online konfigurátoru, který je k dispozici na stránce Planet GYS / Tools / Produktová konfigurace. Chcete-li ji aktivovat, obraťte se na svého distributora. Toto rozhraní pro správu svařování umožňuje sledovat/zaznamenávat všechny fáze svařovací operace, svar po svaru, během průmyslové...
- Page 99 Přenositelnost Import Config. Načtení konfigurace stroje z paměti USB (adresář : Vyměnitelný diskPORTABILITY\CONFIG) do stroje. Dlouhým stisknutím tlačítka č. 1 ( ) lze odstranit konfigurace klíče USB. Export Config. Exportování konfigurace počítače na paměťové zařízení USB (adresář : Vyměnitelný diskPORTABILITY\CONFIG). Import jobu Import jobů...
- Page 100 Použití rozhraní stroje Nakládání drátu (MIG-MAG) Chcete-li odvíjet drát v hořáku MIG/MAG bez spotřeby plynu, postupujte podle níže uvedeného postupu: 1- Držte spoušť stisknutou v nesvařovacípoloze. 2- Jakmile se na obrazovce zobrazí postup, můžete spoušť uvolnit. 3 - Drát se začne odvíjet. Ve výchozím nastavení pracuje 3m rychlostí 5 m/min. Tyto hodnoty můžete změnit pomocí...
- Page 101 V následující tabulce je uveden neúplný seznam zpráv a chybových kódů, které se mohou objevit. Před přivoláním autorizovaného technika GYS proveďte tyto kontroly a ověření. Pokud uživatel potřebuje výrobek otevřít, musí povinně odpojit napájení vytažením zástrčky ze zásuvky a z bezpečnostních důvodů...
- Page 102 Zkontrolujte nastavení a instalaci generátoru (drát, válečky, plyn, Přetížení, Zkontrolujte prosím své nastavení hořák atd.) Stisknutím a uvolněním spouště vymažete Pokud problém přetrvává, proveďte aktualizaci (prostřednictvím služby Planet GYS). Zkontrolujte nastavení a instalaci generátoru (drát, válečky, plyn, Problém při spuštění svařování hořák atd.) Zkontrolujte prosím parametry svařování...
Need help?
Do you have a question about the KRONOS 400T DUO and is the answer not in the manual?
Questions and answers