Advertisement
Quick Links
User Manual
HT 430-22
Programmable energy-saving radiator
thermostat
V 1.15
08/22
ID: 73024
User manual
Please read the user manual before you
place
the
thermostat.
Keep
documents for later questions and
provide them if you pass the thermostat
on to other persons.
Scope of delivery
1 HT 430-22 energy saving radiator
thermostat
1 User manual
1 Connector
3 Adapters (Danfoss RA, Danfoss RAV,
Danfoss RAVL)
2 batteries (mignon, AA)
Application as directed
By purchasing the HT 430-22 energy saving
radiator thermostat you own a programmable
radiator thermostat which can be used for
temperature regulations in enclosed rooms
and therefore, it can contribute to the
reduction of heating energy. – Please use the
thermostat only for this purpose. The
programming port is intended ONLY for our
programming stick. Never connect other
devices with the programming port!
The Programming stick can be found on:
www.addliving.com
Set up menu
By pressing MENU, you will arrive at the
set up menu. Please choose one of the
items with the selector wheel. With OK
you can select one menu item and with
the selection wheel they can be adjusted.
The button OK confirms the setting. The
button MENU leads to the previous level.
MODE Select the mode
AUTO = automatic mode
MANU = manual mode
PROG
Setting of time program
TEMP
Setting of comfort and economy
temperature
ZEIT
Setting of date and time
FENS
Window function
RES
Reset of the device to factory
preset
ADAP
Starting of a new adaptation to
adjust the valve
URLA
Travel function
INST
Installation function (Please only
attach the controller to the coupling ring in
this position)
OFFS
Adaptation of temperature to the
room situation
STBY
Standby mode
VERS
version
DST
Daylight saving time
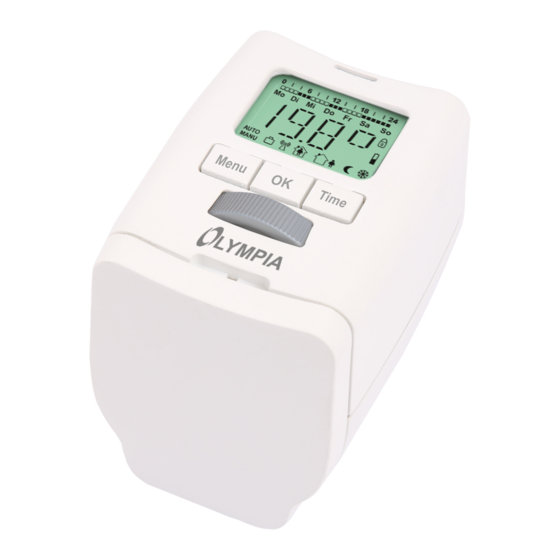
Display and control elements
1
Union nut
2
Heating times
3
AUTO or MANU mode
4a
MENU – Opens the main menu
(starting from the standard display);
within a menu, navigate one step
back by pressing the button
4b
OK – Confirm
4c
TIME – Timer function
5
Adjusting wheel
6
Key lock
7
Battery low
8a
Vacation function
8b
Comfort temperature
8c
Energy-save temp.
8d
Frost protection function
9
Battery compartment
10
USB-Port
Inserting / replacing batteries
Remove the battery lid by pressing the
battery lid upwards (1) at the highlighted
point and then taking it out (2).
(2)
the
Then insert the batteries as represented in the
appliance. Do not use accumulators! Ensure
that the polarity is correct!
Safety information regarding handling
batteries
Warning! Risk of suffocation through
batteries.
• Keep batteries out of reach of children.
• Seek medical attention immediately if
one is swallowed.
Caution! There are different risks involved
when dealing with batteries.
• Never attempt to recharge standard
batteries, never short circuit batteries
and/or open batteries. Doing so leads to a
potential risk of overheating, fire or
explosion.
•
Improper
handling
batteries/rechargeable
batteries
endanger
your
health
environment.
Batteries/rechargeable
batteries
may
contain
environmentally harmful heavy metals
(Cd = cadmium, Hg = mercury, Pb = lead).
Therefore, hand in used batteries at a
municipal collection point. Therefore,
separate disposal and recycling of spent
batteries is essential for the environment
and health.
• Ensure the connection terminals are not
short-circuited.
• Never throw batteries into a fire or
water.
• Never
expose
batteries
mechanical loads.
• Leaking batteries could cause damage to
the device. If a battery should start to leak,
remove it from the device immediately to
prevent any further damage. Take the
utmost care when handling damaged or
leaking
batteries
and always
protective gloves.
• Avoid any contact with the skin, eyes,
and mucous membranes. Rinse any parts
of the body which have encounter battery
acid with plenty of clean water and
contact a doctor immediately. Avoid
extreme conditions and temperatures
which could affect the batteries, e.g. by
placing them on radiators or exposing
them to direct sunlight.
• Only use batteries of the type specified.
• Never use batteries of different types or
new and old batteries together.
• Ensure batteries are inserted with the
correct polarity.
• If the device will not be used for a longer
period, switch the device off and remove
the batteries.
• Remove empty batteries from the
device and dispose of them according to
the applicable directives.
• The batteries must be removed from the
device before its disposal.
• You are legally obliged to dispose of
batteries at your dealer or at the collection
points provided by the responsible waste
disposal authority.
Setting date and time
After inserting the batteries for the first
time the date will flash on the display.
Now, date and time can be set.
Set date with the selector wheel. Confirm
with OK.
Set month with the selector wheel.
Confirm with OK.
Set day with the selector wheel. Confirm
with OK.
Set hour with the selector wheel. Confirm
with OK.
Set minute with the selector wheel.
Confirm with OK.
– That's it.
On the display PREP. will be shown. Now, the
motor will completely move to the installation
position to make the installation easier. As
soon as HT 430-22 is ready for installation. INST
will be shown on the display (INST - any time
selected in the menu). Now please do not press
any other buttons! Plug device for coupling
ring.
→ see mounting.
The HT 430-22 automatically switches to
daylight saving time.
You can also set date and time via the
menu item later on. But in case of that, HT
430-22 does not move to the installation
position.
→ In case of replacing batteries, the
stored time programme will remain
active. You should check the specifi ed
time to ensure that.
Mounting
HT 2000 can be quickly and easily mounted on all
common valves (see adapter table). It can be
installed without grime and water spots because
the heating circuit is not interrupted.
of
can
and
the
toxic
and
1. Turn the manual thermostat head up
completely, loosen the
1. fastening and pull the thermostat off
the valve.
2. Use an appropriate adapter, if required,
and push it onto the valve.
3. Screw the connector on the valve or the
adapter.
4. Now, you put HT 2000 on the connector
until it noticeably clicks into place.
ATTENTION: It must be possible to insert the
device without applying force, ensure that the
to any
appliance is in the INST or EIN position.
→ In case of a later installation, please
switch in the menu to INST before you
install
the
device.
installation is facilitated. Only mount it in
this position.
Dismounting
wear
To remove HT 430-22, remove this at the
EIN (with the wheel turn on the highest
temperature of over 28 C° to EIN position),
wait for a short period and unscrew the
cap nut and remove the device from the
valve.
Adaptation
Initial installation: Press the button OK
until ADAP appears on the display so that
HT 430-22 will be able to start its
adaptation. The device will adapt itself to
the stroke of your valve body. To do this
the valve will now be opened and closed
several times to store the end points. In
some cases, this process can take a few
minutes. After successful adaptation it
returns to normal mode.
- Should adaptation become necessary
again, e.g., if your radiator does not cool
down in the -Position, please press in
the menu the button until adaptation
starts again.
- If the mistake is shown on the display
place HT 2000 onto the radiator valve
and then take the batteries out for a
short time to execute a reset.
Adapter
Heimeier,
Junkers
Landys+Gyr,
MNG, Honeywell,
Braukmann
Gewindemaß
von M 30x1,5
Danfoss
RAV
(accompanying pin
must be plugged on
the valve tapped)
Danfoss RA
Danfoss RAVL
NOTE: Use the enclosed letter and nut
with Danfoss RA/RAV.
Please remove the marked connecting rods
completely before mounting the adapters!
Basic operating modes
MANU-Modus
In the MANU-mode HT 430-22 adjusts to the
manually specified temperature.
AUTO-Modus
In the AUTO-mode HT 430-22 changes
between to temperatures according to
the time program that has been set:
Comfort temperature
21°C)
Economy temperature (factory preset
16°C)
The heating and economy times can be
specified via the adjustable time program. It is
possible to set 8 switch points (4 heating and 4
economy times) per day at the most. HT 430-
22 has the following factory preset:
Heating time:
Heating with comfort temperature
(factory preset: 1st heating time at 07:00)
Economy time:
Lowering to economy temperature
(factory preset: 1st economy time at 22:00)
Setting heating and economy times:
With HT 430-22 it is possible to set 4 heating
and 4 economy times per day – one for each
day or one for a block of several days. TAG1 to
Herewith
the
TAG7 represent the weekdays from Monday to
Sunday. Additionally, the corresponding days
are shown as abbreviation below the menu bar
on the display.
Block construction:
T 1–5 = same program from Monday - Friday
T 1–6 = same program from Monday -
Saturday
T 1–7 = same program from Monday - Sunday
→ For non-programmed days the factory
preset remains active.
Setting of an individual program:
Press MENU. Select the menu item PROG
with the selector wheel. Press OK. TAG1
for Monday is shown on the display. Select
day/block with the selector wheel.
Confirm with OK.
Set the beginning of the 1
(symbol
) with the selector wheel.
Confirm with OK. Set the beginning of the
1
st
economy time (symbol
selector wheel. Confirm with OK. Now, if
desired, a 2
nd
, 3
No adapter
required.
(factory preset
st
heating time
) with the
rd
or 4
th
heating/economy
Advertisement

Related Manuals for Olympia HT 430-22

Summary of Contents for Olympia HT 430-22
- Page 1 INST or EIN position. Reset of the device to factory With HT 430-22 it is possible to set 4 heating → In case of a later installation, please mechanical loads. preset and 4 economy times per day – one for each •...
- Page 2 Daylight saving time Cleaning By the way: Maximum energy saving can Declaration of Conformity Press MENU. Select DST with the selector To clean the HT 430-22 use only a dry or obtained with economy wheel. Confirm with the OK button and The full EU Declaration of lightly wet cloth.
Need help?
Do you have a question about the HT 430-22 and is the answer not in the manual?
Questions and answers