
Related Manuals for made for movement Xplore


Summary of Contents for made for movement Xplore
- Page 1 User’s Manual Xplore For Xplore Small, Xplore Medium, Xplore Large User’s Manual for Xplore Page 1 of 46 Version 2.53 - Version date: 15.02.2022...
-
Page 2: Table Of Contents
How to get the user into the Xplore ....................23 8.6. Securing users in the Xplore ......................23 8.7. How to get the user out of the Xplore ....................24 Who can perform the initial adjustments and follow-up adjustments ..........25 9.1. Initial adjustment ..........................25 9.2. - Page 3 Appendix 1 – Training for users and/or assistants....................45 Appendix 2 - Assembly Guide ..........................47 Disclaimer: Minor differences between images and real product can occur in the user manual. User’s Manual for Xplore Page 3 of 46 Version 2.53 - Version date: 15.02.2022...
-
Page 4: Introduction
The Xplore comes in 3 sizes and is suitable for people who are between 70 and 180 cm tall and who weigh a maximum of 80 kg. It is an individual device and will be fitted to each user individually. - Page 5 Before the product is used, the supervisor must have received training (in accordance with Appendix 1) from an Made for Movement representative to monitor use and provide the user with any necessary assistance. The representative is usually a Made for Movement employee or a distributor / doctor / therapist who is appropriately trained and officially approved to work with the product.
-
Page 6: Pre-Check
6. Wheels – Check that the rear wheels can’t move sideways on the axle more than 3mm. Contact your Made for Movement representative if errors are discovered to agree on actions/ repairs. Don’t use the product before this is settled. -
Page 7: Warnings
4. The Xplore shall only be used with shoes which fits the product (not sandals) 5. The Xplore with large wheels can be used both indoors and outdoors. Make sure that the surface is smooth and flat in order to prevent the user from tipping over or otherwise sustaining injuries. Using the product elsewhere is at your own risk. - Page 8 Xplore, but cannot be taken of as this is for safety. 23. The The Xplore shall never be used close to flames or open fire, as the belts and paddings are not fire- proof.
-
Page 9: Technical Description
Xplore Large Recommended user height 140-180 cm The Xplore is an individually adapted aid. Before the product is delivered, the height and width of the user must be measured. These measurements should be sent to Made for Movement who will be able to roughly adjust the product prior to delivery. -
Page 10: Chassis
The chassis is shaped like an H. The front and rear axles are connected to the main frame. When a user stands or walks in the Xplore, he/she will have one leg on each side of the main frame, between the front and rear axles. The main frame between the user's legs will prevent the user from crossing their legs while using the Xplore. - Page 11 The column with attachments for the seat, hip, chest and head supports is placed vertically in the main frame. The height of the column is adjustable. User’s Manual for Xplore Page 11 of 46 Version 2.53 - Version date: 15.02.2022...
-
Page 12: Column, Seat, Hip Support, Chest Support And Headrest
Seat bracket Seat Figure 4: Xplore column with headrest and companion handle mounted The column is attached to the highest point of the chassis. The column extends down into the chassis and is held in place by a clamp with a fastening screw in front of the shock absorbers in the chassis. -
Page 13: Correction System Thigh And Ankle
Correction system thigh and ankle A correction system can be mounted on the Xplore for users who require correction of their legs to align their position and enable them to walk. Cuffs are attached around to the lower part of the user’s thighs and/or ankles. -
Page 14: Adjusting The Xplore To Users
6. Adjusting the Xplore to users When an Xplore model is ordered for a new user, the measurements of the user should be taken so that the correct product size can be selected for the user before delivery. Such measurements are usually taken by a physiotherapist/occupational therapist. Made for Movement’s measurement form can be used for this purpose. -
Page 15: Adjusting The Xplore For A User
Adjusting the Xplore for a user The Xplore will be adjusted by a representative from Made For Movement, or another qualified person. Adjustments will be carried out at school, at home or at a place deemed to be most appropriate by the purchaser of the product. - Page 16 Seen from the side - The user is perpendicular to the ground, or tilted slightly forwards (1-3 degrees). Testing - The user is now positioned in the Xplore. The strength of the shock absorber can be adjusted to enable mobility forward. Amount of weight bearing on the feet will depend on how much the user is supported by the seat and height of the column.
- Page 17 Figure 6: Illustration showing where the trochanter is located on the user’s femur. User’s Manual for Xplore Page 17 of 46 Version 2.53 - Version date: 15.02.2022...
-
Page 18: How To Adjust The Xplore Parts
7. How to adjust the Xplore parts Shock absorbers Variants: The Xplore Small is supplied with one shock absorber and the Medium and Large models have two shock absorbers. Shock absorber stiffness: the correct level of the shock absorber is adjusted by a Made for Movement representative when the first adjustments are made. -
Page 19: Adjusting The Height Of The Column
Adjusting the height of the column The Xplore comes in 3 sizes covering the size ranges defined in Chapter 5. In order to adapt the device to the user you should select the model that fits the user's height. Adapting the device to suit the user is carried out by adjusting the height of the column, seat, hip and chest supports. - Page 20 Important: please ensure that the column is lowered at least 100 mm into the frame. Less than 100 mm will cause the column to become unstable. Important: The Xplore should only be adjusted by a Made for Movement representative or another qualified person who has been trained by Made For Movement.
-
Page 21: Adjusting The Height Of The Chest Support, Hip Bar And Seat
Adjusting the height of the chest support, hip bar and seat The Xplore’s chest support, hip bar and seat employ the same principles as those used for height adjustment. By loosening the knob which holds them in place, they can be adjusted to the desired height and then tightened again. -
Page 22: Adjusting The Width Of The Chest Support And Hip Bar
Adjusting the width of the chest support and hip bar The Xplore’s chest support and hip bar employ the same principles as those used for width adjustment. By loosening the knobs that secure the arms of the chest support and hip bar, the arms can be pushed outwards or inwards to the desired width. -
Page 23: Using The Xplore
Common to all these methods is that the user is transferred to the seat of the Xplore. For the smallest and lightest users, it is usually easiest to lift the user to the seat. -
Page 24: How To Get The User Out Of The Xplore
The user should ALWAYS wear the hip and chest belt while in the Xplore. If it is discovered that user’s movement pattern is being impaired by the belts, these could be slightly loosened and, if necessary, lowered slightly. This will give the user better freedom of movement, while at the same time preventing the user from falling out of the product. -
Page 25: Who Can Perform The Initial Adjustments And Follow-Up Adjustments
9. Who can perform the initial adjustments and follow-up adjustments 9.1. Initial adjustment • The Xplore is a personal aid and can only be used by the person for whom the product has been adapted. • The Xplore should only be adjusted by a Made for Movement representative or another qualified person who has been trained by Made For Movement. -
Page 26: Transport
Transport The Xplore can be dismantled for packing or transportation without changing the settings. When dismantling/assembling the rear axle and the column, you will need the following tools: a special spanner for the rear axle. Disassembly: Dismantling the column: Loosen the tightening knob in front of the shock absorbers. - Page 27 Check to ensure that the rear axle has been securely fastened. Figure 17: Xplore Using the tool to tighten the conical nuts. Carrying the product: Carrying points: Carry the product by holding the front axle and the trailing arm that holds the rear axle.
-
Page 28: Technical Information
Technical information 11.1. Labelling Figure 19: Xplore Small metal sign Figure 20: Xplore Medium metal sign Figure 21: Xplore Large metal sign User’s Manual for Xplore Page 28 of 46 Version 2.53 - Version date: 15.02.2022... -
Page 29: Specifications And Dimensions On The Xplore
11.2. Specifications and dimensions on the Xplore Xplore Small Medium Large Max. product height: 94 cm 110 cm 140 cm Max. product length: 103 cm 114 cm 127 cm Max. product width: 55 cm 70 cm 80 cm Product weight: 12.9 kg... - Page 30 * For the smallest users, the seat padding is attached directly to the frame to enable the use of the Xplore as early as possible. The seat post is removed and stored during this period. As the user grows, the seat padding is moved back to the seat post that is re-attached to the seat bracket on the column.
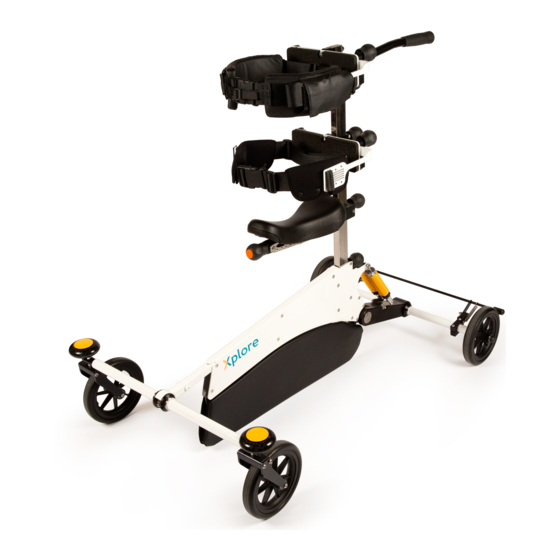
- Page 31 The Small model it is supplied with two lower column components with different lengths. The shortest of these should be replaced with the longest one as the child grows. Figure 22: Xplore complete User’s Manual for Xplore Page 31 of 46...
-
Page 32: Extra Equipment
12.2. Side handles Side handles can be mounted on the hip bar if the user needs something to hold on to while walking. Figure 24: Xplore side handles User’s Manual for Xplore Page 32 of 46 Version 2.53 - Version date: 15.02.2022... -
Page 33: Escort Handle
The height of the escort handle can be adjusted by adjusting the height of the lower column adjustment. Escort handle Escort handle attachment knob Figure 255: Xplore escort handle User’s Manual for Xplore Page 33 of 46 Version 2.53 - Version date: 15.02.2022... -
Page 34: Correction System For Thighs And Ankles
U-tube rollers and attached to the cuffs. The guide straps/bands are adjusted by a Made for Movement representative to correct standing position and achieve alignment and still allowing the user to move freely forward. - Page 35 U-tube rollers Spreader rollers Figure 266: Xplore spreader rollers and U-tube Figure 277: Details of Xplore spreader rollers and U-tube User’s Manual for Xplore Page 35 of 46 Version 2.53 - Version date: 15.02.2022...
-
Page 36: Chest Padding
By unlocking the wheels, these can rotate freely through 360 degrees. 12.7. One-way rear wheel The rear wheels can be supplied with a one-way function, so that the Xplore can only move forwards. Any backward movement will cause the rear wheels to lock. This may be relevant for users who find it difficult to move forwards. -
Page 37: Support Handle
310 mm width (standard) and 410 mm width (wide). If necessary, the length of the support handle can be cut to fit the user concerned. Figure 29: Xplore support handle User’s Manual for Xplore Page 37 of 46 Version 2.53 - Version date: 15.02.2022... -
Page 38: Tests And Approvals For
Waste handling All the parts of the Xplore can be recycled. The product should be delivered to an approved waste management facility. Straps, elastic bands, padding and clips can be treated as normal household waste. Cleaning and maintenance Cleaning The Xplore should be cleaned with a damp cloth and mild soapy water. -
Page 39: Adjustment For User Growth And Function Change
Important: If pre-checks and repairs are not being executed, and repairs documented, then the product certification is broken, and Made for Movement is no longer liable for any unwanted events, incidents or injuries that occur. That responsibility is upon the customer in the unlikely event that the pre-checks and eventual repairs are not performed. - Page 40 * Normally most of these parts will last for many years, however MFM enable walking in the Xplore for users with a-typical movement, weight-bearing, strength and/or walking pattern, and the pace of parts being worn down is highly individual due to the users use.
-
Page 41: Reuse
Reuse The Xplore can be reused by a new user when the period of use ends. If the Xplore is to be reused, the product must be returned to Made for Movement or its representative. A reuse service will be carried out involving disinfection and the replacement of worn parts. -
Page 42: Warranty
AS. Warranty claims should be sent Made for Movement within reasonable time (2 months at most). Claims put forward after this might lose the right to claim warranty. • The product has not been rebuilt or repaired by other than Made for Movement Group AS or it’s representative or trained partner. •... -
Page 43: Declaration Of Conformity
Declaration of Conformity Declaration of conformity is available as stand-alone document. See chapter 13 for approvals. User’s Manual for Xplore Page 43 of 46 Version 2.53 - Version date: 15.02.2022... - Page 44 Producer: Made for Movement Group AS Rødmyrlia 2 3735 Skien Norway Tel. +47 35 50 51 20 Fax +47 35 50 51 21 info.no@madeformovement.com www.madeformovement.com BRN: NO 991 237 615 VAT User’s Manual for Xplore Page 44 of 46 Version 2.53 - Version date: 15.02.2022...
-
Page 45: Appendix 1 - Training For Users And/Or Assistants
Using the QR-code on the product Assess need of adjustment in accordance to user growth Set N/A (Not Applicable) for topics that are not relevant in this case User’s Manual for Xplore Page 45 of 46 Version 2.53 - Version date: 15.02.2022... - Page 46 A superuser can train other assistants/caretakers. A superuser have received training on how to use the product by a Made for Movement representative and is officially approved to work with the product. The superuser will train other assistants/caretakers in accordance with the user manual and use the Appendix 1 during training.
-
Page 47: Appendix 2 - Assembly Guide
Appendix 2 - Assembly Guide The main parts of the Xplore are easily assembled manually by just using a special tool. The illustrations below show how. Step 1 Attach the front axle to the frame using the special tool. Tighten both nuts well. - Page 48 Step Attach the rear axle to the frame using the special tool. Tighten both nuts well. Page 48 of...
- Page 49 Step The seat: push the seat into the seat bracket. Companion handle: unscrew and remove the tightening handle (1.). Insert the companion handle into the bracket (2.) Replace and re-tighten the tightening handle. Page 49 of...
- Page 50 Step Loosen the column tightening handle which is attached to the chassis and push the column down into the chassis. Tighten the tightening handle in order to secure the column. Tighten well. Page 50 of...
- Page 51 Step The product is ready to use Appendix 2 - Rev 01/20 CTS 11.11.20 Page 51 of...
Need help?
Do you have a question about the Xplore and is the answer not in the manual?
Questions and answers