
Related Manuals for Pop-A-Shot PASHOM17-02


Summary of Contents for Pop-A-Shot PASHOM17-02
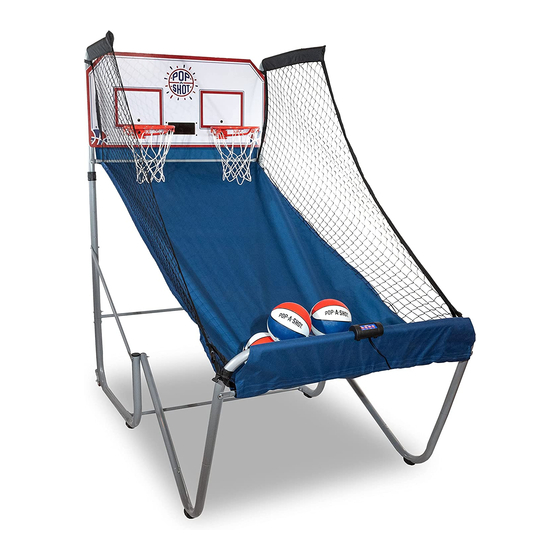
- Page 1 A S S E M B L Y I N S T R U C T I O N S Model: PASHOM17-02 REV 7-26-22 support@popashot.net www.popashot.net...
- Page 2 Warranty As described in and as limited by this Warranty, Pop-A-Shot Enterprise, LLC (the “Company”) warrants this product to be free from defects in workmanship and materials for a period of 360 days from the date of original purchase. The term defects shall mean any imperfections that impair the use of the product.
-
Page 3: During Assembly
• We recommend working on a soft, non-marring surface such as carpet or the cardboard box your game came in. • Like most things in life, putting together a Pop-A-Shot is better with a friend. If you can’t find someone to help the entire time, we’ll point out those steps when two people are especially helpful. - Page 4 HOME DUAL SHOT PARTS Top Tube Board Tube Instruction Part ID# Part Name Part # Part Image Step Used In Part Quantity HHH001 HDS002 STEPS 4, 5, 11 & 12 STEPS 2-5 Base Tube Forward Tube Connector Tube Cross Tube HDS003 HHH004 HDS005...
-
Page 5: Included Tools
HARDWARE BLISTER PACK Sensor Screw Extra Long Bolt Backboard Bolt Bolt HDS022 HDS023 HDS024 HDS025 STEP 10 STEP 7 STEPS 11 & 12 STEPS 1, 3 & 5 Rim Bolt Cross Bolt Scoreboard Bolt Washer HDS026 HDS027 HDS028 HDS029 STEP 8 STEPS 4 &... - Page 6 STEP 1 ID# Name Qty. Base Tube Repeat on this side Connector Tube Bolt Washer STEP 2 3 Holes Note: This part will not be secured until the next step ID# Name Qty. Note: Upper holes on (#2) Board Tubes Board Tube should face forward.
- Page 7 STEP 3 ID# Name Qty. Board Tube Base Tube Repeat on this side Connector Tube Bolt Washer STEP 4 ID# Name Qty. Start at the lowest Spring Lock position Top Tube and raise it up as needed. Choose your height based on your Board Tube space and the height of your players.
- Page 8 STEP 5 ID# Name Qty. Top Tube Board Tube Forward Tube Side Arm Bolt Note: Make sure the Washer (#4) Forward Tubes flare outward. Repeat on other side STEP 6 ID# Name Qty. Side Tube Ramp Tube PAG E support@popashot.net www.popashot.net...
- Page 9 STEP 7 ID# Name Qty. Base Tube Repeat on this side Side Tube Side Arm Extra Long Bolt Washer Note: (#7) Side Tubes go on the inside of the frame. (#11) Side Arms go on the outside. Reminder: Do not over tighten, these should be able to swing. STEP 8 ID# Name Qty.
- Page 10 STEP 9 ID# Name Qty. Scoreboard Backboard Scoreboard Bolt Scoreboard Nut STEP 10 ID# Name Qty. Sensor Backboard Sensor Screw Note: (#13) Sensor must be attached level and screwed all the way into the (#16) Backboard. After installing the (#22) Sensors, plug the TOP sensor cords into the “Top”...
- Page 11 STEP 11 Note: If you can, grab a helper for this step. ID# Name Qty. Top Tube Backboard Backboard Bolt Washer Note: Only attach the bolts to the top of the (#16) Backboard. We need the bottom holes open for a later step. Reminder: Do not over tighten.
- Page 12 STEP 12 First slide the elastic straps onto (#1) Top Elbow Tube first, then the ramp sleeves. Note: Secure the (#19) Ball Return Ramp elastic straps over the nuts on rear of (#14) Backboard. Note: Fabric loops should be on right side when oriented properly.
- Page 13 STEP 13 ID# Name Qty. Ramp Tube Lean Bar Attach (#9) Lean Bar to the (#8) Ramp Tubes using the attached spring locks. STEP 14 ID# Name Qty. Attach the (#6) Cross Tube to Lean Bar the front of the (#9) Lean Bar. Cross Tube Cross Bolt Washer...
- Page 14 ID# Name Qty. Pull the straps around the (#9) Lean STEP 15 Pull the front of the Bar and snap it into the buckle. Use (#19) Ramp under the lower buckle on the Top Height, the (#6) Cross Tube Lean Bar and the upper buckle on the others.
-
Page 15: Control Panel Operation
CONTROL PANEL OPERATION AUDIO OPTIONS There are 6 different audio options. Select the audio option by pushing AUDIO until you reach your selection. The number will be displayed on the scoreboard. TURNING ON THE GAME: Press ON/OFF to turn on your game. SELECT GAME: Press GAME to select one of the 16 games S1: Play-by-play announcer &... - Page 16 GAME OPTIONS (Continued) 7. Team: 2 Players/:30 Combined score of players is shown on both scoreboards Bonus: :15 extra at 30 points; :10 extra at 60 points 8. Cross Court: 1/2 Players/:30 Player 1 goes first and shoots at basket displaying score/active basket will change 9.
Need help?
Do you have a question about the PASHOM17-02 and is the answer not in the manual?
Questions and answers