Table of Contents
Advertisement
Quick Links
Advertisement
Table of Contents

Related Manuals for VDO AcquaLink


Summary of Contents for VDO AcquaLink
- Page 1 Installation Instruction Nav Control V1.1 08/16...
-
Page 3: Table Of Contents
Content Installation Safety Instructions for Maintenance AcquaLink® Nav Control In the Box VDO Bus Hardware Specification Pinout Specifications Accessory... -
Page 4: Installation
Before beginning work the negative Terminal of the battery should be disconnected! Use of information provided by the VDO system does not release you from the responsibility over your ship and demands good seamanship. Always use your nautical experience in interpreting the displayed values. -
Page 5: Safety Instructions For Maintenance
Connect the wires only in accordance with the wiring diagram. Safety Instructions for Maintenance The VDO Nav Control system is maintenance-free. Do not use cleaning agents. Repairs on the system should be carried out only by VDO authorized specialists! -
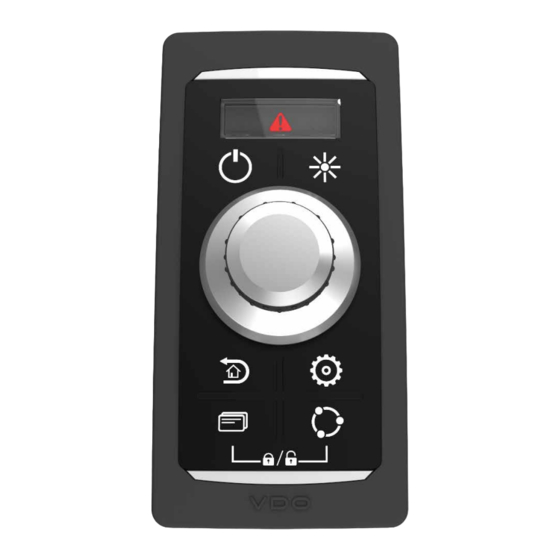
Page 6: Acqualink® Nav Control
/ turn knob and six other push buttons. A Nav Control unit can assume control of any display connected to the same VDO Bus with just the push of a button. Even multiple units can be connected to the same Bus without conflicts. -
Page 7: Vdo Bus
Acqualink system to share the information gathered from the system interfaces as well as to distribute proprietary messages containing status information of the system itself. The VDO Bus uses M12 8 pin cables and all devices are powered through the network. - Page 8 Calculation 12V power supply: The voltage drop for every segment of the VDO Bus is calculated as follows: Ohm‘s Law: E (voltage drop) = I (circuit current) x R (wire resistance) R = 2/2x Cable Length (m) x Power Pair Resistance / 100 L = Total length of VDO Bus cables in one segment I = LEN (Load Equivalency Number) x 0.050 amps...
-
Page 9: Hardware Specification
Hardware Specification Front View (with bezel) Front View (without Bezel) Side view Rear view Pinout... -
Page 10: Specifications
Housing Material Rear: PBT GB20 Front: VMQ Silicone Knob: EN AW-AL Bezel Material PC-FR Connectors 2x M12 8 Pin VDO Bus Operating temperature -20° / +70° Storage temperature -40 / +85° Operating voltage range 8...28 VDC Protection Class IP 67 According to IEC 60529:2001;... - Page 12 Switzerland www.marine.vdo.com VDO – A Trademark of the Continental Corporation The information provided in this brochure contains only general descriptions or performance characteristics, which do not always apply as described in case of actual use or which may change as a result of further development of the products.
Need help?
Do you have a question about the AcquaLink and is the answer not in the manual?
Questions and answers