Table of Contents
Advertisement
Quick Links
Advertisement
Table of Contents

Related Manuals for Hover-1 BEAST BUGGY


Summary of Contents for Hover-1 BEAST BUGGY
- Page 1 BEAST BUGGY H O V E R B O A R D AT TA C H M E N T OPERATION MANUAL HY-BST-BGY...
- Page 2 WARNING HELMETS SAVE LIVES! Always wear a properly tted helmet that complies with CPSC or CE safety standards when you ride. Incorrect Fit: Correct Fit: Forehead is exposed and Make sure your helmet vulnerable to serious injury. covers your forehead.
- Page 3 INTRODUCTION This manual provides you the information you need for the safe operation and maintenance of your Hover-1 Beast Buggy. Please read it thoroughly before riding your Hover-1 Beast Buggy. WARNING Make sure you read this complete manual before riding your Hover-1 Beast Buggy.
-
Page 4: Specifications
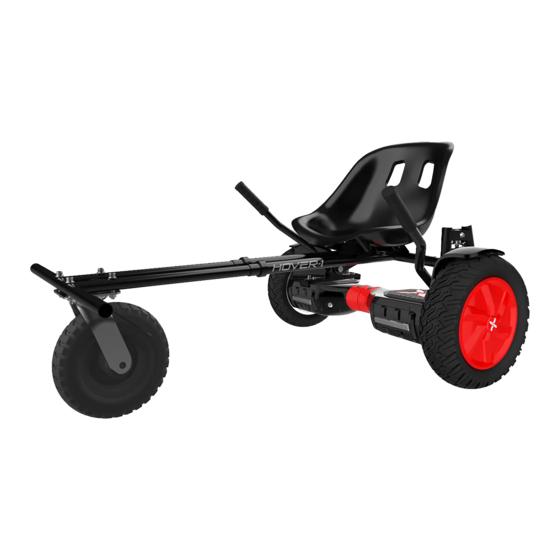
HOVER-1 BEAST BUGGY DIAGRAM 1. Seat 2. Handle Bars 3. Shock Absorbing Coils 4. Pedal Mounts 5. Elastic Strap 6. Seat Frame 7. Locker 8. Frame Extension 9. Foot Rests 10. Front Wheel SPECIFICATIONS Compatibility: Most hoverboards with 10” wheels Max Supported Weight: Refer to your hoverboard’s manual... -
Page 5: Parts List
PARTS LIST (1) Wrench (1) Seat Hex Keys: (1) M8 (1) M6 (1) Seat Frame (2) Lockers (2) M8 X 38 Screws (1) Frame Extension (4) M8 X 40 Screws (4) M6 X16 Screws (1) Left Handlebar (4) 6 mm Nuts (1) Right Handlebar (6) 8 mm Nuts (1) Wheel... - Page 6 ASSEMBLING YOUR HOVER-1 BEAST BUGGY 1. Remove all of the Hover-1 Beast Buggy contents from the box. Ensure all the contents from the “PARTS LIST” section are accounted for. 2. Insert the left and right handlebar mounts into the seat frame as shown below. Align the holes of the handlebar mounts with the holes in the seat frame.
- Page 7 3. Insert the frame extension into the seat frame. The foot rests should be pointing down. Adjust the front frame to your preferred length. Remove the black cap and the rst white washer from the end of each locker. Fully insert the screwed section of one locker into the seat frame holes.
- Page 8 5. Align the holes of the wheel plate with the 4. Align the holes of the seat with the holes of the seat frame as show below. Insert the M6 X16 screws. holes in the frame extension. Insert the M8 X 40 screws into each hole and attach the 6 mm lug Attach the 20 mm washers and the 6 mm nuts to nuts to each screw.
- Page 9 6. Your Hover-1 Beast Buggy is now assembled and should look like the below image.
- Page 10 ATTACHING YOUR BEAST BUGGY TO YOUR HOVERBOARD Your Hover-1 Beast Buggy should be completely assembled prior to attaching it to your hoverboard. Please refer to the “ASSEMBLING YOUR HOVER-1 BEAST BUGGY” section for assembling procedures. 1. Place the handlebar mounts onto the foot pads of your hoverboard. Ensure the mounts are centered on...
- Page 11 2. Secure the Beast Buggy to your hoverboard using 2 of the included hook and loop straps. The other 2 straps included are spares. With the fastener side facing away from your hoverboard, thread the straps through the front hole of each handlebar mount.
- Page 12 4. Adjust both adjustable straps so that there is an even amount of pressure on the pedals. 5. Your Hover-1 Beast Buggy should be properly installed onto your hoverboard as shown below.
-
Page 13: Before Riding
BEAST BUGGY OPERATION It is important that you fully understand all the functions of your Beast Buggy. If these functions are not used correctly, you will not have full control of your Beast Buggy. Practice using the Beast Buggy at slower speeds in a flat, open area before riding the Beast Buggy in other spaces. - Page 14 PRE-RIDE HOVER-1 BEAST BUGGY CHECKLIST Ensure that your Beast Buggy and hoverboard are in proper working order each time you ride. If a part of the Beast Buggy does not function correctly, please contact our Customer Support Center. • Ensure the battery of your hoverboard is fully charged before riding your Beast Buggy.
-
Page 15: Safety Precautions
The first rule of safe riding is to use common sense. The Beast Buggy cannot protect you in a crash, against impact, or from loss of control the way a car can. The Beast Buggy can tip over sideways or pitch you over the front wheel if you don’t ride it properly. - Page 16 CAUTION: RIDING IN WET WEATHER It is recommended that you do not ride your Beast Buggy in wet weather, as the electronic components of the hoverboard may be damaged if exposed to water. Stopping distances can be longer in wet conditions...
- Page 17 2. Due to the nature of this product, the assembly pieces should be checked before every ride to avoid an accident while riding. 3. Do not make a sharp turns, as you may drift and overturn the Beast Buggy, which can result in injury to yourself and/or damage the unit.
- Page 18 RIDING YOUR HOVER-1 BEAST BUGGY Ensure your Beast Buggy is fully assembled and correctly attached to your hoverboard with all straps, screws, and nuts secured in place. Ensure your hoverboard is properly maintained as well. Failure to do so may result in damage to the unit, serious bodily harm, or death.
-
Page 19: Warranty
WARRANTY For warranty information, Please visit us at www.hover-1.com Manufacturer: DGL Group, Ltd. 2045 Lincoln Highway, Edison, NJ 08817... - Page 20 @Hover1Rideables @RideHover1 @RideHover1 www.Hover-1.com...
Need help?
Do you have a question about the BEAST BUGGY and is the answer not in the manual?
Questions and answers