
Related Manuals for Atlantic Navilink A59


Summary of Contents for Atlantic Navilink A59
- Page 1 REFERENCE GUIDE Navilink A59 Intelligent Room temperature Controller 074208 074231 074232 1846_EN_9 For professionals and the user 12/10/2020 To be kept by the user for future reference...
-
Page 2: Table Of Contents
Frequency: 868 MHz. Radiofrequency output: 5 mW maximum. Mounting Mounting Trou de Trou de fixation screw hole fixation vis screw hole fi g. 1 - Dimensions in mm - 2 - Navilink A59 / REFERENCE GUIDE / 1846 - EN... -
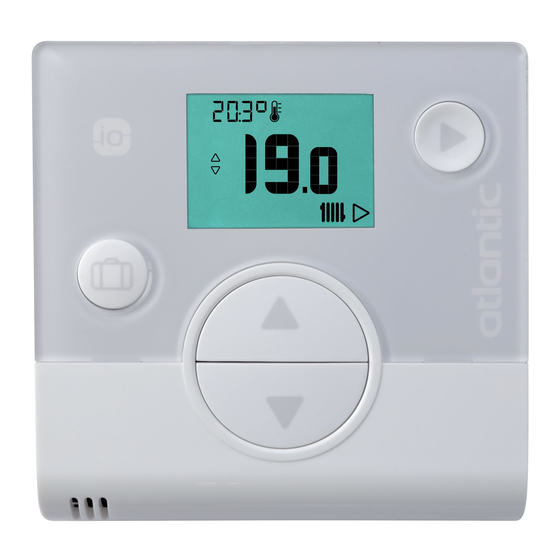
Page 3: Display Description
• Comfort mode Heating activated • ECO mode Heating/Cooling activated • Timer programming mode • Manual mode • Setpoint value • Screensaver / Ambient temperature * If installation allows - 3 - Navilink A59 / REFERENCE GUIDE / 1846 - EN... -
Page 4: Assembly And Connections
2 AAA LR03 batteries (supplied). Maintain polarity. Do not connect the wires. Risk of premature wear of the batteries if the generator is off power. fi g. 3 - Battery-operated sensor - 4 - Navilink A59 / REFERENCE GUIDE / 1846 - EN... -
Page 5: Using The Sensor With Mains Power
Attach the sensor's rear plate using the screws (not supplied). Rotate the small metal plate while pulling on the cable. fi g. 5 - Cable disconnection fi g. 6 - Attaching to a wall - 5 - Navilink A59 / REFERENCE GUIDE / 1846 - EN... -
Page 7: Wireless Connection
Pair the 2 sensor with the 1 sensor. To pair two devices (HP / Boiler - Sensor or Sensor - Sensor), both devices must be in pairing mode. - 7 - Navilink A59 / REFERENCE GUIDE / 1846 - EN... -
Page 8: Pairing A Sensor With A Hp / Boiler
A A A A A A A A A A A A A A A A A A A A A A A A A A A A A A A A A A A A A A A A A A A A A A A If a 2 sensor is to be paired Select "Sde" (sensor) using the buttons. "Sde" fl ashes. The sensor waits for pairing for 10 minutes. - 8 - Navilink A59 / REFERENCE GUIDE / 1846 - EN... - Page 9 B B B B B B B B B B B B B B B B B B B B B B B B B B B B B B B B B B B B B B B B B B B B B B B B Go back to the main screen using the button. In the event of a failure, restart the procedure from the beginning. - 9 - Navilink A59 / REFERENCE GUIDE / 1846 - EN...
-
Page 10: Nd Sensor
A A A A A A A A A A A A A A A A A A A A A A A A A A A A A A A A A A A A A A A Select "FIn" (end) using the buttons. - 10 - Navilink A59 / REFERENCE GUIDE / 1846 - EN... - Page 11 B B B B B B B B B B B B B B B B B B B B B B B B B B B B B B B B B B B B B B B B B B B B B B B B Go back to the main screen using the button. In the event of a failure, restart the procedure from the beginning. - 11 - Navilink A59 / REFERENCE GUIDE / 1846 - EN...
-
Page 12: Installer Menu
Receive key Version page 13 page 14 page 15 page 16 page 17 page 18 secs. secs. secs. secs. secs. 10 mins. 10 mins. 10 mins. max. max. max. - 12 - Navilink A59 / REFERENCE GUIDE / 1846 - EN... -
Page 13: Calibration
Select "EtAI" (calibration) using the button. Adjust the temperature using the buttons. Wait 5 seconds. The sensor is calibrated. Quit the Installer Menu by pressing simultaneously during 3 seconds. - 13 - Navilink A59 / REFERENCE GUIDE / 1846 - EN... -
Page 14: Pairing A Sensor
"Sde" (sensor) fl ashes. The sensor waits for pairing for 10 minutes. Pairing was successful. Pairing failed. Go back to the main screen using the button. In the event of a failure, restart the procedure from the beginning. - 14 - Navilink A59 / REFERENCE GUIDE / 1846 - EN... -
Page 15: Resetting
Access the Installer Menu by pressing simultaneously during 3 seconds. Select "init" (reset) using the button. Select "oui" (yes) using the buttons. Wait 5 seconds. The sensor is reset. - 15 - Navilink A59 / REFERENCE GUIDE / 1846 - EN... -
Page 16: Sending An Io-Homecontrol® Key
The io-homecontrol® key was sent successfully. The io-homecontrol® key was not sent. Go back to the main screen using the button. In the event of a failure, restart the procedure from the beginning. - 16 - Navilink A59 / REFERENCE GUIDE / 1846 - EN... -
Page 17: Receiving An Io-Homecontrol® Key
The io-homecontrol® key was received successfully. The io-homecontrol® key was not received. Go back to the main screen using the button. In the event of a failure, restart the procedure from the beginning. - 17 - Navilink A59 / REFERENCE GUIDE / 1846 - EN... -
Page 18: Version
Display Access the Installer Menu by pressing simultaneously during 3 seconds. Access the "Version" screen using the button. Quit the Installer Menu by pressing simultaneously during 3 seconds. - 18 - Navilink A59 / REFERENCE GUIDE / 1846 - EN... -
Page 19: Pairing Procedure
Place the NAVIPASS IO waiting for pairing. Press key 1 during 3 seconds. Release. LED 1 fl ashes green quickly. >3s For more information, please refer to the instructions supplied with Navipass io-homecontrol®. - 19 - Navilink A59 / REFERENCE GUIDE / 1846 - EN... -
Page 20: Manual Mode
Press The setpoint fl ashes. Adjust the setpoint using the buttons. Once the setpoint has been selected, wait 5 seconds. It stops fl ashing. The setpoint was changed. - 20 - Navilink A59 / REFERENCE GUIDE / 1846 - EN... -
Page 21: Holiday Mode
Set the number of days for the holiday period using the buttons. Wait 5 seconds. The number of days remaining is displayed during the holiday period. Press the button again to cancel Holiday mode. - 21 - Navilink A59 / REFERENCE GUIDE / 1846 - EN... - Page 22 Wireless malfunction (if no Wireless signal for more than 16 minutes) Button malfunction (if button problem detected for Check that no buttons are stuck in the depressed more than 20 seconds) position - 22 - Navilink A59 / REFERENCE GUIDE / 1846 - EN...
- Page 23 Do not store batteries in an environment with a very high temperature or subject them to extremely low air pressure, as doing so could cause an explosion or a fl ammable liquid or gas leak. - 23 - Navilink A59 / REFERENCE GUIDE / 1846 - EN...
- Page 24 Commissioning date: atlantic-comfort.com Société Industrielle de Chauffage Contact details of your heating engineer or After Sales service. SATC - BP 64 - 59660 MERVILLE - FRANCE This equipment complies with: - Low Voltage Directive 2014/35/UE in accordance with EN 60335-1, - Electromagnetic Compatibility Directive 2014/30/UE This appliance is marked with this symbol.
Need help?
Do you have a question about the Navilink A59 and is the answer not in the manual?
Questions and answers