
Subscribe to Our Youtube Channel
Related Manuals for Carry-on Folding Controller 49


Summary of Contents for Carry-on Folding Controller 49
- Page 1 Owner’s Manual D E S I G N E D I N P A R T N E R S H I P W I T H B L A C K S T A R A M P L I F I C A T I O N U K...
- Page 2 Please keep your Carry-on Folding Controller away from rain, water, or 6. When cleaning the Carry-on Folding Controller, wipe it with a soft and any other wet environment. dry fabric. Do not use a cloth soaked in paint thinners, organic solvents,...
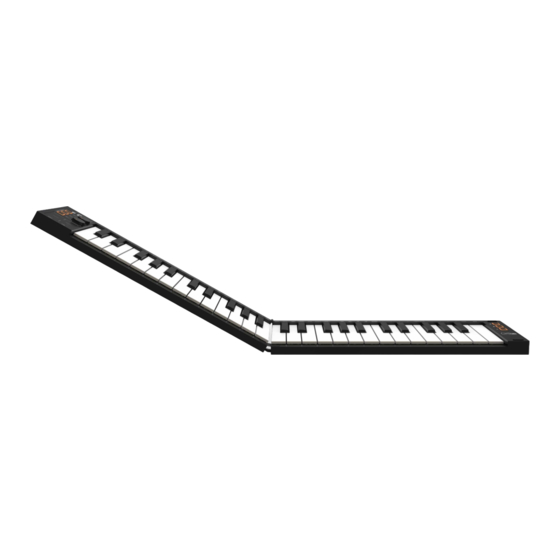
- Page 3 Congratulations on buying this Carry-on Folding Controller 49. How to unfold your Carry-on Folding Controller 49: Measuring only 39cm long when folded, the Carry-on Folding Controller is Important: Lay the Folding Controller on a flat surface before unfolding. a unique 49-key MIDI Controller in a foldable, easy to store and portable To prevent damage, Do not unfold the Piano on an uneven surface.
-
Page 4: Factory Reset
Turning the A/DIV. knob will send MIDI CC messages to all MIDI outputs. By default, the A/DIV. knob is set to MIDI CC number 12. The MIDI CC number of the A/DIV. knob can be changed using the Carry-on Control app (see section on Carry-on Control app). Map the appropriate CC number to a parameter in your DAW or MIDI device to control that parameter with the A/DIV. - Page 5 8. Keyboard Turning the B/SWING knob will send MIDI CC messages to all MIDI Your Folding Controller 49 has 49 velocity sensitive keys. Playing the keys outputs. By default, the B/SWING knob is set to MIDI CC number 13. with different amounts of pressure will cause the velocity of the MIDI notes The MIDI CC number of the B/SWING knob can be changed using the to vary.
-
Page 6: Rear Panel Features
The custom curve To do this hold the SHIFT button and press the transport button you can be altered using the Carry-on Control app and saved to your Folding would like to change. The display will show the current configuration of Controller. -
Page 7: Using The Arpeggiator
If your Folding Controller does not power up, connect it to a suitable power To select the clock source for the Arpeggiator hold the SHIFT button source to charge the battery using the USB-C socket (3). The typical and press the CLOCK key. Pressing this key will toggle between: charging time from zero charge is 2 hours. - Page 8 - ORDER – The sequence will be played in the same order that the notes were played into the Arpeggiator on the keyboard. To get the most out of your Carry-on Folding Controller 49, please read the detailed guide of the Carry-on Control app below.
-
Page 9: Daw Integration
- Select “Carry-on FC49” in the list of devices, then click connect. be saved in this way and recalled by using the IMPORT button. - Your Carry-on FC49 will now be visible in your DAW as a MIDI peripheral. NOTE: When recalling configurations, the SEND button must be pressed... -
Page 10: Technical Specification
- In the MIDI Studio window, click the Configure Bluetooth button in the toolbar. - Select “Carry-on FC49” in the list of devices, then click connect. Your Carry-on FC49 will now be visible in your DAW as a MIDI peripheral. - Page 11 Blackstar Amplification Ltd, Beckett House, 14 Billing Road, Northampton, NN1 5AW, UK For the latest information go to: www.carryonplaying.com Whilst the information contained herein is correct at the time of publication, due to our policy of constant improvement and development, Blackstar Amplification Ltd reserves the right to alter specifications without prior notice.
Need help?
Do you have a question about the Folding Controller 49 and is the answer not in the manual?
Questions and answers