
Related Manuals for Sole Digital STL100

Summary of Contents for Sole Digital STL100
- Page 1 LINK-4 Wireless Crane Gateway Model STL100, STL100W Installation and User Manual Revision 03 – June 2022 © CASWA Pty Ltd – 2021 1 | Page © CASWA Pty Ltd – 2017...
-
Page 2: Table Of Contents
CONTENTS OVERVIEW ..........................4 1.1 Operation Summary ........................ 4 SPECIFICATIONS ........................5 2.1 Physical Specifications ......................5 2.2 Electrical Specifications ......................6 2.3 Communication Specifications ..........Error! Bookmark not defined. INSTALLATION DETAILS ......................7 3.1 Prior to Installation ......................... 7 STARTUP PROCEDURE ...................... - Page 3 3 | Page © CASWA Pty Ltd – 2017...
-
Page 4: Overview
1 OVERVIEW The Link-4 gathers live data from your HoistNet devices (such as Liftlog and AccessPack), connects them to the internet, and uploads the operating data to the cloud in real-time. The Link-4 also enables you to receive live analysis, download abilities and reports, as well as receive instant alerts and notifications if your device is being operated incorrectly;... -
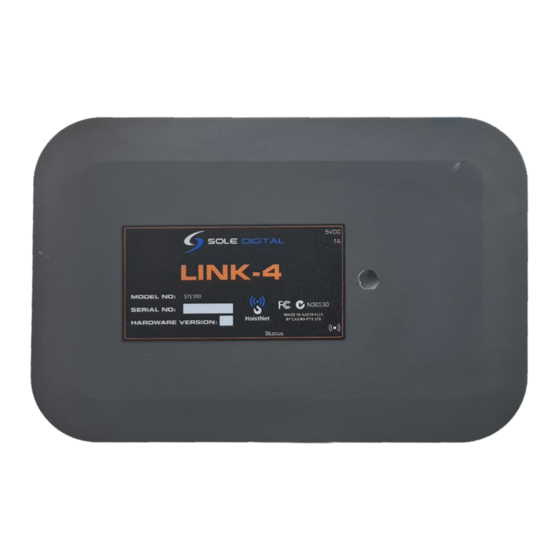
Page 5: Specifications
2 SPECIFICATIONS 2.1 Physical Specifications Overall length (mm): Overall width (mm): Overall height (mm): Weight (kg): Mounting: Adhesive Velcro Figure 2: Case Dimensions 5 | Page © CASWA Pty Ltd – 2017... -
Page 6: Electrical Specifications
2.2 Electrical Specifications Parameter Description Units Supply voltage Supply current Operating -40C Temperature Note: Extended operation at maximum temperature will reduce the life of the device. 6 | Page © CASWA Pty Ltd – 2017... -
Page 7: Installation Details
3 INSTALLATION DETAILS 3.1 Before Installation Before installing your Link-4 device visually inspect the device and check that: (a) the type of input marked on the front of the device is appropriate for your application; (b) the case is not damaged and fits together securely; (c) the power terminal is secure;... -
Page 8: Startup Procedure
4 STARTUP PROCEDURE 4.1 Plug-In Power At the bottom of the Link-4, there is a round 5V power input. The power supply for which will be included by SoleDigital upon purchase of a Link4 unit. By default, an Australian type “I” plugged power supply will be included with your Link-4, but other plug types can be included upon request. - Page 9 NO LIGHT ON = No Power If there is no power running to the unit, check your adaptor is the correct voltage and that there is power running to your Link-4 RED LIGHT = Fault There is some fault in the unit, whether it is not connected to a device yet, or is failing to find a 4G signal to broadcast on.
-
Page 10: Startup Procedure
4.3 STARTUP PROCEDURE Upon connecting the Link-4 to power the device should go through the following steps. If you disconnect Link-4 from its power source, the device will recycle through these steps. If the device remains in the RED phase for longer than 3 minutes, check to make sure your Link-4 has a 4G signal and is within range of the Hoistnet device you are attempting to connect to. -
Page 11: Sim Card And 4G Connectivity
Link-4 in that country you must contact Sole Digital so the appropriate settings adjustments can be made. In most cases, this change can be executed remotely by Sole Digital, but in some cases, you may be required to switch out the SIM card inside the device. For more advice on this process please speak to a member of the Sole Digital technical team. -
Page 12: Web Portal Setup
6.1 WEB PORTAL SETUP IMPORTANT: The Web Portal Setup Only applies to LIFTLOG and ACCESSPACK products, if you are trying to set up alerts from a different device please skip to step 6.2. For this method you will need to grab your RFID card reader, USB Type B Cable, and Software Licence Access Pack Card. -
Page 13: Downloading The Caswa.cardreader Software
6.1.3 Downloading the CASWA.CardReader software First, you will need to visit the Sole Digital website to download the card reader software, the software can be found at >> https://www.soledigital.com.au/AccessPack.html (1). You will need to scroll down the page and click on the [Downloads] tab (2) and then proceed to the [Card-reader- setup] link (3). -
Page 14: Accessing The Inspector
[Login] tab on the page. The portal login can be found near the top of the Sole Digital website as indicated by Step (4) in Figure 7. With an RFID reader plugged into the computer and having clicked on the [Login] page, you will be directed toward a webpage prompting you to swipe your AccessPack card. -
Page 15: Picking Your Settings
Figure 9: The Alert Settings Menu 6.1.6 Picking your Settings In our example here our alert settings menu has 4 options: Equipment Activated: To receive an email when the equipment is activated. Equipment Tagged Out: To receive an email when an operator turns off the equipment for maintenance. -
Page 16: Field Service Utility (Fsu) Setup
6.2.1 Installing the Field Service Utility (FSU) Most Sole Digital products are designed to be commissioned via our FSU software using a laptop computer, so for this process, you will need to make sure you have a computer ready to go. You will also need a CASWA LINK-2 Bluetooth Modem (Pictured Below in Figure 10) and the Field Service Utility (FSU) software application, version 17.1 or higher, loaded on a laptop. -
Page 17: Launching The Application
The FSU software can be downloaded from the [Download] tab on the following link >> https://www.soledigital.com.au/MaxOut.html Note: You should check this location periodically for updates. 6.2.2 Launching the application Once the program has been installed onto your computer, double-click on the FSU program icon: 6.2.3 Connecting to the MaxOut Upon opening the FSU program will automatically use the Link-2 to scan for all of the Bluetooth- enabled devices within range. -
Page 18: Managing Firmware
Note: The Bluetooth link between the Laptop and Maxout is within approximately 100m. If you require live support for any of Sole Digital products, either go to our website or open a remote support session, by pressing the icon. - Page 19 A new window will pop up showing the FSU software connecting to the device. When this is complete, the window will show the name of the device, its current firmware version and a list of newer firmware that is available for the device. If you need to roll back to an earlier version, check the 'Show old versions' box in the lower-left corner of the window.
- Page 20 Select a firmware version and then press the <Apply firmware> button that appears in the lower right corner of the window: The display will change to the following: 20 | Page © CASWA Pty Ltd – 2017...
- Page 21 As the message states, DO NOT switch off the MaxOutDX or the computer running the FSU software or remove the Link2 modem until you are told to do so. If either device loses power then the MaxOutDX may become unusable and the device will need to be returned to your supplier for repair.
-
Page 22: Setting Your Parameters
All configuration options for the MaxOut are now shown on a single screen. To calibrate the other parts of the MaxOut please refer to the MaxOut manual available on the Sole Digital website here >> (https://www.soledigital.com.au/MaxOut.html) this manual will just be focusing on the Alert Notification part of the process that pertains to the Link-4. - Page 23 7 ROUTINE MAINTAINANCE It is always a good idea to do some basic routine maintenance to ensure the Link-4 is operating to the best of its ability. The amount of maintenance required will differ depending on the environment your Link-4 is housed in. If the Link-4 is housed in a hot, dusty or dirty environment we would recommend conducting the following checks once a month, in contrast to an office environment in which case the following steps will only need to be carried out once every 6 months.
Need help?
Do you have a question about the STL100 and is the answer not in the manual?
Questions and answers