Advertisement
Wood Chipper
Instruction Manual
WARNING:
Read carefully and understand all INSTRUCTIONS before operating. Failure to follow the safety rules
and other basic safety precautions may result in serious personal injury.
Save these instructions in a safe place and on hand so that they can be read when required. Keep
these instructions to assist in future servicing.
REV 08/16/19
Advertisement
Table of Contents

Related Manuals for Landworks LCE12

Summary of Contents for Landworks LCE12
- Page 1 Wood Chipper Instruction Manual WARNING: Read carefully and understand all INSTRUCTIONS before operating. Failure to follow the safety rules and other basic safety precautions may result in serious personal injury. Save these instructions in a safe place and on hand so that they can be read when required. Keep these instructions to assist in future servicing.
- Page 2 WARNING SYMBOL WARNING: This is the warning symbol to get your high attention for the instruction notice, which should be followed to avoid the potential serious personal injury. Anyone to use this equipment should read all the instructions of this manual. Keep this instruction manual for future reference.
-
Page 3: Table Of Contents
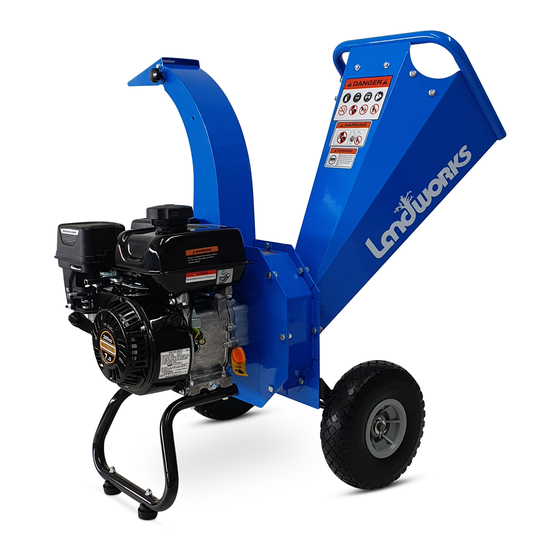
Parts Breakdown ----------------------------------------------------------------------------------------------------------------------- 12 FEATURES Discharge chute Handle Handle In-feed Bin Engine Guard plate Wheel Supporting stand SPECIFICATIONS Engine Specifications Item No. LCE12 Chipping Capacity Max. 3” Engine Brand Rato Chipping Knives Engine Type Reduction Rate 15:1 Power Chipper Knife Material CR12MoV Displacement... -
Page 4: Safety
GENERAL OPERATING SAFETY 1.Read, understand, and follow all instructions in the manual and on the unit before starting. 2. Locate the Chipper/Shredder on a flat, level, sturdy surface capable of supporting the weight of the Chipper / Shredder and any additional tools and equipment. 3. - Page 5 8. Never attempt to reposition or move the chipper shredder unit while it is running. Doing so could cause the machine to tip over, and reaching to steady the unit could result in accidental insertion of your hands into the chipper cone or shredder hopper areas.
- Page 6 Gasoline Fires and Handling Fuel Safely Use extra care in handling gasoline and other fuels. They are flammable and vapors are explosive. 1. When storing extra fuel be sure that it is in an appropriate container and away from any fire hazards. 2.
-
Page 7: Assembly
ASSEMBLY Install Stand (See Figure 1) 1. Position the stand (A) underneath the engine base 2. Using the four M8x60 bolts (B) and four nuts (D) with 8 flat washer(C)to tight the stand with the engine base plate. 3. Fix the wheel bracket (E) on the housing with three M8x20 bolts (G) and three M8 nuts.(F) Figure 1 Install the Wheels (See Figure 2) 1. - Page 8 In-feed bin installation (see Figure 3) 1. Place the Infeed bin (A) on four M8 bolts; 2. Fix the bolt with four M8 flange nuts (B). Figure 3 Fixed the discharge chute (see Figure 4) 1. Place the discharge chute (A) on the housing and align the fixed hole. Fix the discharge chute with three M8*16 bolts (B) on the housing.
-
Page 9: Operation
Fixed the discharge chute guide (see Fig. 5) 1. The guide (A) is placed at the fixed holes of the discharge chute 2 .Fix the discharge chute guide with 2 M6*12 (D), 2 elastic washers (C), 1 flat washer (B) and 1 M6*16 star handle Figure 5 GENERAL OPERATION 1. -
Page 10: Transportating And Storage
WARNING 1. GASOLINE IS HIGHLY FLAMMABLE AND MUST BE HANDLED WITH CARE. NEVER FILL THE TANK WHEN THE ENGINE IS STILL HOT FROM RECENT OPERATION. 2. DO NOT ALLOW OPEN FLAME, SMOKING OR MATCHES IN THE AREA. AVOID OVER-FILLING AND WIPE UP ANY SPILLS. -
Page 11: Maintenance
MAINTENANCE Schedule & Procedures The following schedule should be followed for normal care of your unit. BEFORE EVERY EVERY EVERY EVERY SPRING SAFETY ITEMS EACH USE 5 HOURS 25 HOURS 100 HOURS 250 HOURS & FALL Check for loose hardware Check all safety labels Inspect cone, hopper, and guards CHIPPER MAINTENANCE ITEMS... -
Page 12: Trouble Shooting
CAUTION 1. FOR THE SAFETY OF THE USER, AND TO MAXIMIZE THE LIFE OF THE ENGINE, IT IS CRUCIAL TO TAKE TIME TO CHECK THE CONDITION OF THE ENGINE. 2. PROBLEMS MUST BE CORRECTED BEFORE OPERATING. 3. AVOID INJURY! ENGINE OIL IS HAZARDOUS TO YOUR HEALTH. DISPOSE OF OIL APPROPRIATELY. 4. -
Page 13: Parts Breakdown
Chipping Knives Sharpening and Replacement 1. The chipping knives should be sharpened or replaced when tree limbs require extra force to feed into the chipper cone. 2. The chipping knives may be sharpened at a 39 degree angle until the distance between the edge of the blade bevel and the mounting hole is less than 1/16”...
Need help?
Do you have a question about the LCE12 and is the answer not in the manual?
Questions and answers
What size wrenches are need for the nuts?
The Landworks LCE12 uses M6 and M8 nuts. Typically, M6 nuts require a 10 mm wrench, and M8 nuts require a 13 mm wrench. Therefore, 10 mm and 13 mm wrenches are needed.
This answer is automatically generated
Starter rope frozen. How do I cor
To fix a frozen starter rope on a Landworks LCE12, follow these steps:
1. Turn Off the Engine – Ensure the engine is off and allow the rotor to come to a complete stop.
2. Disconnect the Spark Plug Wire – Remove the spark plug wire and secure it away from the spark plug to prevent accidental starting.
3. Check for Obstructions – Inspect the shredding chamber, shredder hopper, and chipper cone for any material that may be preventing the engine from turning over. Remove any debris.
4. Ensure the Unit is Empty – If the unit has been idle, make sure there is no material inside before attempting to restart.
5. Inspect the Starter Rope Mechanism – If the rope is stuck, check if the recoil starter mechanism is jammed or if the engine is seized.
6. Manually Rotate the Engine – Try to turn the engine flywheel manually to see if it is free-moving.
7. Check Oil Levels – Low or old oil can cause engine issues. Ensure the oil is at the correct level and of the recommended type (SAE).
If the rope remains frozen after these steps, the recoil starter or engine may need further inspection or professional repair.
This answer is automatically generated
Please advise how I may obtain a replacement part for my LCE12 Landworks Wood Chipper. It is the cover to the “clean out window” that accesses the chipper’s blades. I believe it’s called the a “Window Plate”. (# 4 in the parts diagram page of the LCE12 Manual)
what type of oil to use