
Subscribe to Our Youtube Channel
Related Manuals for Mayer TM 1010


Summary of Contents for Mayer TM 1010
- Page 1 Potting machine TM 1010 frequency controlled Operating instructions Issue date: 01.08.2021 / V1.8 Before the initial start-up, read and keep at the machine for future use.
-
Page 2: Table Of Contents
List of Contents 1 Product description 5 Initial start-up 1. Intended use 1. Check prior to first start 2. Structure 2. Starting the machine for the first time 3. Functional description 3. Stopping the machine 4. Technical Data 5. EU Declaration of conformity 6 Operation 2 General safety instructions 1. -
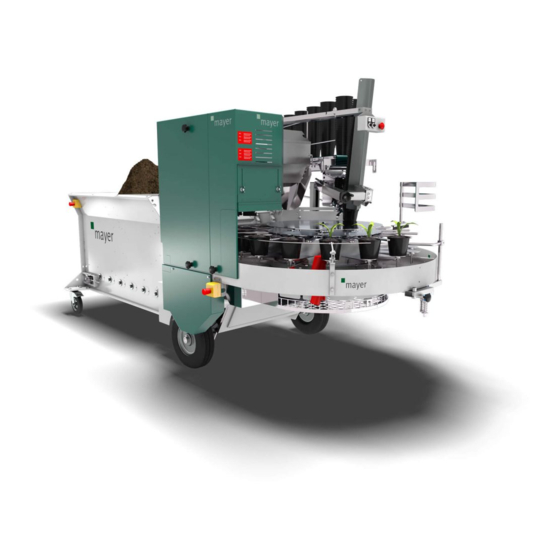
Page 3: Product Description
– and they are not the usage for intended purpose. If the MAYER TM 1010 frequency controlled potting machine is not used in accordance with the regulations, the safe operation of the machine is not guaranteed. -
Page 4: Structure
2. Structure Plan view of potting machine 1010 frequency controlled back left right front... -
Page 5: Functional Description
3. Functional description a) Working without automatic pot dispenser When there is no pot dispenser installed then empty pots are loaded by one person on the turntable located on the right side of the machine when it is viewed from front side. The turntable is driven by a worm drive mechanism and is moved intermittently in counter clockwise. -
Page 6: Technical Data
When there is an automatic pot dispenser installed then feeding by hand is not necessary and one person may be saved. Further instructions are detailed in Operation instructions of pot dispenser. 4. Technical data Make: Mayer Machine type: Potting machine Series: 1010 frequency controlled Length / width / height:... - Page 7 Available accessories (for an additional charge) • Pot clamper for diameters 15-30 cm (T8) • Drill sleeve 100 mm • Standard drills from 3.5 cm - 13 cm • Special drills from 3.5 cm - 16 cm • Container drill from 11 cm - 22 cm •...
-
Page 8: Eu Declaration Of Conformity
5. EU declaration of conformity According to Appendix IIA of the EU Machinery Directive (2006/42/EC) Mayer Ipari és Kereskedelmi BT. The manufacturer: Georg Mayer u. 1. 9341 Kisfalud / Magyarország Mayer GmbH & Co. KG Maschinenbau u. Verwaltung Poststrasse 30... - Page 9 Any design alterations that effect the technical specifications given in the Operating Instructions or the intended use, i.e. change the machine substantially, will invalidate this EU Declaration of Conformity. Heidenheim, 01.08.2021........Geschäftsführer | Managing Director...
-
Page 10: General Safety Instructions
2 General safety instructions 1. Due diligence of the operating company The MAYER TM 1010 frequency controlled potting machine was designed and built taking a danger analysis into consideration and after careful selection of the harmonised standards to be complied with as well as other specifications. -
Page 11: Explanation Of The Safety Symbols Used
• • Before beginning with any work on the machine, The machine may not be started if any safety secure its drives and accessory parts against devices are removed. • being switched on unintentionally. In the working area the operator is responsible •... -
Page 12: Basic Safety Precautions
This symbol indicates that reaching into the area identified by this sign is not allowed while the machine is in operation. This symbol warns against the danger of electric shock. Be sure to also note that a safety symbol can never replace the text of safety instructions—the text of safety instructions must therefore always be read completely! 3. -
Page 13: Machine-Related Safety Precautions
4. Machine-related safety precautions The workplaces are spread over various areas of In case of malfunctions during the work flow it is the potting machine. forbidden to touch the running machine in order to resolve the malfunction. a) Feeding pots into the rotating assembly (for a It must always be possible to access the machine without pot dispenser) or feeding pots into emergency cut-off switch. -
Page 14: Demands On Operating Personnel
Frequency converters can cause fault currents that are not detected by means of a standard earth leakage circuit breaker. So the machine may be operated with an AC/DC sensitive RCCB (residual-current circuit-breaker) only. Frequency converters have built-in capacitors that discharge after switching off the machine. -
Page 15: Transport
3 Transport To prevent damage to the machine as well as When transporting the machine, the following injuries while transporting the machine, it is special dangers must be expected: absolutely necessary to comply with the • following points: Suspended loads can drop, which would be a lethal danger –... -
Page 16: Handling
2. Handling The potting machine is fitted with 2 pneumatic tyres on one axle on the front and 2 castors with handbrake on the soil hopper. The weight of the empty machine is balanced on the axle. The machine can be pushed and pulled. On request, a trailer coupling can also be attached for an extra charge. -
Page 17: Installation
4 Installation 1. General notes To protect the machine against weather caused damages it is suggested to use and store it inside. Electrical connection: 400V/50Hz. Connection is permitted only to socket-outlets which are protected by an AC/DC sensitive RCCB (residual-current circuit- breaker). -
Page 18: Installing The Machine
2. Installing the machine A hard soil surface shall be provided under the machine to prevent the wheels and castors from sinking into the soil. The castors are equipped with a handbrake. 3. Measures for the machine’s stability against overturning There is no need to carry out other activity for erecting the machine than it is described in section 4.2. -
Page 19: Initial Start-Up
5 Initial start-up It is absolutely necessary to comply with the following safety instructions for the initial start-up of the machine. This will prevent injury to individuals, damage to machinery and other property damage. • The initial start-up may only be carried out by qualified individuals, complying with the safety instructions. -
Page 20: Starting The Machine For The First Time
1. Starting the machine for the first time After reassembly the machine shall be checked as Care shall be taken on the following: per the following: With the potentiometer, “Soil” means: • turn to the right Be sure not foreign materials, such as tools or >... - Page 21 Emergency stop Main Switch Flexible start/stop...
-
Page 22: Stopping The Machine
3. Stopping the machine There are two ways provided to switch off the machine. In normal case by switch „Stop” mounted on the swinging cable. In emergency case by „Emergency Stop” switch. Note: See also section "6.3 – Shutting down the machine" WARNING! •... -
Page 23: Operation
6 Operation 1. Normal operation a) Before starting operation the following shall be checked: • Are pots, plants and soil mixture available in sufficient quantity? Care about the following • Soil transport • Plant feeding and unloading • Pot preparation •... - Page 24 • By means of the hand wheel, tighten the adjustable pot holder until the clamps slightly grip the pots. • Adjust pot scraper in such a way that excessive soil is scraped from the pot. • Shifting of the scraper takes place via the hand wheel. •...
- Page 25 c) Soil feeding and emptying the machine The soil hopper contains 1,500 litres and can be fed in various ways without the work flow at the machine being disturbed or interrupted. Feeding can take place: • manually by means of a shovel •...
- Page 26 • Set the drilling slide to lower position • Apply a suitable spindle on the drill and slide them on shaft of the motor then fix them by means of a threaded pin • Set roughly the required drilling depth by using an empty pot •...
- Page 27 e) Adjusting the speed of operation (hourly output) and the soil amount by means of potentiometers (standard) Adjusting the speed of operation (hourly output) Infinitely variable adjustment can be carried out only if the machine is running by turning the potentiometer on a scale of 1 to 10 to run faster or slower.
- Page 28 Speed of the belt may be increased or decreased by rotating the star wheel as it is marked. Before setting is started, clamping lever of spindle of the star wheel shall be loosened and when the required speed is set it shall be tightened.
- Page 29 Setting compactness of the soil (in the pot) Special feature of MAYER potting machines is to set compactness of the soil in the pot. This depends on: 1. Drilling in or out the soil mixture. 2. Setting the filling quantity by setting the drawer.
- Page 30 Various designs of plates: Closed clamping Tree nursery With soil addition With watering plate clamping plate edge (optional)
-
Page 31: Shutting Down The Machine
2. Shutting down the machine There are two ways provided to switch off the machine. In normal case by pressing switch „Stop” mounted on the swinging cable. In this case the machine may be restarted by pressing switch „Start”. In emergency case by „Emergency Stop” switch. When push button „Emergency Stop”... -
Page 32: Malfunctions
7 Malfunctions To prevent damage to the machine as well as injuries while remedying malfunctions at the machine, it is absolutely necessary to comply with the following points: • Only eliminate a malfunction if you have the qualification specified to do so. •... -
Page 33: Possible Malfunctions And Trouble Shooting
2. Possible malfunctions and trouble shooting a) Mechanical malfunctions Failure/Malfunction Cause Trouble shooting Noise in the elevator Jammed stone or wooden piece Remove cause for malfunction. Possibly by running elevator backwards (turn switch left to position "1" or "2") Rotating assembly has too much Worn shifting roll or carrier bolt Replace shifting roll or carrier clearance. -
Page 34: Maintenance
• Release pressure of every unit that is under pressure. • Only Mayer GmbH & Co. KG may ever manipulate the machine's control programme. • All un-recycled operational materials, lubricants and supplies must be disposed of in an environmentally friendly manner. -
Page 35: General Notes
Spare parts have to meet the technical requirements of the machine's manufacturer. This is guaranteed with original spare parts from MAYER. 2. Inspection and preventative maintenance 2.1 Elevator chains Chains may be retensioned by means of tensioning bearings located on two sides of the elevator. -
Page 36: Rubber Conveyor Belt
2.2 Rubber conveyor belt Generally the rubber belt requires no retensioning. However if the belt should be readjusted caused for example by remedy works carried out on the machine, follow the process described below: Tensioning of the belt may be adjusted by means of tensioning nuts located at end of soil hopper. -
Page 37: Maintenance Schedule
3. Maintenance schedule Description Interval Grease shifting roll’s groove and drive chains quarterly Grease holding-down bar at drill monthly Grease elevator chain (prior to a longer shutdown) Grease the brake (grease nipples on back side of quarterly turntable) Grease all bearings fitted with grease nipples yearly... -
Page 38: Part List
9 Part list... -
Page 39: Guarantee
11 Guarantee Horticultural machinery and special machinery We will accept liability for faults in the supplied goods and for any failure to provide features for the existence of which an express assurance had been given. In such a case we undertake –... - Page 40 You have chosen to purchase a product of true quality. We wish you every success with your product. We would be most grateful if you would recommend our products to others. Thank you Your MAYER-TEAM...
Need help?
Do you have a question about the TM 1010 and is the answer not in the manual?
Questions and answers