Table of Contents
Advertisement
Quick Links
Advertisement
Table of Contents

Related Manuals for Zte T203


Summary of Contents for Zte T203
- Page 2 法律聲明 本資料著作權屬中興通訊股份有限公司所有。未經著作權 人書面許可,任何單位或個人不得以任何方式摘錄、複製或 翻譯。 侵權必究。 對本手冊中的印刷錯誤及與最新資料不符之處我們會及時 改進。這些改動不再事先通知,但會編入新版手冊中,中興 通訊保留最終解釋權。 Copyright © 2012 ZTE CORPORATION. 中興通訊股份有限公司 地址:深圳市科技南路55號 郵編:518057 電話:(+86) 755 26779999 技術支援網站:http://www.zte.com.cn 電子郵件:mobile@zte.com.cn...
-
Page 3: Table Of Contents
目錄 1 安全事項 ..............5 1.1 安全須知 ................. 5 1.2 安全警告和注意事項 ............ 5 1.3 駕駛車輛時使用手機注意事項 ........6 1.4 醫用設備及公共醫療場所 ........... 6 1.5 日常使用 ................. 6 1.6 可能引起爆炸的地點及爆破區 ........7 1.7 電子設備 ................. 8 1.8 汽車安全 ................. 8 1.9 飛機上的注意事項 ............8 1.10 電池禁用... - Page 4 4.2 為電池充電 ..............16 4.3 安全密碼 ............... 17 4.3.1 手機密碼 ............. 17 4.3.2 PIN碼 ..............18 4.3.3 PIN2碼 ..............18 4.3.4 PUK碼 ..............18 4.4 安全設定 ............... 19 5 基本使用 ............20 5.1 開機/關機 ..............20 5.2 主要指示符號 .............. 20 5.3 主菜单 ................21 5.4 鍵盤鎖...
- Page 5 7.3 其他操作選項 .............. 29 8 簡訊 ..............30 8.1 發送簡訊 ............... 30 8.2 簡訊設定 ............... 30 9 其他功能 ............31 9.1 生活备忘 ............... 31 9.2 日曆 ................31 9.3 計算機 ................31 9.4 調頻收音機 ..............32 10 設定 ..............33 10.1 情景模式 ............... 33 10.2 手機設定...
-
Page 6: 安全事項
安全事項 1.1 安全須知 • 如果您的手機丟失或被竊,請按運營商相關規定掛失 (U)S I M卡,這將使您免受他人冒打電話帶來的經濟損 失。 • 為使您的手機免受誤用,請採取防範措施,如: 開啟(U)SIM卡的PIN碼。 開啟手機密碼。 儘量隨身攜帶。 1.2 安全警告和注意事項 • 請正確使用手機。撥打或接聽電話時,按照使用有線電 話的方式手握手機,然後直接對著話筒講話,並確保手 機與身體保持適當距離。 • 通話期間請勿觸摸或覆蓋天線區域(手機背部上方區 域),以免影響通話效果、耗費更多電量,從而減少通 話時間和待機時間。 • 有些人在閃爍的燈光下(如看電視),可能易於發作癲 癇或眩暈。如果您有過類似的發病史,在玩手機遊戲或 使用閃燈功能前請先向醫生諮詢。 • 請將手機放在兒童難以觸及的地方,以免兒童將其當成 玩具,造成人身傷害。... -
Page 7: 駕駛車輛時使用手機注意事項
1.3 駕駛車輛時使用手機注意事項 駕車時請遵照相關交通法規,注意交通安全。 1.4 醫用設備及公共醫療場所 • 在某些醫用設備如心臟起搏器旁使用手機時需注意:保 持開著的手機與這些醫用設備之間至少20c m的距離; 不要把手機放在胸前口袋中;應使用與佩戴起搏器的不 同側的耳朵聽電話,以減少潛在干擾;必要時請關閉手 機。如有其它問題請在使用之前向該醫用設備生產廠家 諮詢瞭解。一些數字手機可能會對某些助聽器產生干 擾,如果出現了這類干擾,請與助聽器製造商聯繫尋求 解決辦法。 • 如果您還有其它個人醫用設備(如植入耳蝸等),請向 這些設備製造廠家諮詢,以確定這些設備是否能夠遮罩 周圍的射頻信號。 • 在醫院或休養院等有特殊要求的場所,請注意手機的使 用限制。若有要求,請關閉手機。 1.5 日常使用 • 您只能使用原配的或經廠商認可的配件。使用任何未經 認可的配件,都有可能影響手機的使用性能,違反本手 機的保修條款以及國家關於通信終端產品的相關規定, 甚至會導致人身危害。... -
Page 8: 可能引起爆炸的地點及爆破區
• 清潔手機時請先關機,並使用微潮且乾淨的防靜電布。 清潔手機表面時注意不要使用清洗劑等化學製劑。 • 您的手機會產生電磁場,請不要放置在磁存儲媒質附 近,如電腦磁片等。 • 在電視、電話、收音機和個人電腦等電器設備附近使用 手機可能會引起干擾。 • 請不要將您的手機暴露在強烈日光之下,以免過度受熱 而損壞。 • 請避免各種液體進入手機內部,以免造成損壞。 • 請不要扔放、敲打手機,粗暴地對待手機會毀壞內部電 路板。 • 請不要與其它不配套的設備連接。 • 請勿拆卸手機。 • 請不要將易燃、易爆物品與手機放在一起,以免發生危 險。 1.6 可能引起爆炸的地點及爆破區 • 在進入因潛在因素可能引起爆炸的區域之前(如油料倉 庫,化學工廠等有爆炸性生產過程的區域),如果手機 不是專門為這種區域使用而設計的,請您先關閉手機。 • 在這類區域,請不要取出、安裝電池,也不要給手機充 電,因為在這些環境中,火花可能引起爆炸或火災,造 成人身傷害。... -
Page 9: 電子設備
• 為了避免干擾爆破作業,在爆炸區的電雷管附近,以及 貼有關閉手機等類似標語指示的地方,請遵守相關規定 關閉手機。 1.7 電子設備 使用包括手機在內的射頻設備可能會對一些遮罩性能不 好的電子設備造成干擾,如機動車輛中的某些電子系統,必 要時使用手機前請諮詢該設備製造商。 1.8 汽車安全 • 安全氣囊、刹車、速度控制系統與油料噴射系統應不受 無線傳輸的影響,如您遇到如上問題,請與汽車經銷商 聯繫。但請注意不要將手機放在安全氣囊上方或安全氣 囊展開後能夠觸及到的區域,以免氣囊膨脹時產生的外 力推動手機對車主造成傷害。 • 在加油時請關閉您的手機,同樣的情況也適用於禁止使 用雙向無線設備的地方。 1.9 飛機上的注意事項 在飛機起飛前請關閉手機。為防止對飛機通信系統的干 擾,在飛行中禁止使用手機進行無線通訊。在飛機未起 飛時使用手機應按照安全規定征得機組人員許可。... -
Page 10: 電池禁用
1.10 電池禁用 • 請不要將電池短路,以免損壞電池、產生熱量及引起火 災。 • 禁止將電池放在高溫下或丟入火中,以免引起爆炸。 • 請勿試圖拆開電池。 • 如果一段時間內不使用電池,請將其放電並存放在乾 燥、避光、涼爽的地方。 • 當電池和充電器已經損壞或明顯老化時請停止使用。 • 請將廢舊電池返還給供應商或是放在指定的回收點,而 不能放在家庭垃圾中。 提示: 假如電池破損,應避免接觸裡面的物質,若被沾染到皮 膚,應用大量的清水沖洗,必要時請尋求醫生的幫助。 1.11 使用充電器的注意事項 • 禁止短路充電器,否則會引起觸電、冒煙和充電器損 壞。 • 請不要在電源線損壞的情況下使用充電器,否則可能會 導致起火和觸電。 • 請及時清潔積在電源插座上的灰塵。 • 請不要把盛水的容器等放在充電器旁,以免水濺出造成 充電器過熱、漏電和故障。... -
Page 11: 清潔和維護
• 請不要拆卸或改裝充電器,否則會導致人身傷害、觸 電、起火和充電器損壞。 • 請不要在浴室等高濕度的地方使用充電器,否則會導致 觸電、起火或充電器損壞。 • 請不要用濕手接觸充電器、電線和電源插座,否則可能 會導致觸電。 • 不要將重物放在電源線上或試圖改裝電源線,否則可能 會造成觸電或起火。 • 在清潔和維護前請先將電源插頭從插座裡拔出。拔插頭 時要抓住充電器,硬拉電源線會損壞電源線,可能引起 觸電或起火。 • 請不要在下列地方充電:陽光過強溫度過高的地方;潮 濕、多灰的地方或振動大的地方(容易引起故障)。 1.12 清潔和維護 • 請保持本產品的乾燥。雨水、濕氣和各種液體都可能腐 蝕電子線路,造成產品的損壞。 • 請用柔軟的幹布清潔本產品。 • 請勿用酒精、稀釋劑或苯等溶液擦拭本產品。... -
Page 12: 免責聲明
免責聲明 • 對於超越我們責任能力範圍的自然災害(如:地震、水 災等)而導致的損失,本公司不承擔任何責任。 • 在任何情況下,對於伴隨本產品的使用而帶來的任何損 失(包括依照手冊說明使用而導致的損失),諸如:公 司利潤的損失、信譽損失、營業中斷、或存儲資料的丟 失/改變等,以及因此導致的任何特別的、意外的、連帶 的或間接的損失,本公司不承擔任何責任。 • 對由於不當使用非本公司指定的通訊硬體或軟體而導致 的損失,本公司不承擔任何責任。 • 對於通過使用本產品獲得的資訊、資料、檔或其他產品 與服務,本公司不提供任何形式的保證與技術支援,且 對於使用者對這些資訊、資料、檔或其他產品與服務的 使用,不承擔任何責任。 • 對於通過本產品使用的協力廠商軟體,本公司不承擔任 何形式的擔保與技術支持責任。 • 本手冊的內容按“現狀”提供。除非適用法律另有規 定,否則本公司不對本文檔的準確性、可靠性和內容做 出任何類型的、明確的或默許的保證。... -
Page 13: 您的手機
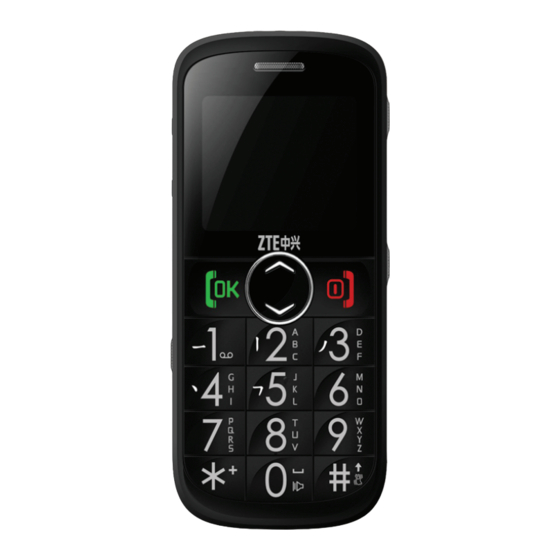
您的手機 3.1 簡述 手機支援GSM 900/1800/1900, UMTS 900/2100 MHz網路, 並且可在不同網路間無縫切換。 手機性能強大、功能豐富。借助於最新的3G技術帶來的 高速寬頻連線,它可以將您的生活與他人即時分享。 3.2 手機概觀 照明燈 聽筒 顯示幕 菜單鍵 上/下鍵 OK鍵(綠鍵) 掛機鍵(紅鍵) * 鍵 #鍵 長按調節通話音量... -
Page 14: 按鍵及功能
照明燈開關 音量鍵 呼救鍵 鍵盤鎖 後蓋 收音機鍵 USB充電器插口 耳機插口 3.3 按鍵及功能 • 待機介面,進入電話簿(所有清單)搜索 上鍵 介面。 • 向上移動游標。 • 待機介面進入主功能表。 下鍵 • 向下移動游標。 • 撥打和接聽電話。 OK鍵(綠 • 待機介面,進入所有通話記錄。 鍵) • 功能表選項確認。 • 執行顯示幕左下方選項功能。... - Page 15 • 長按此鍵開機/關機。 掛機鍵(紅 • 結束或拒絕來電。 鍵) • 功能表介面,返回上一級功能表。 • 在執行顯示幕右下方選項功能。 數字鍵 • 輸入數位或字元。 • 待機介面,按一下輸入*,按兩下輸入+, *鍵 按三下輸入W,按四下輸入P。 • 編輯介面,調出符號欄。 • 輸入#。 #鍵 • 編輯介面,進入輸入法選擇介面。 • 待機介面,長按打開或關閉靜音模式。 • 待機介面,調節鈴音音量。 音量鍵 • 通話過程中,調節聽筒音量。 收音機鍵 打開/關閉收音機。 照明燈開關 打開/關閉照明燈。 鍵盤鎖 啟動/關閉鍵盤鎖。...
-
Page 16: 使用入門
4 使用入門 4.1 安裝電池和(U)SIM卡 1. 長按掛機鍵關機。 2. 如圖下推手機後蓋,然後向上打開。 溫馨提示: 請勿使用蠻力將手機後蓋抬起,以免損壞手機後蓋。 3. 將 ( U ) S I M 卡 的 金 屬 接 點 朝 下 , 如 下 圖 所 示 方 向 , 將 (U)SIM卡插入卡槽向下推到底。... -
Page 17: 為電池充電
5. 將電池向下推入,如下圖所示步驟,直到卡至定位為 止。 6. 裝上手機後蓋。 4.2 為電池充電 充電僅能在0°C至45°C的溫度範圍內進行。 • 電池在第一次拆封時並未完全充電,同時在第一次充電 之前必須先將電力耗盡。為電池充電時,第一次要充電 八小時,之後每次充電至少兩小時,以發揮電池的最佳 效能。 • 您可以使用隨附的充電器或USB傳輸線進行充電。 • 充電時,確認電源線不會阻擋走道同時不會造成危險狀 況。 1. 當電池在手機內的情況下,將充電器的接線連接到手機 的充電器插口中。如下圖所示。... -
Page 18: 安全密碼
2. 將充電器連接至標準的電源插座。 充電完全後,將充電器的插頭拔掉並取下手機。 溫馨提示: 如果包裝內充電器本體和資料線是分離的,充電前,請 先連接資料線和充電器本體。 在不支援資料業務情況下,內裝資料線僅供充電使用。 4.3 安全密碼 手機及(U)SIM卡可受到多重安全密碼的保護,以防止被 盜用。請妥善保管這些重要的密碼,以備不時之需。 4.3.1 手機密碼 如果啟動手機鎖定功能,當手機開機時,您需要輸入手 機密碼。預設的密碼為0000。 手機在鎖定狀態下只能撥打緊急電話。... -
Page 19: Pin碼
4.3.2 PIN碼 P I N碼是網路服務提供商提供的一組密碼,開啟P I N碼 後,每次開機都需要輸入PIN碼。您可以停用此功能,但手機 可能會有被他人使用的風險。某些網路服務提供商不允許您 停用此功能。 溫馨提示: 如果您連續三次輸入錯誤的PIN碼,您的(U)SIM卡會被鎖 定。您必須輸入PUK碼方可解鎖。要獲取PUK碼,請聯繫您 的網路服務提供商。 4.3.3 PIN2碼 某些設置需要PIN2碼。操作方式與PIN碼相同。 4.3.4 PUK碼 PUK碼(8位數的個人解鎖碼)能夠解開鎖定的PIN碼。 如果您連續十次輸入錯誤的PUK碼,(U)SIM卡將會失效。請 聯繫您的網路服務提供商以取得新的(U)SIM卡。... -
Page 20: 安全設定
4.4 安全設定 安全功能保護手機,防止未經授權的使用。 • 密碼開關:您可以在此子選單中選擇開啟/關閉密碼保 護。 手機密碼:設置為開或關(需要輸入當前手機密 碼)。如果設置為開,開機時需要輸入手機密碼。 PIN碼:設置為開或關(需要輸入當前PIN碼)。如 果設置為開,每次開機都需要輸入PIN碼。 • 密碼更改:您可以變更手機密碼和PIN碼。... -
Page 21: 基本使用
5 基本使用 5.1 開機/關機 1. 長按掛機鍵打開或關閉手機。 2. 開機後,手機會自動檢查(U)SIM卡是否可用,然後手機 上會按順序出現以下提示: 輸入手機密碼:如果設置了手機密碼。 輸入PIN碼:如果設置了(U)SIM卡PIN碼。 溫馨提示: P I N(個人識別碼)是由您的網路服務提供商提供的密 碼。您需要這個密碼才能使用(U)SIM卡。 手機接受輸入的PIN碼或手機密碼後,便會自動搜尋指定 的網路。 提示: 請勿在禁止使用手機的場所開機,以免造成干擾和危險。 5.2 主要指示符號 電池電量 鍵盤鎖 信號指示 耳機 新簡訊 鬧鐘 簡訊滿 靜音模式... -
Page 22: 主菜单
未接電話 漫遊 來電轉接 5.3 主菜单 在待機介面按下鍵進入主功能表。 1. 電話簿 3. 通話記錄 1.1 搜尋 3.1 未接來電 1.2 電話簿新增 3.2 已撥電話 1.3 刪除所有 3.3 已接來電 1.4 複製全部 3.4 刪除所有 1.5 全部移動 3.5 通話時間 1.6 本機號碼 4. 設定 1.7 空間資訊 4.1 情景模式 2. 簡訊 4.2 手機設定... -
Page 23: 鍵盤鎖
5.4 鍵盤鎖 • 使用鍵盤鎖功能可以防止鍵盤誤操作。 • 鍵盤鎖下推,啟動鍵盤鎖;鍵盤鎖上推,關閉鍵盤鎖。 溫馨提示: 要在鍵盤鎖定時接聽來電,請按綠鍵。當您結束通 話或拒絕接聽來電時,鍵盤會自動重新鎖定。 當鍵盤鎖定時,仍能撥打在手機中固有的官方緊急 電話號碼。 鍵盤鎖鎖定狀態下,上推S O S鍵,仍可撥打緊急電 話。 5.5 撥打接聽電話 • 在待機介面下,輸入電話號碼,或者按上鍵從電話簿中 查找電話號碼,按綠鍵撥出電話。 • 按兩次*鍵,輸入國際撥號符“+”。 • 按三次*鍵,輸入暫停符“W”,按四次*鍵,輸入暫停 符“P”。暫停符“P”、“W”用於撥打分機號碼,先 輸入總機號碼,暫停符出現後,再輸入分機號碼。然後 按綠鍵撥打電話。 輸入暫停符“W”時,手機先撥出前面的號碼,接通 後,按綠鍵,手機自動播出後面的號碼。 輸入暫停符“P” 時,手機會在接通前面的號碼後,自 動撥出後面的號碼。... -
Page 24: 撥打緊急電話
• 按綠鍵接聽電話。 • 接聽電話時,長按0鍵,將手機聽筒的音量調節到一鍵助 聽的音量級別上(如果聽筒音量已經比一鍵助聽音量 大,一鍵助聽音量無效)。一鍵助聽中的音量大小可以 在設定 > 情景模式 > 個性化設定 > 音量調節 > 一鍵助聽 中設置。 • 按紅鍵結束通話。 5.6 撥打緊急電話 5.6.1 緊急呼救設定 按下鍵4次進入設定介面,選擇緊急呼救,進入緊急呼救 設置。 • 啟動設定:打開或關閉緊急呼救功能。 • 音量:設置緊急呼救警報聲的高低,也可關閉警報聲。 • 緊急號碼:最多可設置5個緊急號碼。連絡人號碼可以從 名片夾導入,也可以從介面上輸入。用戶可以對已設置 的號碼進行編輯、刪除操作。緊急號碼中第1個號碼是緊 急呼救號碼,第2~5個號碼為發送简讯號碼。 • 緊急简讯:設置緊急呼救简讯內容。... -
Page 25: 撥打緊急電話
5.6.2 撥打緊急電話 • 如果您已啟動緊急呼救功能,在除了撥打/接聽電話外的 任何介面下,上推手機背面的S OS呼救鍵,手機進入緊 急狀態。 • 手機進入緊急狀態後,手機先發出警報聲,警報聲響起 後,如果設定了緊急撥號的號碼,手機會先向您在緊急 號碼中所設定的第2~5個號碼發送简讯,發送简讯完閉 後,向緊急號碼中的第1個號碼撥打求助電話。 • 在啟動S OS向您所設定的緊急號碼發送简讯中以及撥打 緊急號碼過程中,手機中斷緊急呼叫。 • 撥打求助電話接通後,手機自動處於免提狀態。 • 電話掛斷後,手機返回緊急狀態,發出警報聲。 • 在任何情況下,推下S OS呼救鍵,手機返回進入緊急狀 態前的介面。 • 鎖鍵盤狀態下,推上SOS呼救鍵也會啟動緊急呼叫。 5.7 設定快速撥號 1. 按四次下鍵進入設定介面。選擇通話設定 > 快速撥號, 進入快速撥號介面。 2. 選擇狀態 > 開,打開快速撥號功能。 3. 選擇速撥列表, 選擇一個空位置,按綠鍵將這個位置分 配給電話簿中記錄。... -
Page 26: 通話設定
4. 選擇一個記錄,按兩次綠鍵保存設置。 在待機狀態下,長按快速撥號號碼對應的數字鍵直接撥 打對應的電話號碼。 5.8 通話設定 • 來電轉接:您可以指定在收到何種來電類型時,要轉移 到另一個號碼。具體請諮詢網路服務提供商。 無條件呼叫前轉 無條件轉移所有來電 遇忙呼叫前轉 忙線時轉移來電 遇無應答呼叫前轉 無人接聽時轉移來電 手機關機或手機不在服務網路涵蓋 用戶不可及呼叫前轉 範圍時轉移來電 取消所有轉移 取消所有轉移服務 • 呼叫等待:您可以選擇登記/取消,啟用或取消呼叫等待 功能。也可以查詢目前狀態。啟動此功能後,在進行通 話時,網路可以通知您有新的來電。 • 呼叫限制:限制某些電話的撥打或接聽。若要啟動或取 消通話限制,您必須輸入網路服務提供商提供的網路密 碼。具體請諮詢網路服務提供商。 禁撥所有電話 禁止撥打任何電話 禁撥國際長途 禁止撥打國際長途電話 禁止所有來電 無法接收任何來電... -
Page 27: 通話記錄
在國外時只能撥打所在國家的電 漫遊時除歸屬國外禁撥國 話,及網路服務提供商所在地的 際長途 本國電話 在本地網路服務提供商服務範圍 國際漫遊時禁止來電 以外使用手機時將無法接收來電 取消所有限制 取消所有限制設定 更改服務密碼 變更密碼 • 發送本機號碼:此功能允許用戶在撥打電話時發送或隱 藏電話號碼。您也可以選擇網路設定,讓網路進行選 擇。 溫馨提示: 呼叫前轉,呼叫等待,呼叫限制,發送本機號碼業務需 要網路支援,具體請諮詢網路服務提供商。 • 通話時間提醒:設置通話時週期提醒或關閉通話提醒功 能。 • 快速撥號:開啟了快速撥號功能後,在待機狀態下,長 按數位鍵即可撥打所設定的相對應的號碼。 • 免持:打開或關閉免提功能。 5.9 通話記錄 在待機介面下,按綠鍵可查看所有通話記錄。或者按3次 下鍵選擇通話記錄選擇查看歷史記錄或時間資訊。... -
Page 28: 文本輸入
6 文本輸入 您的手機提供以下的輸入方法:注音輸入、筆劃輸入、 abc/Abc/ABC輸入、數位(123)輸入。 操作 方法 更改輸入法 按#鍵更改輸入法。 在注音輸入法下,按數位鍵顯示對應的字 元,按*鍵進入文字區域,按上下鍵選擇漢 字,按綠鍵確認輸入對應漢字。 輸入漢字 在筆劃輸入法下,依次按筆劃對應的數位鍵 輸入筆劃組合,按上、下鍵選擇文字,按綠 鍵選擇您想要的漢字。 在abc/Abc/ABC輸入法下,重複按下數字鍵 2~9鍵直到需要的字母出現。按一次即可輸 輸入字母 入按鍵的第一個字母,按兩次輸入第 二個字 母,以此類推。 待游標移動後,再輸入下一個字元。 輸入數位 在123輸入法下,按相應的數字鍵。 輸入符號 按*鍵切換到符號輸入法。 輸入空格 按0鍵(注音輸入法,數字輸入法除外)。 刪除字元 按紅鍵。 移動游標 按上、下鍵。... -
Page 29: 電話簿
7 電話簿 在待機介面下,按下鍵 > 電話簿進入電話簿介面。 電話簿用於保存和管理連絡人資料。您可以添加和編輯 新連絡人或按名稱搜索連絡人。此手機最多可以儲存500個 記錄,(U)SIM卡的電話簿容量需視網路服務提供商所提供的 (U)SIM卡的類型而定。 7.1 新增名片 1. 在待機介面下,按下鍵 > 電話簿 > 電話簿新增進入新增 電話簿介面。 2. 選擇到手機/到(U)SIM卡,將名片保存在手機中或(U)SIM 卡中。 按上下鍵移動游標,選擇編輯,輸入姓名、號碼等資 訊。 4. 選擇完成,完成編輯,選擇是,保存記錄。 7.2 搜尋名片 1. 在待機介面下,按下鍵 > 電話簿 > 搜尋或者直接按上 鍵,進入電話簿搜尋介面。 2. 手機中顯示所有電話簿記錄清單,輸入記錄的首字母, 手機將自動列出所匹配的名片。 3. 選擇所需記錄。... -
Page 30: 其他操作選項
7.3 其他操作選項 刪除所有:刪除手機或(U)SIM卡中的全部連絡人。 複製全部/全部移動:從(U)SIM卡到手機或從手機到SIM 卡對電話簿進行複製或移動。 空間資訊:查看(U)SIM卡和本機的儲存狀態。 本機號碼:編輯本機號碼。... -
Page 31: 發送簡訊
8 簡訊 在待機介面下,按兩次下鍵 > 簡訊進入簡訊介面。 8.1 發送簡訊 選擇新增簡訊。 2. 進入編輯簡訊介面,輸入簡訊內容。編輯完成後,選擇 選項 > 儲存,簡訊保存到草稿箱;選擇選項 > 僅發送/發 送並儲存,發送簡訊。 3. 輸入接收人的電話號碼,或者選擇搜尋,從電話簿中搜 索寄件者。 4. 按綠鍵發送簡訊。 8.2 簡訊設定 您可以查看或更改簡訊設定。一般採用默認設定,如需 修改,請聯繫網路服務提供商。如果您的設定和網路服務提 供商不一致,可能會導致無法正確收發簡訊。 選擇簡訊 > 設定,設置簡訊有效時間,簡訊中心號碼、 狀態報告和社區名顯示。... -
Page 32: 其他功能
9 其他功能 9.1 生活备忘 選擇個人助理 > 生活備忘,進入生活備忘介面。 2. 選擇生日、重要日子、吃藥、起床、娛樂、倒數計時或 其它。您可以新建或者編輯主題,您的手機會根據相應 的設置到時提醒您。 9.2 日曆 提供以月的方式流覽的日曆,並可顯示農曆。 9.3 計算機 此手機提供加減乘除等簡單的計算功能。 • 按數位鍵輸入數位,按#鍵輸入小數點。 • 按下鍵選取+、-、×、÷。 • 按紅鍵清除前一位數或結果。 • 按綠鍵即可計算,按紅鍵退出計算器。 溫馨提示: 本計算器精度有限,有可能產生舍入誤差。... -
Page 33: 調頻收音機
9.4 調頻收音機 待機介面,上推收音機鍵,收聽廣播。 進入收音機,選擇選項 > 自動搜尋開始自動搜尋廣播頻 道。 當收聽廣播時,按上、下鍵更換頻道,按選項即可顯示 更多選項: 退出 退出收音機 頻道清單 顯示所有頻道 設定頻道 指定一個廣播頻道 自動搜尋 自動搜尋廣播頻道 揚聲器播放 當插入耳機時,使用揚聲器收聽收音機。 提示: 收聽廣播時請選用中等適度音量。持續使用過高音量可 能損害您的聽力。因為揚聲器的音量可能很大,所以請勿在 使用揚聲器時將手機置於耳邊。... -
Page 34: 情景模式
10 設定 待機介面,按下鍵四次,進入設定介面,對手機進行設 定。 10.1 情景模式 您可以將手機設為靜音,或進行個性化設計。 • 靜音:打開或關閉靜音。 • 個性化設定:可以設定手機鈴音,音量調節或選擇提示 音類型。 選擇語音電話鈴聲、鬧鐘/提醒、简訊提示音 鈴聲; 鈴音設定 打開或關閉開機、關機、告警音鈴聲; 設定按鍵及撥號聲類型。 設置鈴音音量、按鍵音音量、聽筒音量和一 音量調節 鍵助聽音量。 設置提示音類型為鈴聲、振動、振動加鈴 提示音類型 聲、先振動後響鈴或僅燈光。 10.2 手機設定 • 時間設定:打開網路時間或自己設定時間。 • 世界時間: 當關閉網路時間時,選擇城市,手機根據該 城市時區資訊調整系統時間日期資訊。... -
Page 35: 網路設定
• 自動開機/關機:設置自動開關機時間。 • 語言選擇:設定當前顯示的語言。 • 背光時間:設定背光的時間週期。 • 背光亮度:調整螢幕的亮度。 • 聽力輔助: 輔助增強接聽。 • 恢復出廠設定:恢復到原來的出廠設定。您需要輸入手 機密碼。預設密碼為0000。 10.3 網路設定 • 網路類型:選擇網路類型為自動、GSM網路或UMTS網 路。 • 搜尋網路方式:設置搜尋信號模式為自動或手動。 10.4 語音播报 使用手機過程中,新來電、簡訊或待機狀態下鍵盤輸入 電話號碼時,手機通過發出人聲讀出來電、簡訊或按鍵撥號 的內容。 溫馨提示: 選擇設定 > 情景模式 > 靜音,手機啟動靜音狀態時 關閉語音播報功能。 手機設定語言為繁體中文時語音播報音為粵語,設 定語言為英文時 語音播報音為英文。... -
Page 36: 新來電、簡訊語音播報
10.4.1 新來電、簡訊語音播報 在待機介面下,按四次下鍵 > 設定進入設定介面。 選擇語音播報狀態。 進入語音播報設定介面,選擇開啟/關閉語音播報功能, 調節語音播報音量大小。 來電設置: 來電語音播報功能。 新短信: 開啟/關閉新簡訊語音播報功能。 自動短信播報: 開啟/關閉收件箱中簡訊的語音播 報功能。 10.4.2 待機撥號語音播報 在待機介面下,按四次下鍵 > 設定進入設定介面。 選擇情景模式 > 個性化設定 > 鈴聲設定 > 撥號按鍵音類 型 > 人聲音調,手機啟動待機狀態下按鍵撥號語音播報 功能。... -
Page 37: 簡單故障排除
11 簡單故障排除 使用本手機時如果遇到問題,或是操作有不正常時,您 可以參閱本圖表中的資訊。如果圖表中的資訊無法解決您的 特定問題,請聯繫您購買手機的經銷商。 問題 可能原因 可能的解決方式 您目前所在位置的網路信 號比較弱 (例如地下室或靠 請移動到可以正確接 近大廈),使得無線電波無 收網路訊號的位置。 法有效傳達。 信號接收 目前網路占線 (例如,高 請避免在類似時段使 不良 峰時段網路的流量可能過 用手機,或稍待片刻 高,造成無法通話)。 再試。 請向您的網路服務提 您與基站的距離過遠。 供商索取服務地區地 圖。... - Page 38 問題 可能原因 可能的解決方式 請按下掛機鍵並重新 可能與您當前佔用的網路 撥號。也許可以切換 中繼線品質不良有關。 到品質比較好的網路 中繼線或電話線。 回音或雜 訊 請按下掛機鍵並重新 撥號。也許可以切換 當地電話線路品質不良。 到品質比較好的網路 中繼線或電話線。 無法選取 您的網路服務提供商不支 請諮詢您的網路服務 特定的功 援這些功能,或您尚未申 提供商。 能 請提供這些功能的服務。 電池或電池充電器已經損 請聯絡經銷商。 壞。 請注意電池充電時的 手機溫度低於-10 °C或高於 電池無法 環境,避免溫度過高 45 °C。 充電 或過低。 請檢查所有接頭,確 電池與充電器之間接觸不 定所有線路皆正確連 良。 接。...
- Page 39 問題 可能原因 可能的解決方式 待機時間與網路服務提供 商的系統設定有關。相同 如果您位於信號微弱 的手機在不同網路服務提 的區域,請暫時將手 供商系統下的待機時間不 機關機。 盡相同。 待機時間 電池耗盡。在高溫環境 請更換新電池。 縮短 下,電池壽命將會縮短。 如果無法連接到網路,手 機將會持續發射搜尋基站 請移動到能夠訪問網 訊號。如此一來,便會持 路的地方,或暫時將 續消耗電池電量,造成待 手機關機。 機時間縮短。 請儘快將手機的電池 無法開機 電池電量已經耗盡。 充電。 請將(U)SIM卡交由網 (U)SIM卡故障或損壞。 路服務提供商測試。 (U)SIM卡 請正確插入(U)SIM (U)SIM卡未正確插入。 錯誤 卡。 請使用柔軟的幹布擦 (U)SIM卡接點髒汙。 拭(U)SIM 卡接點。...
- Page 40 問題 可能原因 可能的解決方式 請聯絡您的網路服務 (U)SIM卡無效。 提供商。 請向網路服務提供商 您不在網路服務區域內。 無法連接 詢問服務區域。 到網路 請移動到空曠的地 方;如果您正在建築 收訊不良。 物內,請移動到靠近 窗戶的地方。 請聯絡您的網路服務 提供商。如果網路 PIN碼被鎖 您連續三次輸入錯誤的PIN 服務提供商提供您 定 碼。 (U)SIM卡的PUK碼, 請使用PUK碼解除鎖 定(U)SIM卡。 無法在電 請從聯絡人中刪除不 話簿中輸 電話簿記憶體已滿。 必要的資料。 入資訊...
-
Page 41: 技術參數
12 技術參數 手機規格 GSM 900/1800/1900, UMTS 900/2100 MHz 尺寸 109 mm*50.8 mm*13.5 mm 重量 約86.1 g(包括標準電池) 顯示幕 1.8 英寸 26 萬色 TFT屏 電池規格 鋰離子電池 持續待機時間 約400 小時 持續通話時間 約4 小時 持 續 F M ( 收 音 機 ) 約15 小時 時間 充電時間 約3-4 小時 溫馨提示: 上述標注的時間通常為在優化網路環境下所能達到的通 話時間和待機時間,實際通話時間和待機時間可能因(U)SIM 卡、網路、使用設置、使用情況和環境等不同而有所不同, 從而顯著地短於上述標注的時間。使用調頻收音機和內置免 提功能也會影響手機的通話時間和待機時間。... - Page 43 ZTE Corporation. The manual is published by ZTE Corporation. We reserve the right to make modifications on print errors or update specifications without prior notice.
- Page 44 Index Introduction ..........4 1.1 General Precautions ............4 1.2 Precautions While Driving ..........5 1.3 Aircraft Safety ..............6 1.4 Precautions for Medical Devices and Facilities ....6 1.5 Precautions for Potentially Explosive Atmospheres ..7 1.6 Battery Safety ..............7 1.7 Limitation of Liability ............
- Page 45 Step by step guide ........17 4.1 Switch Setting ............... 17 4.2 Make and receive a call ..........18 4.3 Add a Contact to your Phone Book ....... 19 4.4 Make a call from the Phone Book ........19 4.5 Messages ............... 20 4.6 Text Input methods ............
- Page 46 1 Introduction This section includes some important information on safety and efficient operation. Please read this section before using the phone. 1.1 General Precautions • The antenna is located in the top portion of the handset, be- hind the display. When you are using the handset try to avoid shielding the antenna area with your hand. Hold the handset between your thumb and fingers towards the base of the handset.
- Page 47 • Do not expose the handset or battery to prolonged direct sunlight or temperatures exceeding 50˚ C. This may damage the battery and high temperatures can shorten the life of elec- tronic devices. • Please use original accessories only. Damage caused by non- genuine accessories may not be covered by your warranty terms and conditions. • As your mobile phone can produce electromagnetic field, do not place it near magnetic items such as computer disks or bank cards.
- Page 48 • Please turn off your mobile phone at service stations as rec- ommended. 1.3 Aircraft Safety • Please turn off your mobile phone before boarding as instruct- ed by the airline personnel. • Disable your alarms to make sure that the phone does not turn on during the flight. 1.4 Precautions for Medical Devices and Facilities • If you use a pacemaker please keep the phone at least twenty centimetres from the pacemaker when the phone is switched on. Do not carry the phone in your breast pocket. Use the ear opposite the pacemaker to minimize the potential for interfer- ence.
- Page 49 1.5 Precautions for Potentially Explosive Atmospheres • Switch off your phone prior to entering any area with poten- tially explosive atmospheres, such as fuel or chemical transfer or storage facilities. • Do not remove, install, or charge batteries in such areas. Spark in a potentially explosive atmosphere can cause explosion or fire. • To avoid possible interference with blasting operations switch off your phone when you are near electrical blasting caps, in a blasting area, or in areas posted “Turn off electronic devices.”...
- Page 50 1.7 Limitation of Liability ZTE shall not be liable for any loss of profits or indirect, special, in- cidental or consequential damages resulting from or arising out of or in connection with using this product, whether or not ZTE had been advised, knew or should have known the possibility of such damages.
- Page 51 2 Getting Started 2.1 Insert the SIM Card Remove the battery cover by pressing down on the back cover and sliding the cover down. Insert the SIM card with the metal contacts facing down and the notch on the bottom left corner as shown: 2.2 Insert the battery 1.
- Page 52 2.3 Charging the battery The phone can be charged in the On or Off state. Make sure that the battery is inserted before charging. The charger lead is keyed and will only fit one way. Insert the lead carefully observing the correct align- ment of the plug and socket.
- Page 53 2.4 Battery level indicator Charging Charged The phone will give an audible alert when battery is low and dis- play a low battery message on screen. Please recharge the battery promptly to maintain service. 2.5 Switch your phone On Press and hold the Red key for 2 seconds to switch the phone on.
- Page 54 3 Get to know your phone 3.1 Your phone Torch Earpiece Display Menu Up/Down Call Key End Key Stary Key Harsh Key Hold for In call volume Switch Torch Switch (Call/ Volume Key SMS) Lock Switch Back FM Radio Cover Switch Charger/USB Port Headset Port...
- Page 55 3.2 Display Icons Battery level Keypad locked Network signal level Headset inserted New SMS message Alarm enabled SMS memory is full Silent Mode enabled Missed call Roaming Call Forwarding active 3.3 Key functions Function Description • Press to make a call. Press to answer an incom- Call key ing call. (Green Key) • From the idle screen, press to enter the call his- tory list.
- Page 56 End key • Long press to power on or off. (Red Key) • Press to go back to previous menu. • Clear text and numbers • From the idle screen, press to enter the Phone Up key Book (Quick Search). • Press to move cursor up. • From the idle screen, press to access the Main Down key Menu. • Press to move cursor down. • Press to input ‘#’. Switch text input mode – # key (Predictive). • Hold down to engage / disengage Silent mode. • From the idle screen, press to enter ‘*’, ‘+’, ‘W’, or ‘P’. * key • Use + for the international dialling prefix. • ‘W’ will wait until the next number is entered into the dialling sequence.
- Page 57 • Activate your Switch Call and SMS (see Switch Switch Setting). Volume keys • Adjust the volume up and down. Torch switch • Turn the torch on or off. FM radio key • Turn the FM radio on or off. Lock switch • Lock and unlock keypad. 3.4 Menu Map In standby mode, press the Down Arrow Key [Menu] to enter main menu. Phone Book Messages Call History 1.Quick Search 1.Write Message...
- Page 58 Settings Settings Settings A Audio Profiles B Phone Setup C Call Setup 1.Silent 1.Set Time 1.Call Forwarding 2.Personalise 2.Set Home City 2.Call Waiting • Tone Setup 3.Schedule Power 3.Call Barring • Volume On/Off 4.Send My Number • Alert Type 4.Language 5.Call Time Reminder 5.LCD Backlight 6.Speed Dial 6.Brightness...
- Page 59 4 Step by step guide 4.1 Switch Setting The Switch on the back of the handset can be programmed to make a call and/or send an SMS to friends or relatives simultane- ously. • Press Down > Down > Down > Down to get to the Settings Menu.
- Page 60 • The alert tone volume can be adjusted to Off, Low, Medium or Loud. • In any state, push the Switch key down to return the phone to standby mode. • Switch Dialling is still activated when the keypad is locked. 4.2 Make and receive a call • Enter the phone number using the number keys and press the Green key to dial. If you enter a wrong digit use the Red to delete the mistake. Long press the Red key to clear all the characters and return to the idle screen.
- Page 61 • Press and hold the 0 key to select the In Call volume level which you can pre-define. Eg. If your normal ear-piece volume is 3, you can set the In Call volume setting to 5 which you can use in noisy environments to give a quick volume boost to the earpiece if required.
- Page 62 • Eg. Press 5 to search for John. Press 5 twice to search for Karen. • Use the up and down arrows to scan your Phone Book con- tacts. • When you have selected the required contact press Option > Dial to make a call to that contact. Select the correct number where multiple numbers are stored. 4.5 Messages • The envelope icon indicates a new message. • Press the Green key to read the message. Press the Red key to exit.
- Page 63 • Drafts shows all your saved messages which have not been sent. • Select Message Settings for Valid Time, SMS Centre Number, Delivery Report and Cell Name Display options. 4.6 Text Input methods 1. When editing text, press the # key to change between eZiEng, abc, Abc, ABC and 123.
- Page 64 7. Press the Red key to clear a character. Hold the Red key to de- lete all characters. 8. Press the Up/Down keys to move the cursor to left or right. 4.7 Phone Book You can save names and numbers to the phone memory and the SIM card.
- Page 65 • Select Settings > Call Setup > Speed Dial > Set Number. Pro- gram speed dial keys. Once saved, long press the key to acti- vate Speed Dial to the preset number. • Press and hold the programmed number key to quickly call your assigned Contact. • Go to Settings > Call Setup > Speed Dial > Status to enable or disable the feature.
- Page 66 b) Volume 1. Ring Tone 3. Earphone 2. Key Tone 4. In Call Volume * • * Settings > Audio Profile > Personalise > Volume > In Call Vol- ume sets a preferred second volume setting to quick change the standard earpiece volume. This is activated by long press- ing the 0 key during a call.
- Page 67 • Select Settings > Phone Setup > LCD Backlight to set the back- light timeout. • Select Settings > Phone Setup > Brightness. • Select Settings > Phone Setup > T-mode – Enable T-mode sup- port for hearing aids. • Select Settings > Phone Setup > Master Reset – Restore fac- tory settings.
- Page 68 • Select Settings > Call Setup > Call Time Reminder > Periodic (set your required time from 1-3000 seconds) .You hear a beep during an active call to remind you of the current call duration. • Select Settings > Call Setup > Speed Dial > Set Number. Pro- gram speed dial keys.
- Page 69 4.15 Voice Broadcasting Select Settings > Voice Broadcast. Your handset supports SMS/call broadcast feature for the new, inbox messages, incoming call or call for dial. Note: Select Settings > Audio Profiles > Silent to ensure the hand- set not in silent mode. a) New Message Broadcasting • Select Menu >...
- Page 70 • View a message in inbox and select Option > Text to Speech to broadcast, select Stop to terminate the broadcasting. Note: The handset broadcasts only once for the message. For an incoming call during message broadcasting, the hand- set stops message broadcasting and broadcasts or alerts to re- mind only as preset in Settings >...
- Page 71 Note: In standby mode, the handset broadcasts the numbers and characters (0-9, *, #). For alarm or agenda ring during standby call broadcasting, the handset alerts to remind instead of standby call broadcasting. e) Broadcast Settings • Select Menu > Settings > Voice Broadcast > New Call/ New SMS/Auto SMS Broadcast to set broadcast for new incom- ing call, new SMS, message in inbox, etc.
- Page 72 4.16 Organiser > Alarms / Reminders Select Organiser > Alarms/Reminders (see the table below…). • Select the required Alarm or Reminder function from the avail- able options. • Select Add > Edit to enter a name (optional). • Press the down arrow to select the time field (hh:mm), press Change to enter the alarm time. • Press the down arrow to select the date field (dd.mm – when applicable), press Change to enter the required date.
- Page 73 4.17 Organiser > Calendar • Go to Organiser > Calendar to view the calendar. 4.18 Organiser > Calculator • Go to Organiser > Calculator. Press Up/Down keys to highlight the required functions +, -, *, /, and press the Green key for Equals. • Press the Red key to clear input information and to exit the calculator. 4.19 Torch Switch the torch on or off using the side switch. The torch works whether the handset is on or off, or in the locked or unlocked state so be careful not to activate the torch while the handset is in your pocket.
- Page 74 4.21 FM Radio Switch • Slide the FM key switch up to turn the radio on. • Press the Up / Down arrow keys to manually tune to the re- quired frequency. • Use the side volume keys to adjust the volume. • Select Option > Channel List > Option > Edit to enter a new channel directly. Enter the required frequency, use the * key to enter the decimal point.
- Page 75 Technical Reference 4.22 Technical Specifications Network GSM 900/1800/1900, UMTS 900/2100 MHz Dimensions L×W×H Approx 109mm x 50.8mm x 13.5mm Weight Approx 86.1g (including standard battery) UMTS / GSM Handset with SMS, FM Radio, Features 3.5mm headset jack, LED torch and Pro- grammable Switch Call function. Battery 1000mA hours, Lithium ion (Li-ion) Screen 128 x 160 pixels, 1.8”...
- Page 76 (g) Any other cause beyond the range of normal usage for prod- ucts. The End User shall have no right to reject, return, or receive a refund for any product from ZTE under the above-mentioned situ- ations. Your statutory rights are not affected. Note: Consult the warranty card for full information 4.24 Network Locked Device This device is network locked to your service provider.