Advertisement
RPX40
1- INFORMAZIONI GENERALI :
ATTENZIONE !
A) prima di installare l'apparecchio assicurarsi che il
!
!
fluido sia compatibile con i dati di targa e specifica
tecnica.
B) Attenzione! Durante la messa in funzione o
l'esercizio non toccare l'apparecchio che potrebbe
condurre calore se il fluido impiegato è ad alta
temperatura.
C) Attenzione! Prima di iniziare eventuali operazioni di
manutenzione assicurarsi che l'apparecchio non sia in
pressione e/o caldo.
D) Non rimuovere la targhetta descrittrice poiché riporta
importanti dati tecnici e marcature. La manomissione di
tale targhetta comporta la decadenza della conformità
PED 2014/68/UE
tecnica.
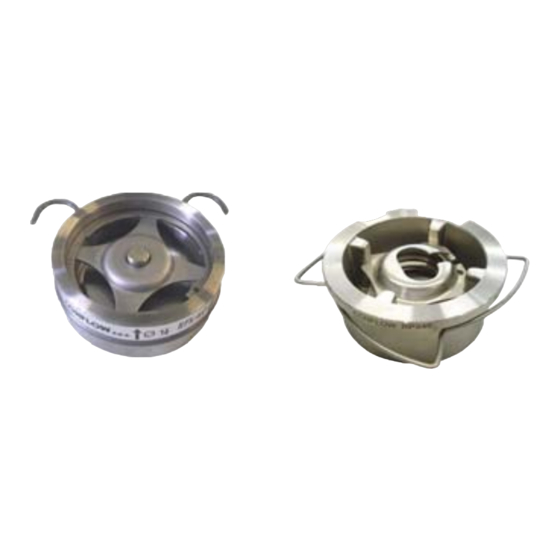
2- INSTALLAZIONE Tipo RPX40 :
Appoggiare
la
valvola
sul
guarnizione inserita tra flangia e valvola,
inserendo l'anello di centraggio nelle due viti
(vedi disegno).
Assicurarsi che il senso della freccia indicato
sulla targhetta sia corrispondente all'entrata
del flusso.
Inserire le ulteriori viti e/o tiranti e serrare le
flange.
2.1 - INSTALLAZIONE Tipo RPX40K :
Appoggiare la valvola sul piano
della guarnizione rif. A (vedi
disegno)
Inserire le viti rif. C nella flangia e
successivamente
nell'anello
centraggio Rif. B
Assicurarsi che il senso della
freccia indicato sulla targhetta sia
corrispondente
all'entrata
flusso.
Serrare Viti e dadi incrociati,
secondo la tabella
DN
DN 15 – 25
DN 32 – 50
(1) Il serraggio può cambiare a secondo del tipo di guarnizione – dati con guarnizione metalbond m=2, y=1800
The tightening can change according to the type of gasket- gasket metalbond data with m = 2, y = 1800
3- MANUTENZIONE:
Non sono previste operazioni di manutenzione.
Telefono - Phone : +39 - (0)39 - 651705 / 650397 Fax : +39 - (0)39 – 654018
Manuale di Installazione e Manutenzione
Installation and Maintenance Manual
TIPO / TYPE
Valvole di Ritegno a Disco
Disc Check Valves
RPX40K
e della conformità alla specifica
piano
della
di
Ref.C
del
DESIGNAZIONE DADO
Locknut size
M12
N° 4
M16
N° 4
Servizio Assistenza - Servicing Department
Via Lecco, 69/71 - 20864 AGRATE BRIANZA (MB) - ITALY
E-mail:
servicing@conflow.it
RPX40 – RPX40K
1- GENERAL INFORMATION:
WARNING !
A) Before installing equipment, be sure the fluid is
!
!
compatible with the plate data and the technical leaflet.
B) Warning! Do not touch the equipment when is started
or during working operation because it may conduct
heat if the used fluid is at high temperature..
C) Warning! Before starting maintenance be sure that
the equipment is not pressurized or hot.
D) Do not remove description plate because important
technical data is stamped on it.
description plate the PED 2014/68/UE conformity and
the conformity to the technical leaflet will expire.
2- INSTALLATION Type RPX40:
2.1 - INSTALLATION Type RPX40K:
Ref.A
Ref.B
DIMENSIONE CHIAVE
Spanner
19
24
3- MAINTENANCE:
No maintenance operations are required.
Web:
www.conflow.it
M/RPX/I/E
07
Removing the
Put the valve on the gasket situated
between flange and valve, insert the
centering ring in the bolts ( see drawing )
Make
sure
that
the
flow
corresponds to the direction of flow.
Insert the other blots or tie rods, screw and
tighten.
Put the valve on the gasket ( see
drawing )
Insert the screws Ref.C into the
flange and into the centering ring
Ref.B
Make sure that the flow direction
corresponds to the direction of
flow.
Tighten the bolts cross way, see
table
Nm
Nm
35-40 (1)
50-60 (1)
2016
direction
Advertisement
Table of Contents

Related Manuals for CONFLOW RPX40


Summary of Contents for CONFLOW RPX40
- Page 1 PED 2014/68/UE conformity and PED 2014/68/UE e della conformità alla specifica the conformity to the technical leaflet will expire. tecnica. 2- INSTALLAZIONE Tipo RPX40 : 2- INSTALLATION Type RPX40: Appoggiare valvola piano della...
- Page 2 Descrizione / Description : Valvole di ritegno a disco Tipo RPX40 / RPX40K DN 15 - 25 Disk Check valves Type RPX40 / RPX40K DN 15 - 25 B. Tabella 7 – Tubazioni di cui all’articolo 4, paragrafo 1, lettera c), punto i) secondo trattino Table 7 –...
Need help?
Do you have a question about the RPX40 and is the answer not in the manual?
Questions and answers