Table of Contents
Advertisement
IR Series
(IR-1, IR-2.5, IR-5, & IR-12)
Installation & Operation Manual
2019
Diedrich Roasters LLC, 850 Hawthorne Ave., Ponderay, ID 83852
Telephone: (208) 904-1989
Toll Free: (844) 343-3742
Fax: (208) 417-1552
Technical Support: support@diedrichroasters.com
PROPRIETARY RIGHTS NOTICE: All rights reserved. No part of this material may be reproduced or transmitted in any form or by
means, electronic, mechanical or otherwise, including photocopy and recording or in connection with any information storage or
retrieval system, without the written permission of Diedrich Roasters, LLC.
Advertisement
Table of Contents

Subscribe to Our Youtube Channel
Related Manuals for Diedrich Roasters IR Series


Summary of Contents for Diedrich Roasters IR Series
- Page 1 PROPRIETARY RIGHTS NOTICE: All rights reserved. No part of this material may be reproduced or transmitted in any form or by means, electronic, mechanical or otherwise, including photocopy and recording or in connection with any information storage or retrieval system, without the written permission of Diedrich Roasters, LLC.
- Page 2 PRIOR TO operating the roaster. Failure to have these inspections performed may void the warranty and will relieve Diedrich Roasters of any liability associated with the installation and use of your machine.
-
Page 3: Table Of Contents
Table of Contents SAFEGUARDS ..........................1 SPECIFICATIONS ..........................2 INSTALLATION INSTRUCTIONS ....................8 RECEIVING AND UNPACKING SHIPMENT ................8 LEVELING ............................. 8 PROXIMITY TO WALLS ....................... 8 GAS INSTALLATION ........................9 SAFETY SHUT-OFF VALVE ......................9 PRESSURE REGULATOR ......................10 PIPE SIZING .......................... -
Page 4: Safeguards
SAFEGUARDS Safety Information Before attempting to operate your unit, read the instructions in this manual thoroughly. Throughout this manual, you will find notations enclosed in bordered boxes similar to the ones below. CAUTION CAUTION CAUTION boxes contain information about actions or conditions that may cause or result in a malfunction of your system. -
Page 5: Specifications
SPECIFICATIONS Description Unit of Measure IR-1 IR-2.5 IR-5 IR-12 Roast Capacity Range 5.29oz / 2.2 1-5.5 1 - 10 1 - 26.4 (minimum batch by 150g / 1 .454 / 2.5 .453 - 5 .454 - 12 temperature) * Hourly Roast Output 16.5 79.4 (based on 20 min cycle) - Page 6 IR-1 IR-2.5 Page 3 of 23...
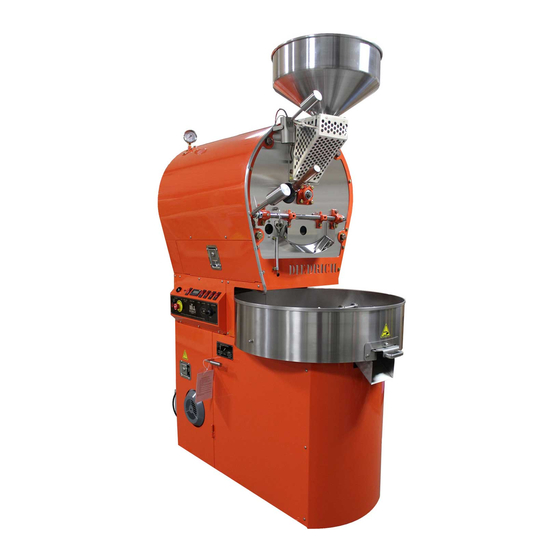
- Page 7 IR-5 & IR-12 Roaster Components Funnel Hopper gate handle Sample trowel Drum door handle Burner view window Operator control panel Cooling bin Airflow control handle Page 4 of 23...
- Page 8 IR-5 & IR-12 Roaster Components Burner & chaff tray access door Gas supply inlet Cooling bin tray & chaff compartment Exhaust outlet Impeller Fan shroud 6” x 6” electrical box Page 5 of 23...
- Page 9 Roaster Dimensions Inches / Centimeters IR-1 IR-2.5 IR-5 IR-12 8-3/4”/22.22cm A: Chute Height 24.5" / 62.2cm 24.5" / 62.2cm 32” / 81.28cm 41” / 104.14cm B: Bin Height 35.25" / 89.5cm 36.25" / 92.1cm 55” / 139.7cm 59.5”/151.02cm C: Roaster Height 64"...
- Page 10 Non-restrictive exhaust cap Check with local codes and duct manufacturer for clearances to walls Minimum 8” clearance for access to roaster components Roaster Models - Dimensions in Inches / Centimeters IR-1 IR-2.5 IR-5 IR-12 47”/1193.8 55.5”/1409.7 16” / 44.5mm 16” / 44.5mm A: Exhaust Air Outlet Height 4”/101.60 6”/152.40...
-
Page 11: Installation Instructions
INSTALLATION INSTRUCTIONS ATTENTION Professional installation is required. Your Diedrich Roaster is designed for ease of installation and simplicity of operation. Read these instructions completely before starting installation. Your local building authority should be contacted to obtain local codes and installation requirements before installing your roaster. -
Page 12: Gas Installation
GAS INSTALLATION ATTENTION Use a licensed gas company for the gas line installation. Gas installation MUST conform to local codes, regulations, and/or laws. The gas supply line MUST be sized to accommodate the total length of the run and to accommodate any required elbows. -
Page 13: Pressure Regulator
PRESSURE REGULATOR If the installation has both a roaster and an oxidizer, a separate incoming pressure regulator MUST be used for each piece of equipment. The roaster’s factory installed valve is preset for the BTU requirements of the roaster burners. The valve in the roaster is not intended to reduce incoming pressure. -
Page 14: Gas Installation
Roaster Orifice Max Manifold High Fire Allowable Pressure Inlet Pressure Consumption Range "WC "WC mbar BTU/Hr mbar Plus 5% Minus 5% 30 - 35 90,000 IR-12 1.9mm 12 - 14 85,500.00 94,500.00 90,000 8 - 9 20 - 22.5 85,500.00 94,500.00 30 - 35 50,000... -
Page 15: Cyclone To Roaster Connections
All electrical components supplied in the roaster are grounded electrically to the roaster frame. DANGER A safety shut-off must be installed in the electrical supply line near the roaster‘s junction box where it is easily accessible by the operator. CYCLONE TO ROASTER CONNECTIONS (Applies to IR-1 &... -
Page 16: Installation Inspection
DANGER DO NOT USE CLASS B OR SPIRAL-WRAP DUCTING UNDER ANY CIRCUMSTANCES. The exhaust system must be designed to operate with a static flue pressure between negative 0.15”WC and positive 0.25”WC at the exhaust of the roaster while in operation. Check local codes to determine the requirements specific to your location. -
Page 17: Operations
OPERATIONS ROASTER PARTS Hopper Gate Handle Drum Door Handle Drum Door Burner View View Window Window AIR FLOW POSITIONS “Through Roasting Drum” “50/50” “Through Cooling Bin” Page 14 of 23... -
Page 18: Operator Control Panel
OPERATOR CONTROL PANEL. IR-1 & IR-2.5 (Manual) IR-5 & IR-12 (Manual) COMPONENT DESCRIPTION 1. BEAN TEMP display: This is the temperature of the beans in the drum. 2. AIR light: This light may be on or off depending on the model of roaster. Standard model roasters have a red light. -
Page 19: Initial Start-Up
Universal model roasters have a blue air light. This light will be illuminated during normal operation. If it is NOT illuminated there may be a draft in the exhaust ducting and the roaster will not ignite the burners. 3. Pilot Only/Burners On toggle switch: This switch toggles the main burners on and off. If lower than the minimum GAS knob setting is required, the operator can turn the main burners off. -
Page 20: Roasting
7) Allow the roaster warm to 400°F - 450°F, (204°C - 232°C). NOTE: If no grinding sounds occur up to 415°F, the initial warm-up is complete and roasting can begin. If there is a grinding sound, turn “OFF” the drum motor (5) and contact the Diedrich Roasters Technical Support for instructions. -
Page 21: Seasoning The Drum
The bean development and color can be observed by using the sample trowel. You can develop a consistent roast profile by referring to a set of roasted bean samples or color tiles. Sampling of beans should be consistently viewed under a full-spectrum natural fluorescent lamp to maintain a consistent sample comparison. -
Page 22: Roasting For Consumption
10) Repeat this complete dark roasting cycle (50-60 minutes) 5-8 times, then start to develop lighter (15-18 minutes) roasts. This procedure will properly season the roasting drum. ROASTING FOR CONSUMPTION ATTENTION If any of the following happens: Excessive smoke in the room; Smoke coming from the sample trowel port;... - Page 23 NOTE: A larger batch has greater heat absorbing capacity and a higher flame setting can be used without accelerating the roast too quickly. The display temperature will fall drastically after charging the drum with beans. The temperature at which the coffee stops decreasing and starts rising is known as the bottom-out temperature. Charge temperature and initial fuel setting are determined by the desired bottom-out temperature and rate of climb from bottom-out.
-
Page 24: Shut Down
Roasters equipped with an Agitator 1) Turn on the “Agitator” (8). 2) Switch the flame to “Pilot Only” (3). 3) Discharge the coffee into the cooling bin when it has reached the desired color and bean development. 4) After the coffee has been in the cooling bin for approximately a minute, turn off the “Agitator” (8) and spread out the coffee. -
Page 25: Cleaning
Weight loss is a good indicator of the degree of roast. Variables such as humidity, coffee storage, and ambient air temperature will also affect the weight loss. It may go up or down 1% from day to day or month to month, but you should see 15% +/- 1%. -
Page 26: Every 4 Hours
The first three 40-hour cleaning cycles should include checking the tension of the drum drive chain (IR-2.5 ONLY) Refer to the Diedrich Roasters Maintenance, Cleaning & Troubleshooting Guide for specific information on maintaining and cleaning your Diedrich IR Series roaster. - Page 28 Diedrich Roaster Cleaning & Maintenance Schedule ✓when Daily Date Initials complete Vacuum all chaff from the cyclone chaff collection compartment. Vacuum any chaff and/or bean debris from the infrared burner compartment. Inspect perforated cooling bin screen for clogging. Clean as necessary with a screen roller, wire brush or by utilizing a sharp point to clean out the perforated holes.
Need help?
Do you have a question about the IR Series and is the answer not in the manual?
Questions and answers