Advertisement
ASIAIR Mini
User Manual
2022.07
Quick Keyword Search
Keyword search is supported within this document.
You can use the keyboard shortcut Command + F on a
Mac, or Control + F on Windows to find what you need.
Section Jump
You can quickly access sections of this document by clicking the relevant section in the contents table.
Print This Document
This is a high-resolution printable document.
Icon Usage
Symbols
Forbid
Attention
Tips
Further Reading
Supporting Material
ZWO Provides instructional videos and the following supporting documents for ASIAIR Mini users:
1. Quick Start Guide
2. User Manual (including disclaimer and safety summary)
It is recommended that users watch the instructional video first, and then read the "Quick Start Guide" to
understand the installation and basic setup.
For detailed product information, please read the User Manual.
YouTube Videos
To watch some very useful videos: https://www.youtube.com/results?search_query=asiair
Download the ASIAIR App
Scan the QR code to download the app, iOS users can search and download the app in the App Store,
Advertisement

Related Manuals for ZWO ASIAIR Mini


Summary of Contents for ZWO ASIAIR Mini
- Page 1 Tips Further Reading Supporting Material ZWO Provides instructional videos and the following supporting documents for ASIAIR Mini users: 1. Quick Start Guide 2. User Manual (including disclaimer and safety summary) It is recommended that users watch the instructional video first, and then read the “Quick Start Guide” to understand the installation and basic setup.
-
Page 2: Table Of Contents
Android users will find the app in the Google Play Store. ASIAIR app requires Android 6.0 and above, iOS and above. iOS / iPadOS requires 1GB and above: iPhone 5 and above full series, iPod sixth generation and above, iPad third generation and above, iPad Air series, iPad Pro series. -
Page 3: Introduction
ASIAIR since its first release in July 2018. Features The ASIAIR Mini case is constructed of CNC milled aviation aluminum. The case is finished in a rugged and pleasing anodized finish. The case measures 100*70*26.5mm, which makes it excellent in size and weight, and easily mounted on almost any telescope. -
Page 4: Preparation
The built-in power management module makes cable management easy. A variety of USB ports makes connecting equipment a simple task. In addition to the USB ports, it also provides a shutter release port for SLR cameras, which supports exposure over 30s. LED status lights provide indications to the operator which are easily viewable. -
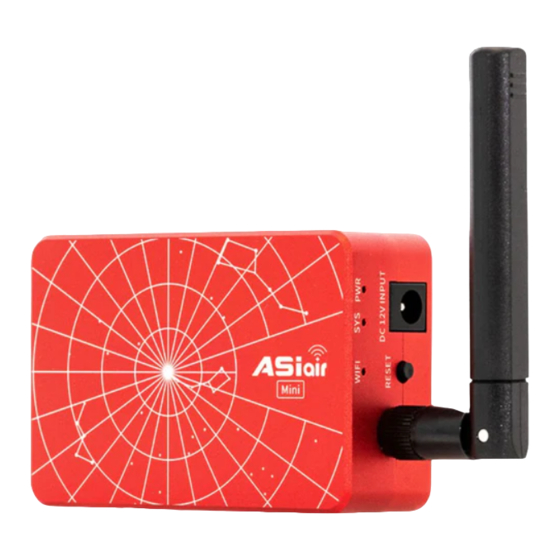
Page 5: Indications
1. DSLR Camera Shutter Release Port (2.5mm) 2. DC 5.5x2.1mm Power Output x4 3. Type-C Port 4. External Hinged WiFi Dual-band Antenna 5. Wi-Fi Status Indicator 6. System Status Indicator 7. Power Status Indicator 8. Reset 9. DC 12V Input USB 2.0 x4 Indications... -
Page 6: Initial Setup
Issues with Wi-Fi can be corrected by pressing the RESET button and releasing it after the light flashes. The Wi-Fi hotspot, password and the details for station mode will be reset after 5 seconds. Initial Setup This section describes the initial setup and connects to ASIAIR Mini. Connections Data Cable Connections Connect the main camera and memory stick to USB 2.0 port. - Page 7 ASIAIR Mini requires 12V@5A power supply. ASIAIR Mini power outlets can provide power to connected equipment such as the main camera cooling, EAF, EFW and dew heaters. Pay attention to cable management to avoid entanglement when the equatorial mount rotates.
- Page 8 Step 1: After electrify and wait for the ASIAIR to beep once. Step 2: Connect your mobile device to ASIAIR network using 12345678 as the password then open the ASIAIR app. Step 3: Start your journey into astrophotography! Mount Connection via Cables Connecting RS-232 Most equatorial mounts have a hand controller used to manage mount settings and control.
- Page 9 USB connection. The equatorial mount is connected to ASIAIR Mini by direct USB connection. To confirm whether your mount is supported by ASIAIR Mini or not, you may need to check the documents of the mount first. 3.EQMod with EQDir cable For the EQMOD system, use an EQDir cable and connect your mount with ASIAIR Mini.
- Page 10 SynScan WiFi module, StarFi Wi-Fi Adapter, SkyPortal Wi-Fi Module, StarGo Wi-Fi mode, PMC-8 Wi-Fi mode etc. For a detailed description of ASIAIR Mini connections, please refer to the relevant documents on the support page of ZWO official website. 2. Network Cable Connection This method is mainly aimed at Vixen's StarBook series control system, including StarBook, StarBook One, StarBook-S, StarBook Ten, etc.
- Page 11 DSLR cameras can only be used as the main camera, using Preview, Autorun, Live. Connect the DSLR camera to ASIAIR Mini through the camera data cable. Before connecting in the app, select the following camera settings before launching the app:...
- Page 12 Switch between main functions. Touch “preview” to switch between main function modes such as focus adjustment, polar axis calibration, multi-targets, live stacking, plan mode and video mode. ③ Bottom – Information Bar Displays current ASIAIR Mini working status information and camera information such as resolution, gain,...
- Page 13 temperature, cooling power, etc. ④ Left Side Show tools available in the current function mode, including Histogram, Guiding, Crosshair, Annotate etcs. Touch the icon to open/close the current tool. Base Configuration Network Settings This area contains most of the basic settings related to ASIAIR. Info Display:...
- Page 14 Network Settings:You can customize ASIAIR Mini wireless hotspot name and password, switch Wi-Fi hotspot band between 2.4Ghz and 5Ghz, configure Wi-Fi STA mode and Ethernet cable network. ‒ Device Operation: Switch Device After completing the setting for Station mode, you can switch between ‒...
- Page 15 the shutter release connection. To customize the file name, you can refer to "Customize File Name" option. The components that can be added in the file name includes camera model, gain, date and temperature. It is recommended to open the advanced settings, which includes Auto White Balance, Mono Bin and Continuous Preview.
- Page 16 Select the corresponding mount model and connection method here, and slide the switch to connect it. For the specific connection method of the mount, please refer to section 2 of "Mount Connection". If the information such as the geographic location and time is inaccurate. You can also synchronize the GPS information of the phone to the equatorial mount.
- Page 17 After connecting the focuser, you can change parameters such as fine and coarse steps, backlash settings and send the focuser to a specific position, or reverse the focuser In/Out commands. Please refer to ZWO EAF Manual for detailed operating instructions.
- Page 18 128GB to 512GB external drive, please ensure that the device has a power supply connected, ASIAIR Mini USB power supply is not capable of supporting reliable memory operations. About Selecting the Update Log will display the ASIAIR update log and terms of service.
- Page 19 Tap this button for the guider calibration data. The graph shows the movement of the star formed by the guide pulse sent by ASIAIR during calibration. The line represents the RA and Dec guide star rates calculated as a result of the calibration. They should generally be approximately vertical. After setting the EXP exposure time, touch this button to start refreshing the image captured by the guide camera in real time.
- Page 20 Mount Control Panel The ASIAIR app provides a range of features to you to move your mount via the mobile device, select a shooting target, complete a GoTo and target composition. We call it the "Mount Control Panel (MCP)". Meet the control panel from top to bottom: Target search box: Touch to enter the "celestial library"...
- Page 21 Show the sizes of stars you captured. Focus Control ‒ When the ZWO EAF focuser is connected you can press this button to enter the focus control it will overlay the main page or focus page until turned off again.
- Page 22 Quick Start Guide to Imaging The main aim of ASIAIR is to simplify the complicated process of astrophotography. To get you started quicker we have prepared the following Quick Start Guide to Imaging. First, let us understand the general shooting process in the deep space field (assum ing that the equipment has been setup), t his does not include post-processing techniques.
- Page 23 ③ With BIN1 selected, better focus is attained with a SMALLER HFD value. 2.Polar Alignment ① Ensure the main camera and mount are connected. ② In preview mode take a short test image to ensure the main camera is in focus and downloading correctly.
- Page 24 3.GoTo and Preview ① After the polar axis calibration is completed, switch to the Preview mode, touch the search box on the equatorial mount control panel (MCP) to enter the object library and select the shooting target with the current high altitude angle in the "Best Tonight" list. ②...
- Page 25 ‒ Live stacking is the automated onscreen stacking of multiple images in real-time this is can be a great feature to show faint objects to friends and family or at a star party . Step 1: Switch the app to Preview mode, select the target you want to shoot on the mount control panel, GoTo to the target, and shoot a short test image to adjust image composition.
- Page 26 Some of the best deep-sky images you see are will be post processed i.e. the saved images are processed on a PC using dedicated software. The longer the cumulative exposure time of the deep-sky target, the clearer the image. You will need to take multiple sets of images and integrate them on a PC if you wish to process images this way.
- Page 27 When the latest version of ASIAIR App is downloaded, the next time you connect to the ASIAIR Mini it will prompt you to update, click Confirm and wait for the update to complete.
- Page 28 For multiple service terms, please refer to the Service Agreement in the App. ZWO will not be held liable for the user’s failure to use the product in accordance with the User Manual. ZWO reserves the right to update, revise or terminate this document without prior notice.
- Page 29 These limits are designed to provide reasonable protection against harmful interference in a residential installation. This equipment generates uses and can radiate radio frequency energy and,if not installed and used in accordance with the instructions, mav cause harmful interference to radio communications. However, there is no guarantee that interference will not occur in a particular installation.
Need help?
Do you have a question about the ASIAIR Mini and is the answer not in the manual?
Questions and answers