Advertisement
INSTALLATION
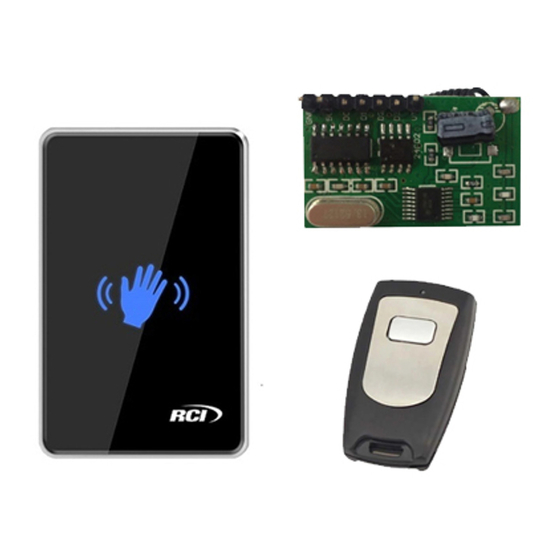
910TC-WRM, 910NTC-WRM & 910TC-WRB
REMOTE RECEIVERS AND REMOTE TRANSMITTER
The remote module allows wireless activation of the 910TC button for convenience or installations that
do not allow for wire access.
1. Remove power to the unit prior to installing the standard or
smaller mullion mount remote receivers shown below.
2. Insert the pins of the remote board into the header of the
standard or mullion button as indicated below. Ensure the
pins are aligned and fully engaged in the header.
3. Reapply power to the unit.
4. Once installed, the transmitter and receiver must be paired
to each other for proper operation.
IS910TC-WRM-WRB
© 2021 dormakaba Canada Inc
www.dormakaba.us • Phone: 1.800.265.6630 • Fax: 1.800.482.9795 • E-mail: sales_RCI@dormakaba.com
5. On the back of the remote board, locate the button and
LED as indicated below.
6. Press and hold the button on the board until the red LED
comes on, then release.
7. While the LED is lit, press the button on the transmitter, the
LED will blink indicating the code is being stored.
8. The red LED will go out to indicate that storing of the code
has been successful.
Up to 5 transmitters can be paired with one receiver by
following the above process.
NOTE: Should you need to reprogram or delete a transmitter,
all transmitters will be erased and need to be reprogrammed
individually.
To Erase All Units: press and hold the button on the
back of the board until the red LED comes on.
Continue to hold the button until the LED goes out.
Repeat steps 6-8 to reprogram
PCN2110
R12-21GR
Advertisement
Table of Contents

Related Manuals for Dormakaba RCI 910NTC-WRM


Summary of Contents for Dormakaba RCI 910NTC-WRM
- Page 1 LED comes on. Continue to hold the button until the LED goes out. Repeat steps 6-8 to reprogram © 2021 dormakaba Canada Inc PCN2110 IS910TC-WRM-WRB www.dormakaba.us • Phone: 1.800.265.6630 • Fax: 1.800.482.9795 • E-mail: sales_RCI@dormakaba.com R12-21GR...
- Page 2 The Lithium Battery Test Summary is posted on the 910TC touchless switch product page of the dormakaba.us website under Brochures & data sheets. FCC Regulatory Statements (For 910TC-WRM and 910TC-WRB) This device complies with Part 15 of the FCC Rules. Operation is subject to the following two conditions: (1) This device may not cause harmful interference, and (2) This device must accept any interference received, including interference that may cause undesired operation.
Need help?
Do you have a question about the RCI 910NTC-WRM and is the answer not in the manual?
Questions and answers