
Related Manuals for Huepar LR-5RG

Summary of Contents for Huepar LR-5RG
- Page 1 LINE LASER RECEIVER LR-5RG English 1~12 Deutsch 13~25 Français 26~38 Italiano 39~50 Español 51~62 Pусский 63~75 日本語 76~85 support@huepar.com...
-
Page 3: Table Of Contents
• Please turn on the Pulse Mode of the laser level when using with the receiver. The receiver can ONLY be used in Pulse Mode. • Huepar receiver can only be compatible with Huepar laser levels that feature PULSE MODE function. Please pay attention to whether the laser level can be used with the Huepar receiver when purchasing. -
Page 4: Safety
Safety General Safety Rules: • This product does not project laser. However, when working with laser tools, please follow the safety instructions for that particular laser instrument. Electronic Safety: • Batteries can explode or leak, cause injury or fire. To reduce this risk, please always follow all instructions and warnings on the battery label and package. -
Page 5: Product Overview
Product Overview LINE LASER RECEIVEER... - Page 6 Product Overview...
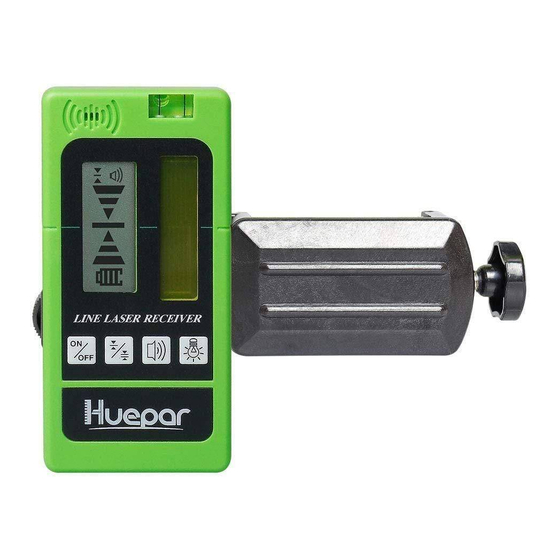
- Page 7 Product Overview 1. Speaker 2. Front Center Mark 3. Front LCD Display Screen a Accuracy indicator b Upper Indicator: move downward c Center Indicator d Lower Indicator: move upward e Power Indicator 4. Bubble Vial 5. Laser Reception Window 6. Power ON/OFF Button 7.
-
Page 8: Set Up
Set Up The laser receiver can be used directly by hand or be mounted to a measuring rod, pole, or similar object with the clamp. Attach the receiver to the clamp by matching with the alignment hole • (11) and tighten the tightening knob (16). Loosen the adjusting knob (17) and fix the clamp onto a measuring rod, •... -
Page 9: Operation
Operation ※Note: Please turn on the Pulse Mode of the laser level when using with the receiver. The receiver can ONLY be used in Pulse Mode. Power ON/OFF Power ON: Press to turn the receiver ON. • ※Note: When powered on, all the icons will be displayed on the LCD screen to ensure the LCD is functioning properly. - Page 10 At LOUD volume level, the audio signal indicator appears • At SOFT volume level, the audio signal indicator appears • When the audio signal is set to MUTE, the indicator goes out. • Detecting the Laser Beam ※Note: Position the receiver at least 17ft (5m) away from the laser level. With the receiver on, position the receiver to where the laser beam can •...
- Page 11 Marking Once the laser beam has been detected, mark the position shown at • the edge of the clamp. ※Note: When looking for the laser beam by using a measuring rod, slightly • loosen the adjusting knob (17) to move the receiver up or down more easily.
- Page 12 Specifications Weight 185g with battery Dimension 140mm (H) x 68mm (W) x 26mm (D) Laser Reception 13mm(W) x 52mm(H) Window Size Display Dual LCD display High: 2mm/0.08in Low: 3mm/0.12in Accuracy (May differ due to the working range and laser power) Working Range (R/G) Up to 50m/165ft 10K Hz...
-
Page 13: Warranty
Warranty The laser tool passed a rigorous and comprehensive product inspection. We are confident in the quality of our products and provide excellent guarantee for professional users of the products. We offer One Year Warranty from date of purchase including that: Proof of purchase is provided •... - Page 14 24 months if you register as a member through the product registration. Please scan the QR code to activate your priority. If you encounter any question or confusion about the product, please feel free to contact us: support@huepar.com -12-...
- Page 15 Vielen Dank dass Sie sich für den Huepar LR-5RG Laserdetektor entschieden haben. Bitte lesen Sie die Sicherheitshinweise und das Benutzerhandbuch sorgfältig durch, bevor Sie dieses Produkt verwenden. Hinweis: • Bitte schalten Sie den Impulsmodus der Laserebene ein, wenn Sie den Laserdetektor verwenden. Der Laserdetektor kann NUR im Impulsmodus verwendet werden.
- Page 16 Sicherheit Allgemeine Sicherheitsregeln: • Dieses Produkt projiziert keine Laserlinie. Wenn Sie jedoch mit Lasergeräten arbeiten, beachten Sie bitte die Sicherheitshinweise von dem betreffenden Lasergerät. Elektronische Sicherheit: • Batterien können explodieren oder auslaufen, was zu Verletzungen oder Feuer führen kann. Um dieses Risiko zu verringern, befolgen Sie bitte immer alle Anweisungen und Warnungen auf dem Batterieetikett und der Verpackung.
- Page 17 • Bitte vermeiden Sie heftige Schläge oder Erschütterungen und drücken Sie die Tasten nicht zu stark. • Es ist empfindlich gegenüber Leuchtstofflampe, Sonnenschein, Blitzlicht und alternativen elektrischen Wellensignalen, die die tatsächlichen Messungen beeinflussen und Fehler verursachen können. -15-...
- Page 18 Produktbeschreibung LINE LASER RECEIVEER -16-...
- Page 19 Produktbeschreibung -17-...
- Page 20 Produktbeschreibung 1. Lautsprecher 2. Mittellinie auf der Vorderseite 3. LCD-Bildschirm auf der Vorderseite a Genauigkeitsindikator b Obere Anzeige: Nach unten bewegen c Mittlere Anzeige d Untere Anzeige :Nach oben bewegen e Stromanzeige 4. Libelle 5. Laser-Empfangsfenster 6. EIN/AUS-Taste 7. Genauigkeitstaste (Fein/Mittel) 8.
- Page 21 Einrichtung Der Laserdetektor kann direkt von Hand verwendet oder mit dem Klemmhalter an einem Messstab, einer Stange oder einem ähnlichen Zielpunkt befestigt werden. Befestigen Sie den Laserdetektor an dem Klemmhalter, indem Sie ihn • an das Ausrichtungsbohrung (11) anpassen und den Befestigungsknopf (16) anziehen.
- Page 22 Inbetriebnahme ※Hinweis: Bitte schalten Sie den Impulsmodus der Laserebene ein, wenn Sie mit einem Laserdetektor arbeiten möchten. Der Laserdetektor kann NUR unter dem Impulsmodus verwendet werden. Ein-/Ausschalten Einschalten: drücken, um den Laserdetektor einzuschalten. • ※Hinweis: Nach dem Einschalten werden alle Symbole auf dem LCD- Bildschirm angezeigt, um sicherzustellen, dass der LCD richtig funktioniert.
- Page 23 Lautstärke des Lautsprechers • Beim Einschalten ist die Lautstärke auf LAUT voreingestellt, um die Lautstärke zu ändern oder das Audiosignal auszuschalten, drücken Sie Bei LAUT-Lautstärkenniveau erscheint diese Tonsignalanzeige • Bei LEISE-Lautstärkenniveau erscheint diese Tonsignalanzeige • Wenn das Audiosignal auf MUTE gesetzt ist, wird das Symbol nicht •...
- Page 24 Audiosignal zur Erkennung des Laserstrahls Wenn die Lautstärke des Lautsprechers eingeschaltet ist, hilft neben der Kontrollleuchte noch ein akustisches Signal bei der Lokalisierung des Laserdetektors. Ein Piepton signalisiert, dass der Laserstrahl erkannt wurde. • Ein schneller Piepton signalisiert, dass der Laserdetektor nach unten •...
- Page 25 Spezifikationen Gewicht 185g mit Batterie Abmessung 140mm (H) x 68mm (B) x 26mm (T) Laserempfangsfenstergröße 13mm(B) x 52mm(H) Dual LCD display Anzeige Doppeltes LCD-Display Hoch: 2mm/0,08 Zoll Niedrig: 3mm/0,12 Zoll Genauigkeit (Kann aufgrund des Arbeitsbereichs und der Laserleistung abweichen) Arbeitsbereich (R/G) Bis zu 50m/165 Fuß...
- Page 26 Garantie Das Laserwerkzeug hat eine strenge und umfassende Produktkontrolle bestanden. Qualität unserer Produkte ist so zuverlässig, dass wir auf alle Produkte eine ausgezeichnete Garantie für professionelle Anwender bieten. Wir bieten 1 (ein) Jahre Garantie auf unsere Produkte ab dem Zeitpunkt des Kaufens unter den folgenden Bedingungen: Kaufbeleg wird vorgelegt •...
- Page 27 24 Monate längere Garantie genießen, wenn Sie sich durch die Produktregistrierung als Mitglied registrieren. Bitte scannen Sie den QR-Code ein, um Ihre Priorität zu genießen. Sollten Sie Fragen oder Unklarheiten bezüglich des Produkts haben, können Sie sich gerne an uns wenden: support@huepar.com -25-...
- Page 28 • Le détecteur Huepar ne peut être compatible qu'avec les niveaux laser Huepar dotés de la fonction PULSE MODE. Veuillez faire attention à savoir si le niveau laser peut être utilisé avec le détecteur Huepar lors de l'achat. Si vous avez des questions,veuillez nous contacter par support@huepar.com.
-
Page 29: Sécurité
Sécurité Règles générales de sécurité: • Ce produit ne lance pas de laser. Cependant, lorsque vous travaillez avec des outils laser, veuillez suivre les instructions de sécurité pour cet instrument laser spécial. Sécurité électronique: • Les batteries peuvent exploser ou fuir, qui peut provoquer des blessures ou des incendies. - Page 30 • Il est sensible à la lumière fluorescente, au soleil, à la lumière flash et aux signaux d'ondes électriques alternatifs, qui peuvent affecter les mesures réelles et provoquer des erreurs. -28-...
-
Page 31: Présentation Du Produit
Présentation du produit LINE LASER RECEIVEER -29-... - Page 32 Présentation du produit -30-...
- Page 33 Présentation du produit 1. Haut-parleur 2. Marque centrale avant 3. Écran d'affichage LCD avant a Indicateur de précision b Indicateur supérieur: descendre c Indicateur central d Indicateur inférieur: monter e Voyant d'alimentation 4. Flacon à bulles 5. Fenêtre de réception laser 6.
-
Page 34: Installation
Installation Le détecteur laser peut être utilisé directement à la main ou être installé sur une tige de mesure, un poteau ou un objet similaire avec la pince. Fixez le détecteur à la pince en faisant correspondre le trou • d'alignement (11) et serrez le bouton de serrage (16). - Page 35 Opération ※Remarque: veuillez activer le mode d'impulsion du niveau laser lors de l'utilisation du récepteur. Le détecteur peut être utilisé UNIQUEMENT en mode impulsion. Marche / Arrêt Marche : Appuyez pour allumer le détecteur. • ※Remarque: Une fois allumé, toutes les icônes seront affichées sur l'écran LCD pour garantir que l'écran LCD fonctionne correctement.
- Page 36 Volume du haut-parleur • Une fois allumé, le réglage de volume de défaut est LOUD. Pour modifier le niveau du volume ou éteindre le signal audio, appuyez Au niveau de volume LOUD, l'indicateur de signal audio apparaît • Au niveau de volume SOFT, l'indicateur de signal audio apparaît •...
- Page 37 Signal audio pour l'indication du faisceau lasérique En plus de la lampe de témoin, si le volume du haut-parleur est activé, un son audible aide à localiser le détecteur. Un bip retentit pour indiquer que le faisceau lasérique a été détecté. •...
-
Page 38: Fonctionnement
Spécifications Poids 185g avec batterie Dimension 140mm (H) x 68mm (W) x 26mm (D) Taille de la fenêtre de 13mm(W) x 52mm(H) réception laser Afficheur Affichage LCD double Haut: ≤2 mm / 0,08 pouces Faible: ≤3 mm / 0,12 pouces Précision (Peut différer en raison de la plage de travail et de la puissance du laser) -
Page 39: Garantie
Garantie L'outil laser a passé une inspection rigoureuse et complète. Nous sommes confiants en la qualité de nos produits et offrons une excellente garantie aux utilisateurs professionnels des produits. Nous offrons une garantie d'un an à compter de la date d'achat, notamment: Une preuve d'achat •... - Page 40 être prorogé jusqu'à 24 mois si vous vous inscrivez en tant que membre via l'enregistrement du produit. Veuillez scanner le code QR pour activer votre priorité. Si vous rencontrez des questions ou des confusions sur le produit, n'hésitez pas à nous contacter: support@huepar.com -38-...
- Page 41 è utilizzata con il rilevatore. Il rilevatore può essere utilizzato SOLO nella Modalità di Impulso. • Il Huepar rilevatore può essere compatibile solo con le Huepar livelle laser che dispongono della funzione Modalità di Impulso. Si prega di prestare attenzione a se la livella laser può...
- Page 42 Sicurezza Regole Generali di Sicurezza: • Questo prodotto non proietta il laser. Tuttavia, quando è utilizzato con strumenti laser, si prega di seguire le istruzioni di sicurezza per quello strumento laser particolare. Sicurezza Elettronica: • Le batterie potrebbero esplodere o perdere liquido, provocando lesione o incendio.
- Page 43 Descrizione di Prodotto LINE LASER RECEIVEER -41-...
- Page 44 Descrizione di Prodotto -42-...
- Page 45 Descrizione di Prodotto 1. Altoparlante 2. Segno Centrale Anteriore 3. Schermata LCD Anteriore a Indicatore di Precisione b Indicatore Superiore: spostare verso il basso c Indicatore Centrale d Indicatore Inferiore: spostare verso l'alto e Indicatore di Energia 4. Fiala a Bolla 5.
- Page 46 Come Installare Il rilevatore laser può essere utilizzato direttamente a mano o essere montato su un'asta, un palo o un oggetto simile di misurazione con il morsetto. Collegare il rilevatore al morsetto facendo corrispondere con il foro di • allineamento (11), e stringere il pomello (16). Allentare il pomello da regolare (17) e fissare il morsetto su un'asta, •...
- Page 47 Operazione ※Nota: Si prega di attivare la Modalità di Impulso della livella laser quando è utilizzata con il rilevatore. Il rilevatore può essere utilizzato SOLO nella Modalità di Impulso. Accendere / Spegnere Accendere: Premere per accendere il rilevatore. • ※Nota: Quando il rilevatore è acceso, tutte le icone saranno visualizzate sulla schermata LCD per garantire il corretto funzionamento dell'LCD.
- Page 48 Volume dell'Altoparlante • Quando il rilevatore è acceso, l'impostazione del volume predefinita è ALTO. Per cambiare il livello del volume o spegnere il segnale audio, premere Al livello del volume ALTO, l'indicatore del segnale audio appare • Al livello del volume BASSO, l'indicatore del segnale audio appare •...
- Page 49 Segnale Audio per l'Indicazione del Raggio Laser Oltre all'indicatore luminoso, se il volume dell'altoparlante è attivo, un suono udibile aiuta a localizzare il rilevatore. Un suono di bip per indicare che il raggio laser è stato rilevato. • Un bip rapido per indicare che il rilevatore deve essere spostato verso •...
- Page 50 Specifiche Peso 185g con batteria Dimensioni 140mm (H) x 68mm (W) x 26mm (D) Dimensioni della Finestra di 13mm (W) x 52mm (H) Ricezione Laser Schermata Doppie schermate LCD Alta: 2 mm/0,08 pollice Normale: 3 mm/0,12 pollice Precisione (Potrebbe differire a causa del limite di funzione e della potenza del laser) Limite di Funzione (R/G) Fino a 50 m/165 piedi...
- Page 51 Garanzia Questo strumento laser ha superato un'ispezione di prodotto rigorosa e completa. Siamo fiduciosi della qualità dei nostri prodotti e offriamo una garanzia eccezionale per gli utenti professionali dei prodotti. Offriamo una Garanzia di Un Anno dalla data di acquisto a condizione che: La prova di acquisto sia offerta.
- Page 52 fino a 24 mesi se ti registri come membro attraverso la registrazione del prodotto. Si prega di scansionare questo codice QR per attivare la priorità. In caso di qualsiasi domanda o confusione sul prodotto, non esitare a contattarci: support@huepar.com -50-...
- Page 53 El receptor SOLO se puede usar en modo de pulso. • El receptor Huepar solo puede ser compatible con los niveles de láser Huepar que cuentan con la función de Modo de Pulso. Por favor, preste atención a si el nivel láser se puede usar con el receptor Huepar al comprar.
-
Page 54: Seguridad
Seguridad Reglas Generales de Seguridad: • Este producto no proyecta láser. Sin embargo, cuando trabaje con herramientas láser, siga las instrucciones de seguridad para ese instrumento láser en particular. Seguridad Electrónica: • Las baterías pueden explotar o tener fugas, causar lesiones o incendios. -
Page 55: Descripción Del Producto
Descripción del Producto LINE LASER RECEIVEER -53-... - Page 56 Descripción del Producto -54-...
- Page 57 Descripción del Producto 1. Altavoz 2. Marca Central Delantera 3. Pantalla LCD Frontal a Indicador de Precisión b Indicador Superior: moverse hacia abajo c Indicador Central d Indicador Inferior: moverse hacia arriba e Indicador de Encendido 4. Vial de Burbuja 5.
-
Page 58: Configuración
Configuración El receptor láser se puede usar directamente a mano o se puede montar en una vara de medir, poste u objeto similar con la abrazadera. Fije el receptor a la abrazadera haciendo coincidir el orificio de • alineación (11) y apriete la perilla de ajuste (16). Afloje la perilla de ajuste (17) y fije la abrazadera en una varilla de •... -
Page 59: Operación
Operación ※Nota: Active el Modo de Pulso del nivel láser cuando lo use con el receptor. El receptor SOLO se puede usar en modo de pulso. ENCENDIDO / APAGADO ENCENDIDO: Presione para ENCENDER el receptor. • ※Nota: Cuando se enciende, todos los iconos se mostrarán en la pantalla LCD para garantizar que la pantalla LCD funcione correctamente. - Page 60 Volumen del Altavoz • Cuando está ENCENDIDO, el ajuste de volumen predeterminado es ALTO, para cambiar el nivel de volumen o apagar la señal de audio, presione En el nivel de volumen ALTO, el indicador de señal de audio aparece •...
- Page 61 Señal de audio para indicación del rayo láser Además de la luz indicadora, si el volumen del altavoz está ENCENDIDO, un sonido audible ayuda a localizar el receptor. Suena un pitido para indicar que se ha detectado el rayo láser. •...
- Page 62 Especificaciones Peso 185g con batería Dimensión 140mm x 68mm x 26mm Tamaño de Ventana de 13mm x 52mm Recepción Láser Pantalla Doble pantalla LCD Alto: ≤2mm / 0,08 pulgadas Bajo: ≤3mm / 0,12 pulgadas Exactitud (Puede diferir debido al rango de trabajo y la potencia del láser) Rango de Trabajo(Rayo Láser Hasta 50 m / 165 pies...
-
Page 63: Garantía
Garantía La herramienta láser pasó una inspección rigurosa e integral del producto. Confiamos en la calidad de nuestros productos y ofrecemos una excelente garantía para los usuarios profesionales de los productos. Ofrecemos garantía de un año a partir de la fecha de compra, que incluye: Se proporciona comprobante de compra •... - Page 64 24 meses si se registra como miembro a través del registro del producto. Escanee el código QR para activar su prioridad. Si tiene alguna pregunta o confusión sobre el producto, no dude en contactarnos: support@huepar.com -62-...
- Page 65 • Пожалуйста включите режим работы с приемником (Pulse Mode/Импульсный режим) на Вашем лазерном уровне. Приемник будет работать ТОЛЬКО в таком режиме. • Приемник Huepar может быть использован только с лазерными уровнями Huepar, которые поддерживают функцию «Работа с приемником» (PULSE MODE). Перед покупкой лазерного уровня, убедитесь...
- Page 66 Безопасность Основные правила по технике безопасности: • Данный продукт не является излучающим лазерным устройством. Однако, работая с лазерными приборами, пожалуйста, следуйте инструкциям безопасности от используемого Вами инструмента. Электробезопасность: • Батарейки могут взрываться, течь, причинять травмы и возгораться. Чтобы уменьшить эти риски, всегда следуйте указаниям...
- Page 67 • Прибор чувствителен к флуоресцентному свету, солнечному свету, вспышке и альтернативному электрическому сигналу, который может повлиять на фактические измерения и вызвать ошибки. -65-...
- Page 68 Обзор продукции LINE LASER RECEIVEER -66-...
- Page 69 Обзор продукции -67-...
- Page 70 Обзор продукции 1. динамик 2. передняя центровая метка 3. передний LCD дисплей a индикатор точности b верхний индикатор, перемещайте вниз c центровой индикатор d Нижний индикатор : перемещайте вверх e индикатор питания 4. пузырьковый уровень 5. окно сенсора приёмника 6. кнопка включения/выключения 7.
- Page 71 Установка Лазерный приёмник может быть использован без дополнительных аксессуаров или будучи установленным на измерительную линейку, штангу и подобные предметы. Присоедините приёмник на крепление (15) совмещая точку • центровки (11) и затяните ручку крепления (16) Разведите зажимной механизм (17) и прикрепите держатель на •...
- Page 72 Операция ※Внимание: Пожалуйста включите режим работы с приемником (Pulse Mode/Импульсный режим) на Вашем лазерном инвелиром. Приемник будет работать ТОЛЬКО в таком режиме. Включение/выключение приемника Включение: нажмите кнопку Включение : нажмите кнопку • ※Примечание: при включении устройства, на дисплее отобразятся все иконки, таким образом можно убедиться в работоспособности дисплея.
- Page 73 Если измеряемая точка находится на далеком расстоянии, так же • необходимо использовать среднюю настройку, так как тепловые волны и слабые вибрации могут влиять на стабильность луча. Громкость динамика • При включении приемника, стандартное значение громкости динамика установлено на «Громкий», для изменения уровня громкости, а...
- Page 74 Если загорается нижний индикатор, перемещайте приемник вверх, • пока не достигните центровой отметки. Нижний индикатор символизирует, что луч находится ниже центровой отметки. Загорание среднего индикатора свидетельствует о том, что луч • совпадает с линией центровой отметки. Звуковая сигнализация опознавания луча В...
- Page 75 Характеристики Вес 185гр. с батарейками Размеры 140mm (H) x 68mm (W) x 26mm (D) Размер окна приемного 13mm(W) x 52mm(H) сенсора Дисплей Двойной ЖКИ дисплей Высокая: 2mm/0.08дюйма Низкая: 3mm/0.12дюйма Точность (Может отличаться из-за рабочей дистанции и мощности лазера) Рабочая дистанция (К/З) До...
- Page 76 Гарантия Данный инструмент прошел строгую и всестороннюю проверку. Мы уверены в качестве нашей продукции и предоставляем отличную гарантию для профессиональных пользователей продукции. Мы предлагаем один год гарантии с момента покупки, если: Имеется документ покупки • Обслуживание/ремонт не производились не квалифицированным •...
- Page 77 Вам предлагается 12-месячная гарантия, которая может быть увеличена до 24 месяцев, если вы зарегистрируетесь в качестве клиента через форму регистрации продукта. Пожалуйста, отсканируйте QR-код, чтобы активировать продленную гарантию. Если у вас возникнут какие-либо вопросы или сомнения относительно продукта, пожалуйста, свяжитесь с нами: support@huepar.com -75-...
- Page 78 各部の名称 使用前のご注意 ①本機はHueparレーザー墨出し器専用の受光器です。 他社の物には対応できないので、ご注意ください。 ②モデル9011G、9211Gのレーザー墨出し器は受光器 が対応できないので、ご注意ください。 ③受光器と合わせて使用する前は、墨出し器のパルスモード (受光器モード)を起動してください。 パルスモードを起動しないと、受光器は反応できないです。 ※墨出し器のパルスモードの起動方法は 当該取扱説明書をご参照ください。 -76-...
- Page 79 -77-...
- Page 80 LINE LASER RECEIVEER -78-...
- Page 81 -79-...
- Page 82 -80-...
- Page 83 -81-...
- Page 84 -82-...
- Page 85 Clamp LINE LASER RECEIVEER -83-...
- Page 86 -84-...
- Page 87 -85-...
- Page 88 Changzhou Levelsure Optoelectronics Technology Co.,Ltd. www.huepar.com E-mail:support@huepar.com Facebook:@Huepartools Made in China...
Need help?
Do you have a question about the LR-5RG and is the answer not in the manual?
Questions and answers