Table of Contents
Advertisement
Quick Links
Recording Animation
Recording Animation
The PicoBoo JR can record up to 4 minutes of animation.
REC
1
2
REC
TAP RECORD TO
START RECORDING
ANIMATE THE RELAYS
USING THE 1 & 2 BUTTONS
Previewing your Scare
REC
1
2
REC
TAP 2 TO START
THE REC LIGHT WILL BLINK
PLAYING THE SCARE
AS YOUR SCARE PLAYS
Write-Protecting Your Audio and Animation
The write-protect setting can be toggled on or off by powering up the PicoBoo while holding the 2 button. When
the red light flashes a few times the write-protect has been toggled.
Leaving an Output On when Animation Completes
Escape Rooms often need an output to stay on after the animation finishes playing. To do this, hold the output's
button as you are tapping REC to stop recording. The output(s) will stay on indefinitely. To turn them off tap the
1 button, or re-trigger the controller to restart the scene.
Troubleshooting
Factory Reset
If at any point you want to start from scratch, power up while holding the REC button for 10 seconds to factory reset.
The yellow IN light is flashing or throbbing and the PicoBoo won't trigger.
The PicoBoo is currently ignoring the trigger. It does this at startup to allow a PIR motion sensor to warm up, or
anytime a triggered scene is cancelled by pressing the 2 button. It will resume normal operation shortly.
The REC button is not responding. Can't record animation.
• The PicoBoo may be write-protected. See Write-Protecting Your Audio and Animation above.
Don't see your problem here? Check our website for more information.
1
2
REC
1
2
TAP RECORD TO
STOP RECORDING
1
2
REC
1
2
TAP 2 TO CANCEL
PLAYBACK
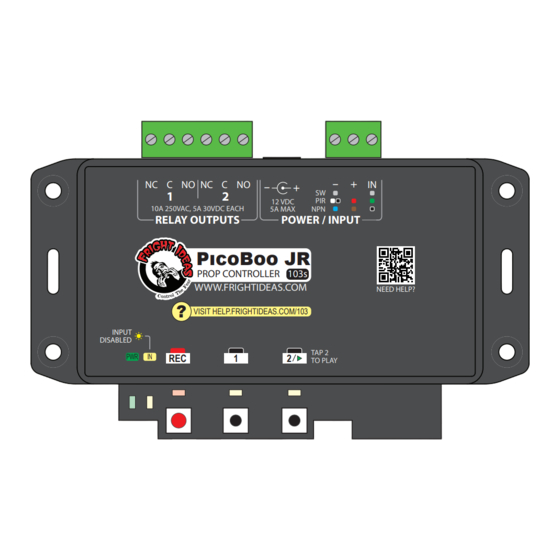
Quick-Start Guide
PicoBoo JR
NEED HELP?
There are videos available online at
help.frightideas.com/103
Power Supply
POWER CAN BE SUPPLIED USING
THE BARREL CONNECTOR OR THE TRIGGER
TERMINAL BLOCK.
-
+
NC
C
NO
NC
C
NO
-
+
1
2
SW
12 VDC
PIR
10A 250VAC, 5A 30VDC EACH
5A MAX
NPN
RELAY OUTPUTS
POWER / INPUT
NC
C
NO
NC
C
NO
-
+
IN
-
+
1
2
SW
12 VDC
PIR
10A 250VAC, 5A 30VDC EACH
5A MAX
NPN
RELAY OUTPUTS
POWER / INPUT
PICOBOO JR
PROP CONTROLLER
103s
WWW.FRIGHTIDEAS.COM
NEED HELP?
?
VISIT HELP.FRIGHTIDEAS.COM/103
INPUT
DISABLED
TAP 2
PWR
IN
REC
1
2
TO PLAY
Sizing your Power Supply
Your PicoBoo's power supply must be 12 volts
DC. The wattage you'll need will vary if you're
trying to power other devices from the same
supply.
Add up the wattage of all the devices that will
be used at the same time and make sure your
power supply's wattage is equal to or higher
than that number. Use 2 watts for the PicoBoo.
Example:
2 watts
PicoBoo
IN
+ 6 watts
1 x 12VDC 6 watt solenoids
= 8 watts
Total - Need at least 8 watts
Advertisement
Table of Contents

Related Manuals for Fright Ideas PicoBoo JR


Summary of Contents for Fright Ideas PicoBoo JR
- Page 1 Recording Animation Recording Animation The PicoBoo JR can record up to 4 minutes of animation. 12 VDC 10A 250VAC, 5A 30VDC EACH 5A MAX RELAY OUTPUTS POWER / INPUT PICOBOO JR PROP CONTROLLER 103s WWW.FRIGHTIDEAS.COM NEED HELP? VISIT HELP.FRIGHTIDEAS.COM/103 TAP RECORD TO...
- Page 2 Relay Output Wiring Trigger Input Wiring By default, the animation will play once Toggling Single Shot Mode • Each output can handle up to 10 amps at 120VAC, 5 amps at 220VAC, or 5 amps at 30 VDC. when the trigger is activated. If the trigger is 1.
Need help?
Do you have a question about the PicoBoo JR and is the answer not in the manual?
Questions and answers