
Related Manuals for Fright Ideas EscapeKeeper


Summary of Contents for Fright Ideas EscapeKeeper
- Page 1 EscapeKeeper & EscapeKeeper JR OPERATING MANUAL 877-815-5744 or 905-803-9274 www.frightideas.com...
-
Page 2: Table Of Contents
Contents Getting Familiar with your EscapeKeeper ........................4 Connections and Controls ..............................4 Your Current Firmware Version ............................5 Upgrading your Firmware ..............................5 Watch some Videos ................................5 Power Supply Requirements............................. 6 Inputs ..................................7 Puzzle Inputs ..................................7 Reset Input ..................................8 Puzzle Bypass .................................. - Page 3 Erasing a Scene’s Animation ............................25 How Much Animation can be Stored ..........................25 Which Scenes Currently Contain Output Animation ...................... 25 Adding Sounds (EscapeKeeper Only) ......................... 26 Sounds and the EscapeKeeper ............................26 Creating your Sound Folders ............................26 Sound Folder List ................................
-
Page 4: Getting Familiar With Your Escapekeeper
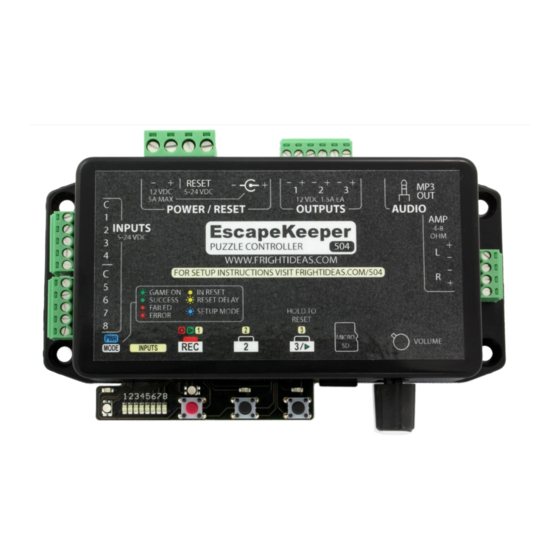
Getting Familiar with your EscapeKeeper Connections and Controls CONNECTIONS AND CONTROLS Power 12 VDC Input / Output. Internally connected to 2.1mm Power Connector Reset Input 5-24 VDC Input can be used to disable or reset the puzzle Power Connector Power connector for standard 2.1mm center-positive power supply... -
Page 5: Your Current Firmware Version
503EFRM.BIN and 504EFRM.BIN. Copy both files into the EK folder on your SD card. If there is no EK folder, you can create one or insert your SD card into the EscapeKeeper for 15 seconds and it will create it for you. If you are asked to replace existing files select “Yes”. -
Page 6: Power Supply Requirements
To calculate how large your power supply needs to be you must add up the wattage of the EscapeKeeper, any outputs, powered sensors, and other devices that may be borrowing power from the same supply. -
Page 7: Inputs
The EscapeKeeper has eight puzzle inputs that can be connected to pushbuttons, sensors, switches, or other controllers. Anything that can output 5 to 24 VDC or complete an electrical circuit can be used as a puzzle input. The EscapeKeeper will monitor these inputs when it’s in game mode to decide if the players have solved the puzzle. How it does that depends on the current puzzle mode and your recorded solution. -
Page 8: Reset Input
The reset input can be connected an external reset button or switch. This would usually be located in a staff area and used to reset the EscapeKeeper to prepare it for the next group. The “3” button on the EscapeKeeper can also be used to reset the EscapeKeeper and restart the puzzle if that’s preferred. -
Page 9: Outputs
EscapeKeeper to detect if the lock circuit has been interrupted due to an E-Stop button being pressed. When this condition is detected the EscapeKeeper can be set to turn off Output 1 and go into an alarm state. This notifies the staff and prevents the door from being locked again if the E-Stop button is released. -
Page 10: Output Wiring Diagrams
Output Wiring Diagrams www.frightideas.com EscapeKeeper Manual... -
Page 11: Linking To Another Escapekeeper
We recommend waiting to link the EscapeKeepers together until all the programming is done. Otherwise the additional EscapeKeepers will be held in reset as you try to program them. NOTE: The Output 1 Mode of any EscapeKeeper holding another unit in reset must be set to Link Mode. www.frightideas.com EscapeKeeper Manual... -
Page 12: Audio Outputs
1A supply. See Power Supply Requirements for more information on selecting the correct power supply for your application. www.frightideas.com EscapeKeeper Manual... -
Page 13: Puzzle Modes In Depth
Sounds With the EscapeKeeper model, each input can play a different sound. You can also play sounds at any point in the sequence. For example, you can play a sound representing a correct press, and nothing for a bad press, or vice-versa, forcing them to piece the code together by process of elimination. -
Page 14: Number Of Inputs
Sounds In addition to the usual input sounds, the EscapeKeeper can play sounds as they activate additional inputs. For example, each time they find another object, or only when they find a specific number of objects. See the PROGRESS folder for more information on using progress sounds. -
Page 15: Selecting Your Puzzle Mode And Setup Options
INITIAL SETUP STEPS Mode LED Setting Description and Options Puzzle Mode The puzzle mode defines how the EscapeKeeper monitors the puzzle inputs and when it declares the puzzle has been solved. See Puzzle Modes in Depth for more information. Input Sequence Players must activate the inputs in a specific sequence to solve the puzzle. - Page 16 Use this mode if you want a maglock to release on success. An E-Stop button can be used but the EscapeKeeper will not stop the game if it’s pressed. The lock will be unlocked if the Game Timer expires or they’ve run out of attempts.
- Page 17 Note that if you enabled the Auto-Reset timer the unit may immediately enter game mode, which is also a green blinking light but at a different rate. If your selected puzzle mode isn’t listed below that’s what happened. Jump to Puzzle Specific Options for … Input Sequence & Morse Code Input State Match www.frightideas.com EscapeKeeper Manual...
-
Page 18: Puzzle Specific Options - Input Sequence & Morse Code
Some of the options below allow you to specify when the EscapeKeeper should declare a Miss has occurred. In On/Off options you’ll see one of the lights flash quickly, this is the cursor position. - Page 19 Pulse Output 2 for each Keypress With this enabled output 2 will pulse to indicate the EscapeKeeper registered a keypress. It would usually be connected to a light of some kind to give players visual feedback their press was registered.
-
Page 20: Puzzle Specific Options - Input State Match
Power up holding both the black 2 & 3 buttons. Let go when the REC LED starts flashing red. If you have been using a Micro SD card with your EscapeKeeper make sure it’s inserted when you do this, otherwise the settings from the card will be loaded next time the card is inserted. -
Page 21: Advanced Options
Use this to limit the maximum number of incorrect guesses (Misses) the players can make at the solution. If they hit the limit the EscapeKeeper will immediately go into a failed state and remain there until it’s reset by auto-reset, the reset input, or Button 3. - Page 22 In puzzle modes other than Input State Match you usually want the game to start with all the inputs off. If you have a sensor or switch that keeps the EscapeKeeper’s input on by default you can tell the EscapeKeeper to invert that input by setting it to Normally-Closed.
-
Page 23: Recording The Solution
Recording the Solution If you selected the Input Sequence or Morse Code puzzle mode, you need to teach the EscapeKeeper the solution to the puzzle. If you selected Input State Match you’ll need to teach it the winning input state. Other modes not mentioned do not require a solution be recorded. -
Page 24: Recording Output Animation
4. Tap button 3 if you’d like to preview the scene you just recorded. 5. If you’d like to record again start back at step 1. 6. When you’re ready to exit record mode and start the puzzle hold button 3 for a few seconds. www.frightideas.com EscapeKeeper Manual... -
Page 25: Erasing A Scene's Animation
During the boot sequence the mode LED will change color a few times. It starts green, then turns yellow to show the version number, then if there are animation scenes it will turn red and show which scenes currently have animation on the input LEDs. www.frightideas.com EscapeKeeper Manual... -
Page 26: Adding Sounds (Escapekeeper Only)
You can have sounds play for pretty much every situation. When an input turns on or off, when the puzzle is solved, when the time runs out, etc. The EscapeKeeper will create a list of possible sound folders on the Micro SD card the first time it’s inserted. - Page 27 Do not use a 00 file for time expired, use the FAILED folder. For example: 15.MP3 plays at 15 minutes remaining. 05.MP3 plays at 5 minutes remaining. www.frightideas.com EscapeKeeper Manual...
-
Page 28: Operation
Operation Boot Sequence As the EscapeKeeper boots up it displays some useful information on the Mode and Input LEDs. BOOT SEQUENCE Mode LED Boot Sequence Step Step 1 - Firmware Check The Mode LED will turn green for a few seconds as it validates the installed firmware. -
Page 29: Operating States
1. Idle In Idle mode the EscapeKeeper will wait for the game to be started. This can be done by tapping button 3 or by pulsing the Reset input. If the EscapeKeeper sees one of the inputs isn’t ready for the game to start it will beep, blink the mode LED red and indicate which input is the problem. -
Page 30: Trouble Shooting
A current higher than 2.5 amps was detected. Firmware Update Required The EscapeKeeper is trying to interpret a saved file that was saved by a future version of the firmware. You need to update the firmware on this unit. Internal Memory Error There was an error syncing an SD card file with internal memory.
Need help?
Do you have a question about the EscapeKeeper and is the answer not in the manual?
Questions and answers