Table of Contents
Advertisement
Quick Links
USER GUIDE FOR MTR-X SET
Thanks for purchasing this genuine TSO Product. Should
you have any product questions or issues, please contact us
toll-free at 800-727-0311 (U.S.), 239-236-5526 (international),
email us at info@tsoproducts.com, or visit
com/support.
Assembling Your MTR-X Set
In addition to using the triangle standalone, the MTR-X can
be confi gured in the following ways:
• Triangle with shoulder, formed by hand-screwing the
Edge Index Pins into the face of the triangle to create a
projected edge.
• Triangle with clamping angles, assembled by attach-
ing the two Angles to the face of the triangle with the
included M6x12 screws.
• Triangle as variable angle guide rail square, when used
with the included Guide Rail Connector.
• Triangle with protractor, assembled by following the
steps below.
• Place both Triangle Dogs on a fl at work surface with
chamfer lip facing up. A foolproof way to ensure the
dogs are always oriented correctly is to place them
with the "double groove" detail facing upward.
• Place Triangle Body
on top of the Triangle
Dogs.
• Place the Pointer on
top of the Triangle
Body, fi tting over both
Triangle Dogs.
• Place the M8 Washers
on top of the Pointer,
and then screw the red
M8 Knobs hand tight.
Publication 696-082 RevA
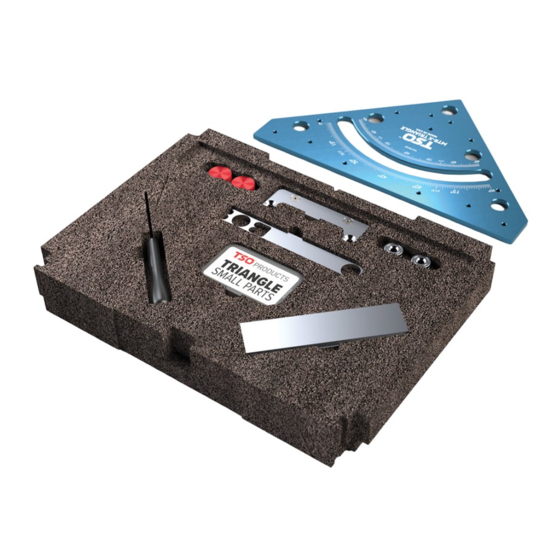
What's Included with Your MTR-X Set
www.tsoproducts.
Questions, Comments or Ideas?
We thrive on your feedback, so please let us know if you
have any comments, concerns, feedback, or ideas on how
we can continuously improve our products.
Weʼre easy to reach! In the United States, call us toll-
free at 800-727-0311. For our international customers,
call us at 239-236-5526. To send us a message, visit us at
www.tsoproducts.com
and weʼll get back to you as soon as possible.
©2022 TSO Products LLC
Qty
Item & Description
MTR-X Triangle Body
1
Precision system triangle body, anodized
Guide Rail Connector Assembly
1
Enables attachment of the triangle to a
compatible guide rail
M6 Edge Index Pins
4
Two 12mm long for forming a shoulder;
two 25mm long for squaring MFT/3
Socket Head Cap Screw, M6x1.0-10
4
Used to attach clamping angles to trian-
gle face
M8 Knobs
2
Secures protractor assembly to the face
of the triangle
M8 Washers
2
Place between M8 knobs and pointer
when attaching protractor assembly
Pointer
1
Aluminum pointer with non-parallax
viewport for precision angle fi nding
Triangle Dogs
2
Use these dogs to secure the triangle and
pointer assembly to MFT-style worktop
Clamping Angles (6")
2
Secure to triangle face to transform
triangle into clamping angle
Hex Driver
1
Use this 3mm hex driver to secure guide
rail connector to your guide rail
Storage Tin
1
A handy cubby for all of the small com-
ponents included in the MTR-X Set
Systainer Foam Insert
1
Custom CNC-cut Kaizen foam insert to
store the triangle and all accessories
Systainer ID Card
1
Fits in the ID card pocket located on
systainer exterior
or email info@tsoproducts.com,
Page 1 of 2
Advertisement
Table of Contents

Related Manuals for TSO Products MTR-X SET

Summary of Contents for TSO Products MTR-X SET
- Page 1 USER GUIDE FOR MTR-X SET What’s Included with Your MTR-X Set Item & Description MTR-X Triangle Body Precision system triangle body, anodized Guide Rail Connector Assembly Enables attachment of the triangle to a compatible guide rail M6 Edge Index Pins Two 12mm long for forming a shoulder;...
- Page 2 USER GUIDE FOR MTR-X SET Square MFT/3 Guide Rail to Fence More Applications for Your MTR-X Set Not sure if your MFT/3 guide See below for common applications of the MTR-X Preci- sion Multifunction Triangle. Got an application we havenʼt rail is positioned at a perfect listed here? Weʼd love to hear about it!
Need help?
Do you have a question about the MTR-X SET and is the answer not in the manual?
Questions and answers