Table of Contents
Advertisement
Quick Links
Contents
1. Introduction..................................................2
2. Getting Started............................................. 3
2.1 Parts List............................................ 3
3. Overview......................................................3
3.1 Features..............................................4
4. Setup Guide..................................................7
4.1 Install batteries...................................7
5. Wi-Fi Configure with gateway.................... 9
5.1 Pair with Gateway..............................9
6. View Online Data on WS View................. 11
7. Custom mode............................................. 14
8. Specification.............................................. 24
9. Warranty Information.................................25
Soil Moisture Sensor
Model: WN51E
1
Advertisement
Table of Contents

Related Manuals for ECOWITT WN51E


Summary of Contents for ECOWITT WN51E
-
Page 1: Table Of Contents
Soil Moisture Sensor Model: WN51E Contents 1. Introduction..........2 2. Getting Started..........3 2.1 Parts List..........3 3. Overview............3 3.1 Features..........4 4. Setup Guide..........7 4.1 Install batteries........7 5. Wi-Fi Configure with gateway....9 5.1 Pair with Gateway......9 5.2 Wi-Fi Connection for the Gateway..11 6. -
Page 2: Introduction
1. Introduction Thanks for purchasing this WN51E soil moisture sensor. This device measures soil moisture. The data can be streamed by GW1000 Wi-Fi Gateway (sold separately) and can be viewed on our WS View mobile application after the Wi-Fi configuration done. -
Page 3: Getting Started
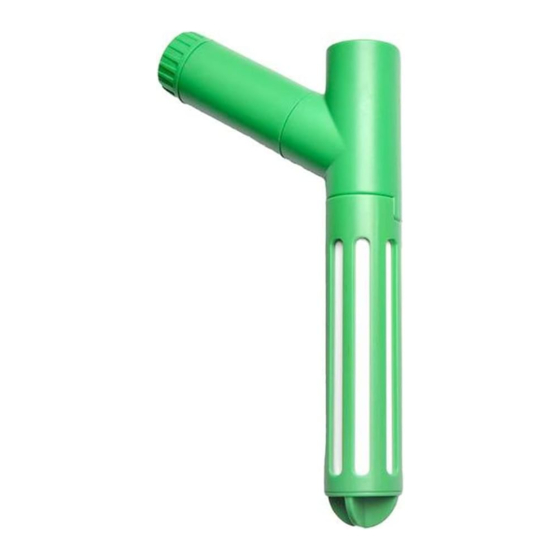
2. Getting Started 2.1 Parts List One Soil Moisture Sensor One User Manual 3. Overview LED Indicator (RF transmission) Battery Cap Soil Moisture Sensor cap... -
Page 4: Features
3.1 Features Soil Moisture Sensor Measures soil moisture content every 71 seconds. Sensor covered with ceramics for more accurate measurement. Custom Mode: with 0%AD and 100%AD custom mode to manually calibrate the low/high moisture value so that you can get more accurate result for different soil types. - Page 5 When paired with a GW1000 Wi-Fi Gateway: Monitor live sensor data on the Live Data page of the WS View app (requires the gateway and your phone is using the same Wi-Fi network) Up to 8 channels supported. Channel names can be edited on the app.
- Page 6 Remote monitoring with smart phone, laptop, or computer by visiting the website Note: The WH51 and WN51E will be recognized as the same sensor type by the software. If you purchased both, they will share the eight channels together and the total quantity of the two sensors could not exceed eight.
-
Page 7: Setup Guide
4. Setup Guide 4.1 Install batteries 1.Open the battery cap of the soil moisture sensor 2.Insert one AA battery and close battery door. 3.After inserting the battery, the remote sensor... - Page 8 LED indicator will light for 4 seconds, and then flash once per 71 second thereafter. Each time it flashes, the sensor is transmitting data. You may go to Section 5 now to complete the GW1000 gateway configuration first to make its data displayed and resume the steps followed below.
-
Page 9: Wi-Fi Configure With Gateway
(sold separately). 5.1 Pair with Gateway If GW1000 has been in operation, and you have never had any WN51E soil moisture sensor setup before, just power up the sensor and GW1000 will pick soil moisture data automatically. Please make sure your setup on... - Page 10 The channel name can be edited both on the app and Ecowitt Weather server (will not sync). If you want to use a new WN51E sensor to replace the old one (already configured on certain channel), please try the following: 1.
-
Page 11: Wi-Fi Connection For The Gateway
3. Click Re-register on the Sensor ID page. Then the new sensor will be learned and the old sensor will be erased. 5.2 Wi-Fi Connection for the Gateway For this part, please refer to the manual of the GW1000 Wi-Fi gateway. Any question, please contact the customer service. - Page 13 WS View app. To remote monitor the sensor data, please upload the data to our free Ecowitt Weather Server: https://www.ecowitt.net. Detailed operation instructions can be found on the GW1000 manual.
-
Page 14: Custom Mode
7. Custom mode When in LIVE DATA display mode, you can calibrate the soil moisture sensor by enable the Custom mode. (Click More – Choose Calibration – Choose Soil Calibration – Tick the box on the left side of the Customize). - Page 18 Custom OFF: Moisture level is calculated based on default dry and wet definition: Dry (0%AD) AD: 70 Wet (100% AD) AD: 500 Soil Moisture = (moisture AD – 0%AD) * 100% / (100% AD – 0%AD ) Example: when sensor moisture AD is 310, calculated moisture is: (310 –...
- Page 19 that gives very different output value at same moisture level condition. We introduced this custom mode to make this slope flexible so that it can match your soil type. This becomes a variable slope rate linear system. Adjusting principle: 0%AD is used to adjust for dry condition reading inconsistency.
- Page 20 decrease the 100%AD value to fix it. Please refer to the below example for better understanding. For example: When you use this product at the first time, you may turn off the custom mode and test the product at the following two situations: Situation One: Place the sensor into a glass of fresh water, and the displayed moisture readings is much...
- Page 21 Soil Moisture = (moisture AD – 0%AD) * 100% / (100% AD – 0%AD ) Now AD = 183 0%AD = 70 Target Soil Moisture Reading = 95% Then: 95% = (183 - 70)*100%/(100%AD – 70 ) Result: 100%AD = 188(take the Integer part) Then you can adjust the default 0%AD value to 188 and touch the screen for once to update the data.
- Page 22 water, and the displayed moisture readings are much higher than 10% (e.g.40%). Solution: Enable the custom mode and adjust the 0%AD value. Calculate the 0%AD value with the formula: Soil Moisture = (moisture AD – 0%AD) * 100% / (500 – 0%AD ) Now AD = 183 100%AD = 500 Target Soil Moisture Reading = 10%...
- Page 23 Then you can adjust the default 0%AD value to 147 and touch the screen for once to update the data. When you get your expected moisture reading, click Save to save the setting. Note: The soil moisture sensor should be inserted totally into the soil for accurate result.
-
Page 24: Specification
8. Specification Moisture Range:0~100%; Resolution: 1% 0%AD setting range:0~200; Initial value: default to factory calibration. 100%AD setting range:0%AD+10~1000; Initial value: default to its factory calibration Frequency: 433/915/868 MHz(optional) Sensor reporting interval: 71 seconds Transmission distance in open field: 100m(300 feet) IP66 waterproof Power consumption ... -
Page 25: Warranty Information
9. Warranty Information We disclaim any responsibility for any technical error or printing error, or the consequences thereof. All trademarks and patents are recognized. We provide a 1-year limited warranty on this product against manufacturing defects, or defects in materials and workmanship. This limited warranty begins on the original date of purchase, is valid only on products purchased, and only to the original purchaser... - Page 26 or claims based on misrepresentation by the seller, or performance variations resulting from installation-related circumstances. FCC Statement Statement according to FCC part 15.19: This device complies with part 15 of the FCC rules. Operation is subject to the following two conditions: 1.This device...
- Page 27 operate the equipment. Statement according to FCC part 15.105: NOTE: This equipment has been tested and found to comply with the limits for a Class B digital device, pursuant to Part 15 of the FCC Rules. These limits are designed to provide reasonable protection against...
- Page 28 the equipment off and on, the user is encouraged to try to correct the interference by one or more of the following measures: •Reorient or relocate the receiving antenna. •Increase separation between equipment and receiver. •Connect the equipment into an outlet on a circuit different from that to which the receiver is connected.
Need help?
Do you have a question about the WN51E and is the answer not in the manual?
Questions and answers