Table of Contents
Advertisement
Quick Links
Advertisement
Table of Contents

Related Manuals for LG LSEL6333F/00


Summary of Contents for LG LSEL6333F/00
- Page 1 OWNER'S MANUAL ELECTRIC RANGE Read this owner's manual thoroughly before operating the appliance and keep it handy for reference at all times. ENGLISH LSEL6333* / LSEL6331* www.lg.com MFL57206018 Rev.03_061721 Copyright © 2021 LG Electronics Inc. All Rights Reserved.
-
Page 2: Table Of Contents
TABLE OF CONTENTS IMPORTANT SAFETY 21 Test the Range Before Use INSTRUCTIONS 23 OPERATION READ ALL INSTRUCTIONS BEFORE USE Control Panel 4 Safety Messages 23 Control Panel Features 4 Anti-Tip Device 24 Knob Positions WARNING Changing Oven Settings 5 Installation 25 Clock 5 Operation 25 Oven Light... - Page 3 48 Wireless LAN Module Specifications 48 FCC Notice 48 FCC RF Radiation Exposure Statement 49 Open Source Software Notice Information Smart Diagnosis™ Feature 49 Using LG ThinQ to Diagnose Issues 49 Using Audible Diagnosis to Diagnose Issues 50 MAINTENANCE Cleaning...
-
Page 4: Important Safety Instructions
IMPORTANT SAFETY INSTRUCTIONS IMPORTANT SAFETY INSTRUCTIONS READ ALL INSTRUCTIONS BEFORE USE Download this owner's manual at http://www.lg.com Safety Messages Your safety and the safety of others are very important. We have provided many important safety messages in this manual and on your appliance. Always read and follow all safety messages. -
Page 5: Installation
IMPORTANT SAFETY INSTRUCTIONS • Do not step or sit on the oven door. The range could be tipped and injury might result from spilled hot liquid, food, or the range itself. • Never remove the oven legs. The range will not be secured to the anti-tip bracket if the legs are removed. -
Page 6: Maintenance
IMPORTANT SAFETY INSTRUCTIONS • Always use pot holders or oven mitts when removing food from the oven or the surface element. Cookware will be hot. Use only dry pot holders. Moist or damp pot holders on hot surfaces may result in burns from steam. -
Page 7: Caution
IMPORTANT SAFETY INSTRUCTIONS • If a cabinet storage is provided directly above cooking surface, place items that are not frequently used and can be safely stored in an area subjected to heat. Temperatures may be unsafe for volatile items such as flammable liquids, cleaners or aerosol sprays. •... -
Page 8: Product Overview
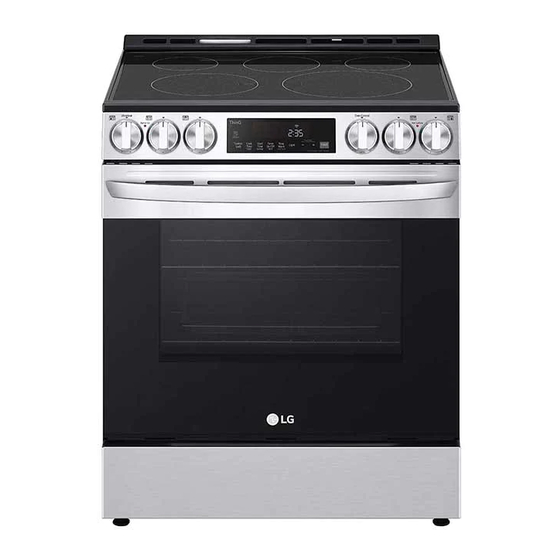
PRODUCT OVERVIEW PRODUCT OVERVIEW Product Features Exterior & Interior Cooktop Cooktop controller Oven door Storage drawer Glass-ceramic cooktop Oven mode knob (LSEL6333* model only) Gasket Model & serial number plate Product Specifications The appearance and specifications listed in this manual may vary due to constant product improvements. Oven Range Models LSEL6333*, LSEL6331* Description... -
Page 9: Accessories
• Optional accessories are not included with the unit. These accessories are available for purchase on the www.lg.com web page. • Contact LG Customer Service at 1-800-243-0000 (1-888-542-2623 in Canada) if any accessories are missing. • For your safety and for extended product life, only use authorized components. -
Page 10: Installation
10 INSTALLATION INSTALLATION Before Installing Installation Overview Please read the following installation instructions first after purchasing this product or transporting it to another location. The images in this guide may be different from the actual components and accessories, which are subject to change by the manufacturer without prior notice for product improvement purposes. -
Page 11: Tools Needed
INSTALLATION Tools Needed Parts Not Provided 4-Wire cord or 3-Wire cord (UL approved 40 or 50 AMP) Strain relief (For conduit installations only) NOTE Phillips screwdriver • Observe all governing codes and ordinances. Flat-blade screwdriver • Have the installer show you the location of the circuit breaker or fuse. -
Page 12: Choosing The Proper Location
12 INSTALLATION Ambient Temperature NOTE • Do not use sharp instruments, rubbing alcohol, CAUTION flammable fluids, or abrasive cleaners to remove • Make sure wall covering, countertop and tape or glue. These products can damage the cabinets around the range can withstand the surface of your range. -
Page 13: Dimensions And Clearances
INSTALLATION Dimensions and Clearances Dimensions LSEL6333*, Dimensions LSEL6331* Width 29 7/8" (759 mm) Height 37 1/4" (946 mm) Depth (Includes Door Handle) 29 7/32" (742 mm) Height (Excludes Vent Trim) 36" (914 mm) Depth (Includes only the product body that is loaded into the cabinet. 24 25/32"... - Page 14 14 INSTALLATION Clearances / " / " / " Acceptable electrical outlet area Normal counter top depth Counter top height Cabinet Wall Center A (Cabinet opening) = 30" (76.2 cm) For U.S.A = 30" (76.2 cm) ~ 31" (78.7 cm) For CANADA Minimum Dimensions...
-
Page 15: Leveling
INSTALLATION 30" (76.2 cm) minimum clearance between the top of the cooking surface and the bottom of an unprotected wood or metal cabinet; or 24" (60.9 cm) minimum when bottom of wood or metal cabinet is protected by not less than 1/4" (6.4 cm) flame retardant millboard covered with not less than no. 28 MSG sheet steel, 0.015"... -
Page 16: Connecting The Power Cord / Conduit
16 INSTALLATION Connecting the Power Cord / Specified Power Cord Kit Rating Conduit Case 1 The rear access cover must be removed. Loosen • Voltage: 120/240 volts (3-wire) the two screws with a screwdriver. The terminal block will then be accessible. •... - Page 17 INSTALLATION Tighten the 3 screws securely into the Ring terminal block. Body Cord/Conduit connection plate CAUTION Conduit • Do not remove the ground strap connections. 3-Wire Connection: Power Cord WARNING • The middle (neutral or ground) wire, which is white, of a 3-wire power cord or a 3-wire conduit has to be connected to the middle post of the main terminal block.
- Page 18 18 INSTALLATION Insert the power cord through the strain relief Cord/Conduit connection plate and tighten it. Bend strap up and attach. CAUTION 3-Wire Connection: Conduit • Do not install the power cord without a strain relief. WARNING • If screws are not tightened securely, it can result in electrical spark and severe personal injury or Remove the lower 3 screws from the terminal death.
- Page 19 INSTALLATION Insert the bare wire (white/neutral) end Conduit Installations through the center terminal block opening. Do not remove the ground strap connections. CAUTION • Do not install the conduit without a strain relief. Insert the two side bare wire ends into the lower left and the lower right terminal block Remove the cord/conduit connection plate openings.
-
Page 20: Optional Rear Filler
20 INSTALLATION Optional Rear Filler Attach the ground (green) bare wire end to the range frame and secure it in place with the ground screw. Installing the Rear Filler If the counter does not bridge the opening at the Insert the bare wire (white/neutral) end rear wall, the rear filler kit which is provided with through the center terminal block opening. -
Page 21: Test Run
INSTALLATION Engaging the Anti-tip Device • Install the anti-tip device to the structure and/or the range. Verify the anti-tip device has been properly installed and engaged by following the guide on the anti-tip bracket template. • Engage the range to the anti-tip device by following the guide on the anti-tip bracket template. - Page 22 22 INSTALLATION Now check the oven's operation. Turn the NOTE oven mode knob to select the Bake mode. 350 °F appears in the display. Press START. • Smoke may come out of the range when it is first used. The oven should finish preheating in 15 minutes, and the convection fan should operate while the oven is preheating.
-
Page 23: Operation
OPERATION OPERATION Control Panel Control Panel Features Model: LSEL6333* Model: LSEL6331* Features Oven Control +/- buttons START CLEAR/OFF Smart Diagnosis Cooktop control NOTE • Flashing Clock - If the colon in the clock display flashes, press Clock and reset the time, or press any key to stop the flashing. -
Page 24: Knob Positions
24 OPERATION NOTE • For best results, press buttons in the center, even when activating a button's secondary function. The buttons may not work properly if pressed too far from the center. Knob Positions After cleaning the oven knobs, make sure to replace each knob in the correct position. Failure to do so can result in improper operation of the burners. -
Page 25: Changing Oven Settings
OPERATION Burner On The Burner On indicator light turns on when the knob is turned even if the cooktop element does not operate. Hot surface indicator The hot surface indicator light glows as long as any surface cooking area is too hot to touch. It remains on after the element is turned off and until the surface has cooled to approximately 150 ˚F. -
Page 26: Wi-Fi
26 OPERATION Set the oven mode knob to the Off position. Follow the instructions in the LG ThinQ app to (Model LSEL6333*) connect the appliance. NOTE Press Timer On/Off once to set hours: • See the "Smart Functions" section in the owner’s minutes. - Page 27 OPERATION Setting Convection Auto Conversion Model LSEL6331* (Model LSEL6333*) Press and hold Clock for 3 seconds. Then When Conv. Bake and Conv. Roast are selected, press Clock repeatedly until AdJU appears in Convection Auto Conversion automatically the display. converts the standard recipe temperature entered to a convection temperature by subtracting 25 °F / 14 °C.
-
Page 28: Control Lock
28 OPERATION Set the oven mode knob to the Off position. Press +/- to select Hi,Lo,Off. Press and hold Start Time for 3 seconds. Then press the Start Time key repeatedly Press START to accept the change. until BEEP appears in the display. Model LSEL6331* Press plus(+) or minus(-) to select the desired Press and hold Clock for 3 seconds. -
Page 29: Lsel6333
OPERATION Cook Time (Timed Cook) milk, eggs, fish, meat or poultry, should be chilled in the refrigerator first. Even when Set the oven to cook for a specific length of time chilled, they should not stand in the oven for using the Timed Cook feature. -
Page 30: Minimum & Maximum Default Settings
30 OPERATION The oven will continue to cook for the set amount Feature Min. Max. Default of time and then turn off automatically. When the cooking time has elapsed: 400 ℉ / † 300 ℉ 550 ℉ Air Fry 12 Hr. •... -
Page 31: Cooking Areas
OPERATION This will happen more frequently if cooking on a CAUTION lower temperature setting. • Do not use the glass cooktop surface as a cutting board. • Choose proper burner size. For smaller pots and pans, use the smaller heating elements. For larger pots and pans, use the larger heating elements. - Page 32 32 OPERATION NOTE • Hot Surface Indicator - The hot surface indicator light glows as long as any surface cooking area is too hot to touch. - It remains on after the element is turned off and until the surface has cooled to approximately 150 ˚F.
-
Page 33: The Recommended Surface Cooking Setting
• Do not use foil or foil-type containers. Foil may in a 3-quart pot than in a 1-quart pot. melt onto the glass. Do not use the cooktop if metal has melted on it. Call an authorized LG Cookware should have flat bottoms that make Service Center. -
Page 34: Oven
34 OPERATION Oven Choosing Cookware The cookware material determines how evenly and quickly heat is transferred from the surface Before Using the Oven element to the pan bottom. The most popular materials available are: NOTE • Aluminum - Excellent heat conductor. Some types of food will cause it to darken (anodized •... -
Page 35: Using Oven Racks
OPERATION Using Oven Racks When cooking is complete, turn the oven mode knob to the OFF position. The racks have a turned-up back edge that prevents them from being pulled out of the oven cavity. Remove food from the oven. Model LSEL6331* CAUTION Press Bake. -
Page 36: Convection Mode (Model Lsel6333*)
36 OPERATION the porcelain-enamel surface and should be • Multiple oven rack cooking may slightly increase wiped up immediately. cook times for some foods. • Cakes, cookies and muffins have better results when using multiple racks. Convection Mode (Model The Convection Roast feature is designed to give LSEL6333*) optimum roasting performance. -
Page 37: Broil
OPERATION Rack and Pan Placement Rack Food position Cheesecake, crème Custards brulée Soufflés Sweet or savory Casserole Frozen lasagna Roasting Rack Guide Rack Food position Rare Multiple rack baking Medium Well done Boneless Rare Beef rib, top Medium sirloin Well done Beef Rare Rack (Position 2) - Page 38 38 OPERATION Let the oven preheat for approximately five CAUTION minutes before cooking the food if using Broil. • When using your broiler, the temperature inside the oven will be extremely high. Take caution to avoid possible burns by: Place food in the oven. - Keeping the door closed when broiling - Always wearing oven mitts when inserting or Close the oven door.
-
Page 39: Recommended Broiling Guide
OPERATION Recommended Broiling Guide The size, weight, thickness, starting temperature, and your preference of doneness will affect broiling times. This guide is based on meats at refrigerator temperature. For best results when broiling, use a pan designed for broiling. Grid (sold separately) Broiler pan (sold separately) First Second... - Page 40 40 OPERATION First Second Quantity and/or Rack Food Side Side Comments Thickness Position (min.) (min.) " thick) Pork Chops Well done 2 (1" thick) about 1lb. Medium 2 (1" thick) about 10 to 12 Well Done Lamb Chops Medium 2 (1 "...
-
Page 41: Proof
OPERATION Proof NOTE This feature maintains a warm oven for rising • To avoid lowering the oven temperature and yeast leavened products before baking. lengthening proofing time, do not open the oven door unnecessarily. Check bread products early Setting the Proof Function to avoid over proofing. -
Page 42: Keep Warm
42 OPERATION Press Cook Time and enter the cook time NOTE using the +/- keys. • The Warm function is intended to keep food warm. Do not use it to cool food down. Press Proof/Warm. Warm appears in the display. Keep Warm This function will maintain an oven temperature of 170 °F. - Page 43 (once the oven has cooled). • Use either the optional air fry tray available from LG or a dark baking tray with no sides or short • Run oven cleaning cycles (Easy Clean or sides that does not cover the entire rack. This SelfClean) regularly, depending on how often allows for better air circulation.
- Page 44 44 OPERATION Recommended Air Frying Guide • Arrange food evenly in a single layer. • Put a foil-lined baking pan on a rack in position 2 to catch drips. If needed, add parchment paper to absorb oil and reduce smoking. •...
-
Page 45: Frozen Meal (Model Lsel6333*)
OPERATION Quantity Rack Recommended Items Temp. (°F) Time Guide (oz) Position Thin Sausage (2.5 oz 25-35 each, diameter 0.8") Frozen Coconut Shrimp 30-40 Brush or lightly spray the surface of food with oil. Fresh Scallops on the half 20-30 Melt 4 tbsp. of butter and shell (35.3 oz) brush on scallops. -
Page 46: Remote Start
46 OPERATION Remote Start Press and hold Start Time for three seconds. appears in the display when the Sabbath If the appliance is connected to a home Wi-Fi mode is activated. network, this function starts preheating and then holds the temperature for up to 12 hours (including preheating time). -
Page 47: Smart Functions
Internet service provider or refer to your • Timer wireless router manual. - You can set the timer from the application. • LG ThinQ is not responsible for any network • Firmware Update connection problems or any faults, malfunctions, or errors caused by network connection. -
Page 48: Installing The Lg Thinq Application
Connecting to Wi-Fi This device complies with part 15 of the FCC Rules. Operation is subject to the following two The Wi-Fi button, when used with the LG ThinQ conditions: application, allows the appliance to connect to a (1) This device may not cause harmful interference home Wi-Fi network. -
Page 49: Open Source Software Notice Information
If you experience a problem with your Wi-Fi equipped appliance, it can transmit troubleshooting data to a smartphone using the LG ThinQ application. • Launch the LG ThinQ application and select the Smart Diagnosis feature in the menu. Follow the instructions provided in the LG ThinQ application. -
Page 50: Maintenance
50 MAINTENANCE MAINTENANCE Cleaning • To clean the knobs, make sure that they are in the OFF position and pull them straight off the stems. CAUTION • To replace the knobs, make sure the knob has • Do not clean this appliance with bleach. the OFF position centered at the top, and slide the knob directly onto the stem. - Page 51 MAINTENANCE Oven Door • Both the broiler pan and grid may be cleaned with a commercial oven cleaner or in the dishwasher. CAUTION • Do not use harsh cleaners or harsh abrasive Oven Racks cleaning materials on the outside of the oven Remove the oven racks before operating the Self door.
-
Page 52: Cooktop Surface
52 MAINTENANCE Cooktop Surface Glass-Ceramic Cooktop CAUTION • If any sugar or food containing sugar spills, or plastic or foil melts on the cooktop, remove the material IMMEDIATELY with a metal razor scraper while the cooking surface is still hot to avoid the risk of damage to the glass-ceramic surface. - Page 53 Rub with a towel. dry. Regular (Recommended after each use) Occasional (Recommended every week) Thorough (Recommended for tough stains or burnt-on food) NOTE • For additional product information, visit our website at www.lg.com...
-
Page 54: Easyclean
Compared to the NOTE more intense Self Clean process, your LG oven • For models without Self Clean option gives you the option of cleaning with LESS HEAT, LESS TIME, and virtually NO SMOKE OR FUMES. - Page 55 MAINTENANCE When to Use EasyClean • Example of oven soiling • Suggested plastic scrapers: - Hard plastic spatula - Plastic pan scraper - Plastic paint scraper - Old credit card Case 1 - Soil pattern: Small drops or spots Fill a spray bottle (10 oz or 300 ml) with water - Types of soils: Cheese or other ingredients and use the spray bottle to thoroughly spray - Common food items that can soil your oven:...
-
Page 56: Self Clean
56 MAINTENANCE If some light soils remain, repeat the above CAUTION steps, making sure to thoroughly soak the soiled areas. • Some surfaces may be hot after the EasyClean cycle. Wear rubber gloves while cleaning to • For models with Self Clean function prevent burns. - Page 57 MAINTENANCE cookware, aluminum foil or any other material • Do not line the oven walls, racks, bottom or any from the oven. other part of the range with aluminum foil or any other material. Doing so will destroy heat - If oven racks are left in the oven cavity during distribution, produce poor baking results and the Self Clean cycle, they will discolor and cause permanent damage to the oven interior...
- Page 58 58 MAINTENANCE Self Clean Soil Guide NOTE Soil Level Cycle Setting • Once the door has been locked, the lock indicator light stops flashing and remains on. Lightly Soiled Oven 3-Hour Self Clean Allow about 15 seconds for the oven door lock to Cavity activate.
-
Page 59: Removing/Assembling Lift-Off Oven Doors
MAINTENANCE Press START. between the broil stop position and fully closed. If the position is correct, the hinge arms will move freely. NOTE • It may become necessary to cancel or interrupt a Self Clean cycle due to excessive smoke or fire in the oven. -
Page 60: Removing/Assembling Drawers
60 MAINTENANCE Hinge arm Lever Hinge lock Push down with finger Pull up with finger Close the oven door. Pull the drawer away from the range. Removing/Assembling Drawers Assembling Drawers Removing Drawers Pull the bearing glides to the front of the chassis glide. - Page 61 MAINTENANCE Turn the glass lamp cover in the back of the oven counterclockwise to remove. Remove the halogen lamp from the socket. Insert the new halogen lamp. Insert the glass lamp cover and turn it clockwise. Plug in the range or reconnect the power.
-
Page 62: Troubleshooting
62 TROUBLESHOOTING TROUBLESHOOTING FAQs Frequently Asked Questions What types of cookware are recommended for use with the cooktop? • The pans must have a flat bottom and straight sides. • Only use heavy-gauge pans. • The pan size must match the amount of food to be prepared and the size of the surface element. - Page 63 TROUBLESHOOTING Can I leave my racks in the oven when running a Self Clean cycle? (On some models) No. Although it will not damage the racks, it will discolor them and may make them hard to slide in and out during use. Remove all items from the oven before starting a Self Clean cycle. What should I do if my racks are sticky and have become hard to slide in and out? Over time, the racks may become hard to slide in and out.
-
Page 64: Before Calling For Service
64 TROUBLESHOOTING Yes. The convection fan or heater element may get a little wet during cleaning. However, direct spray onto the broil burner and heater elements is not necessary because these are self-cleaning during regular use. Do I need to use all 1 ¼ cups (10 oz or 300 ml) of water for EasyClean? Yes. - Page 65 TROUBLESHOOTING Problem Possible Cause & Solution Steam is exhausted Cooking foods with high moisture produces steam. through the oven • This is normal. vent. Appliance does not Cord is not plugged correctly. operate. • Make sure cord is plugged correctly into outlet. Check circuit breakers. Service wiring is not complete.
-
Page 66: Parts & Features
66 TROUBLESHOOTING Problem Possible Cause & Solution Excessive smoking Excessive soil. during a Self Clean • Turn off the Self Clean function. Open the windows to rid the room of smoke. Wait until the cycle (On some Self Clean mode is cancelled. Wipe up the excess soil and reset the clean. models) Burning or oily odor This is normal in a new oven. - Page 67 TROUBLESHOOTING Problem Possible Cause & Solution Areas of Food spillovers not cleaned before next use. discoloration on the • See the "Glass-Ceramic Cooktop" section in the MAINTENANCE chapter. cooktop Hot surface on a model with a light-colored cooktop. • This is normal.The surface may appear discolored when it is hot. This is temporary and will disappear as the glass cools.
-
Page 68: Noises
68 TROUBLESHOOTING Problem Possible Cause & Solution Oven will not Self The oven temperature is too high to set a Self Clean operation. Clean. (On some • Allow the range to cool and reset the controls. models) Oven controls improperly set. •... -
Page 69: Wi-Fi
TROUBLESHOOTING Wi-Fi Problem Possible Cause & Solution Trouble connecting The password for the Wi-Fi network was entered incorrectly. appliance and • Delete your home Wi-Fi network and begin the registration process again. smartphone to Wi-Fi network Mobile data for your smartphone is turned on. •... -
Page 70: Limited Warranty
Should your LG Electric Range ("Product") fail due to a defect in materials or workmanship under normal and proper use, during the warranty period set forth below, LG Electronics (“LG”) will, at its option, repair or replace the Product. This limited warranty is valid only to the original retail purchaser of the Product and applies only when purchased and used within the United States including U.S. - Page 71 LIMITED WARRANTY • Damage or failure resulting from misuse, abuse, improper installation, repair, or maintenance. Improper repair includes use of parts not authorized by LG. Improper installation or maintenance includes installation or maintenance contrary to the Product owner’s manual. • Damage or failure caused by incorrect electrical current, voltage, or plumbing codes.
- Page 72 72 LIMITED WARRANTY Problem Possible Cause & Prevention Cooktop enamel Improper usage chipping off • Do not hit enamel cooktop. Pitting of the If not removed immediately, sugary spillovers (such as preserves, ketchup, cooktop glass tomato sauce, jellies, fudge, candy, syrups, or chocolate) or melted plastic or foil can cause surface pitting of the cooktop.
-
Page 73: Procedure For Resolving Disputes
Notice of Dispute. In the event you intend to commence an arbitration proceeding, you must first notify LG in writing at least 30 days in advance of initiating the arbitration by sending a letter to LG at LG Electronics, USA, Inc. Attn: Legal Department- Arbitration 111 Sylvan Avenue, Englewood Cliffs, NJ 07632 USA. - Page 74 74 LIMITED WARRANTY subject of the claim; and describe the nature of the claim and the relief being sought. If you and LG are unable to resolve the dispute within 30 days, either party may proceed to file a claim for arbitration.
- Page 75 LIMITED WARRANTY You may only opt out of the dispute resolution procedure in the manner described above (that is, by e-mail or telephone); no other form of notice will be effective to opt out of this dispute resolution procedure. Opting out of this dispute resolution procedure will not affect the coverage of the Limited Warranty in any way, and you will continue to enjoy the full benefits of the Limited Warranty.
- Page 76 76 Memo...
- Page 77 LG Customer Information Center For inquiries or comments, visit www.lg.com or call: U.S.A. 1-800-243-0000 1-888-542-2623 CANADA Register your product Online! www.lg.com...
Need help?
Do you have a question about the LSEL6333F/00 and is the answer not in the manual?
Questions and answers