Table of Contents

Related Manuals for Yada AC532710

Summary of Contents for Yada AC532710
- Page 1 1A Battery Charger and Maintainer WP ITM. AC532710 User Manual IMPORTANT! READ THE ENTIRE INSTRUCTION MANUAL CAREFULLY AND MAKE SURE THAT YOU FULLY UNDERSTAND IT BEFORE YOU USE THE EQUIPMENT. KEEP THE MANUAL FOR FUTURE REFERENCE.
-
Page 2: Technical Specifications
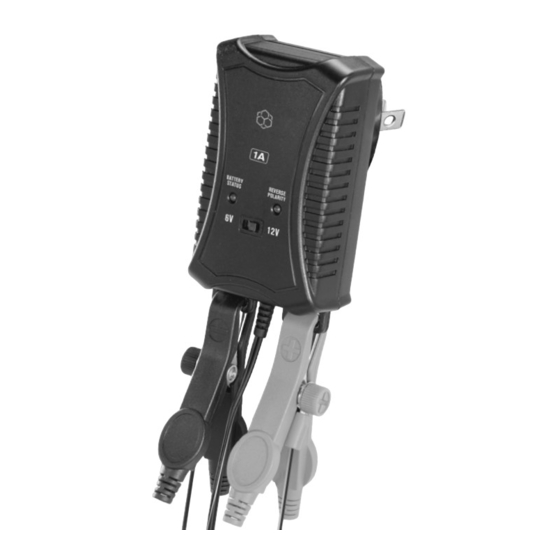
TECHNICAL SPECIFICATIONS: 100-120VAC, 50-60Hz, 22W Input Rating: 6VDC, 12VDC Charging Voltage: 1A (6VDC), 1A (12VDC) Charging Current: <5mA Reverse Current: 3.75V (6VDC), 7.5V (12VDC) Low Voltage Detection: 32°F - 104°F / 0°C - 40°C Operating Temperature: -4°F - 140°F / -20°C - 60°C Storage Temperature: Standard (Wet Cell / Flooded, SLA &... - Page 3 FEATURE OVERVIEW : 1. LED Indicators 2. 6V/12V Switch 3. Battery Clamps 4. Ring Terminals BATTERY REVERSE STATUS POLARITY...
- Page 4 WARNING Please read the entire instruction manual before using the product and then save it for future reference. We reserve the right for any errors in text or images and any necessary changes made to technical data. In the event of technical problems or other queries, please contact our Customer Services (see address details on the back).
- Page 5 • The charger is only intended for charging rechargeable Gel and AGM type lead-acid batteries. Charging other types of batteries than these can damage the charger, battery or other property. • The product is not intended to be used as a power supply unit for other products. •...
- Page 6 SAVE THESE INSTRUCTIONS - This manual contains important safety and operating instructions for battery charger Models AC532710. 1. Do not expose charger to rain or snow. 2. Use of an attachment not recommended or sold by the battery charger manufacturer may result in a risk of fire, electric shock, or injury to persons.
-
Page 7: Warning - Risk Of Explosive Gases
7. Do not disassemble charger; take it to a qualified serviceman when service or repair is required. Incorrect reassembly may result in a risk of electric shock or fire. 8. To reduce risk of electric shock, unplug charger from outlet before attempting any maintenance or cleaning. -
Page 8: Preparing To Charge
c) Wear complete eye protection and clothing protection. Avoid touching eyes while working near battery. d) If battery acid contacts skin or clothing, wash immediately with soap and water. If acid enters eye, immediately flood eye with running cold water for at least 10 minutes and get medical attention immediately. -
Page 9: Charger Location
b) Be sure area around battery is well ventilated while battery is being charged. c) Clean battery terminals. Be careful to keep corrosion from coming in contact with eyes. d) Add distilled water in each Standard wet cell until battery acid reaches level specified by battery manufacturer. -
Page 10: Dc Connection Precautions
DC CONNECTION PRECAUTIONS a) Connect and disconnect dc output Battery Clamps only after setting any charger switches to “off” position and removing ac cord from electric outlet. Never allow Battery Clamps to touch each other. b) Attach Battery Clamps to battery and chassis as indicated. FOLLOW THESE STEPS WHEN BATTERY IS INSTALLED IN VEHICLE. - Page 11 gage metal part of the frame or engine block. f) For positive-grounded vehicle, connect NEGATIVE (BLACK) Battery Clamp from battery charger to NEGATIVE (NEG, N, –) ungrounded post of battery. Connect POSITIVE (RED) Battery Clamp to vehicle chassis or engine block away from battery. Do not connect Battery Clamp to carburetor, fuel lines, or sheet-metal body parts.
-
Page 12: Care And Maintenance
e) Do not face battery when making final connection. f ) When disconnecting charger, always do so in reverse sequence of connecting procedure and break first connection while as far away from battery as practical. g) A marine (boat) battery must be removed and charged on shore. To charge it on board requires equipment specially designed for marine use. -
Page 13: Package Contents
PACKAGE CONTENTS 1A Battery Charger and Maintainer with detachable ring terminals x 1 BATTERY REVERSE STATUS POLARITY... -
Page 14: Feature Overview
OPERATING INSTRUCTIONS Note: Please read the vehicle’s Owner’s Manual before charging its battery or removing any of its battery leads. Check if there are any recommendations for charging the battery of your vehicle. FEATURE OVERVIEW Battery Status BATTERY REVERSE STATUS POLARITY Reverse Polarity 6V Vehicle Battery... -
Page 15: Charging Status
CHARGING STATUS While charging vehicle battery, the LED Indicators will show the charging status. Please see example below for 12V & 6V battery: 12V BATTERY CHARGING iii) 12V Battery Fully Charged; Maintenance i) 12V Battery Connected : ii) Charging in Process : Mode in Progress (0.2A): BATTERY REVERSE... - Page 16 6V BATTERY CHARGING iii) 6V Battery Fully Charged; Maintenance i) 6V Battery Connected : ii) Charging in Process : Mode in Progress (0.2A): BATTERY REVERSE BATTERY REVERSE BATTERY REVERSE STATUS POLARITY STATUS POLARITY STATUS POLARITY GREEN Battery Status LED lights up RED Battery Status LED lights up Low Battery Voltage RED Battery Status LED flashes and no...
- Page 17 Reverse Polarity BATTERY REVERSE Reverse Polarity STATUS POLARITY RED Reverse Polarity LED lights up AUTOMATIC CHARGING 1. Clean the battery terminals if necessary, always wear safety glasses to protect your eyes. 2. Verify the voltage and type of battery. 3. Connect the Clamp / ring terminal to the POSITIVE (+) post of the battery terminal.
- Page 18 Connect the BLACK Clamp / ring terminal to the NEGATIVE (-) post of the battery terminal. The NEGATIVE battery post will be marked with a MINUS (-) sign. There may be a BLACK plastic protective cover over the negative battery post. NOTE: When charging a battery that is mounted on a vehicle, the cables should be attached in the following order: - Connect the...
- Page 19 STATEMENT FCC Compliance Statement: 1A Battery Charger and Maintainer Model: AC532710 / Responsible Party: YADA 2975 Red Hill Ave., Ste. 100, Costa Mesa, CA 92626 / Tel: 866-294-9244 This device complies with Part 15 of the FCC Rules. Operation is subject to the following two conditions: (1)This device may not cause harmful interference, and (2)This device must accept any interference received, including interference that may cause undesired operation.
- Page 20 This equipment generates, uses and can radiate radio frequency energy and, if not installed and used in accordance with the instructions, may cause harmful interference to radio or television reception, which can be determined by turning the equipment off and on, the user is encouraged to try to correct the interference by one or more of the following measures: - Reorient or relocate the receiving antenna.
Need help?
Do you have a question about the AC532710 and is the answer not in the manual?
Questions and answers