Table of Contents
Advertisement
Quick Links
Advertisement
Table of Contents

Related Manuals for Linea DH-1100


Summary of Contents for Linea DH-1100
- Page 1 Product instruction manual Linea DH-1100 OPERATION MANUAL The Linea has been designed to be user friendly, however we strongly recommend you take a few minutes to read through this manual to ensure correct operation. Keep this manual safe for future reference.
- Page 2 IMPORTANT INFORMATION Your Linea Roll Fed Laminator should reach you in perfect condition, however please retain all original packaging once you have unpacked your Laminator as this system is covered by a return to manufacturers warranty. If your Laminator arrives damaged or faulty in anyway this must be reported to your supplier immediately.
-
Page 3: Safety Precautions
SAFETY PRECAUTIONS WARNING Please do not use broken, aging or self-made electrical wire and damaged supply cord. Please do not immoderately draw, twist or enlace the electrical wire, to avoid the fire or electric shock. Please do not use the power supply that is not in accordance with the rated voltage, to avoid the fire or electric shock. - Page 4 SAFETY PRECAUTIONS CAUTION This machine should be put at the dry and clean place, do not put it at the damp place or near the exit of cooling appliances. WORKING This machine should be put on the horizontal and firm place. In PLACE front and rear of the machine, there should be sufficient place for the document in and out.
-
Page 5: Structure And Control Panel
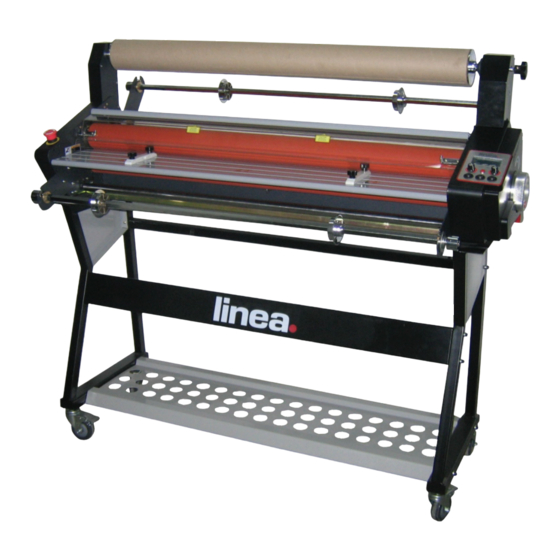
STRUCTURE AND CONTROL PANEL Top supply roll Safety shield Core adapter Top roll shaft Take-up bobbin tension knob Take-up bobbin tension knob Active bolt Top stabilizer Emergency stop Roller pressure Left side cover knob Bottom supply Bottom stabilizer bar Control panel roll tension knob Right side cover Feed guide... -
Page 6: Installation
INSTALLATION 1.Upon receipt of the laminator, inspect of box, the machine and all other contents of the box for shipping damage. Shipping damage should be brought to the immediate attention of the delivering carrier. 2.The laminator comes fully assembled on a stand . 3.Screw the wheel on the stand, put the stand upright. - Page 7 FUNCTIONS OF LCD DISPLAY AND CONTROL PANEL A)Turn the temperature control knob can increase or decrease the set temperature. The set temperature will display on the LCD. B)The range of temperature that can be adjusted manually is 0 -140 . C)The true temperature of the roller will display on the LCD.
- Page 8 OPERATION INSTRUCTIONS 3. Emergency Stop There is a emergency stop button on the front of the laminator. In emergency situation pressing the button will stop the rollers and stop heating. Rotate the button to the direction of arrow to turn on the power supply.
- Page 9 OPERA TION INSTRUCTIONS Step 3: Follow the diagram to thread the film Fil m ou tsid e top Fil m ins ide top sta bil izer bar sta bil izer bar Top roll film Top roll film Top stabilizer bar Top stabilizer bar Top heating roller Top heating roller...
- Page 10 OPERATION INSTRUCTIONS Step 6: Position the safety shield forward toward the roller and lock the active bolt. Remark: The machine will not power on without the feed table and the safety shield in the proper positions. Step 7: Make sure there is still enough slack in the web. Close the rollers with the knob on the right side of the laminator.
-
Page 11: Hot Laminating
OPERATION INSTRUCTIONS Step 3: Insert a piece of wide cardboard (guiding paper) between the rollers. the width of cardboard should be larger than the width of cold film. Pull the film from the top roller passing over the top stabilizer bar to the top roller. Step 4: Put the paper back of the cold film to the bobbin at take-up bar to rewind the paper back. -
Page 12: Maintenance And Service
MAINTENANCE AND SERVICE Temperature setting Normally, your film supplier should provide the information about the film application temperatures and operating characteristics. If you do not know the source of your film, or if the supplier cannot provide the information, please try the temperature and speed until you have the best result. -
Page 13: Problem Solution
MAINTENANCE AND SERVICE Set the speed at minimum speed, press the LOAD button, the roller will run, cleans the roller. After cleaning, position the feed table and slide on the safety shield. CAUTION: If the film gets wrapped around the roller, set the RUN/STOP switch to STOP immediately, set the HOT / COLD switch to COLD. - Page 14 MAINTENANCE AND SERVICE PROBLEM: Film gets wrapped around the laminating rollers while hot laminating. SOLUTION: The film is threaded improperly. If the adhesive side face to the roller, the film will be wrapped around the rollers. Thread the film in proper position.
-
Page 15: Specification
SERVICE If the service is required, please provide the following information: The detail of the problem Installation Date Serial number SPECIFICATION Model 1100 Operate mode Electric Max. laminating width 1050 mm Max. laminating thickness 5 mm Max. laminating temperature Max. Laminating speed 1.8M/min Recommended film Up to 250 mic...
Need help?
Do you have a question about the DH-1100 and is the answer not in the manual?
Questions and answers