
Related Manuals for Eletech NTP-100S

Summary of Contents for Eletech NTP-100S
- Page 1 NTP-100S Private Network Time Server User’s Manual First Edition (C)2022 Eletech Enterprise Co., Ltd All Rights Reserved...
-
Page 2: Table Of Contents
TABLE OF CONTENTS Package Contents ....................2 Panel Descriptions ....................3 Connection Diagram ......................5 Installing NTPClock Client Software ..............6 LCD Information ....................13 Device Configuration ..................14... -
Page 3: Package Contents
Package Contents QUANTITY ITEM DESCRIPTION NTP-100S GPS Receiver with 10 meters long PS2 cable RJ-45 Network Cable Power Adapter Installation CD If any item is missing or broken upon opening of the package, please contact your dealer immediately. -
Page 4: Panel Descriptions
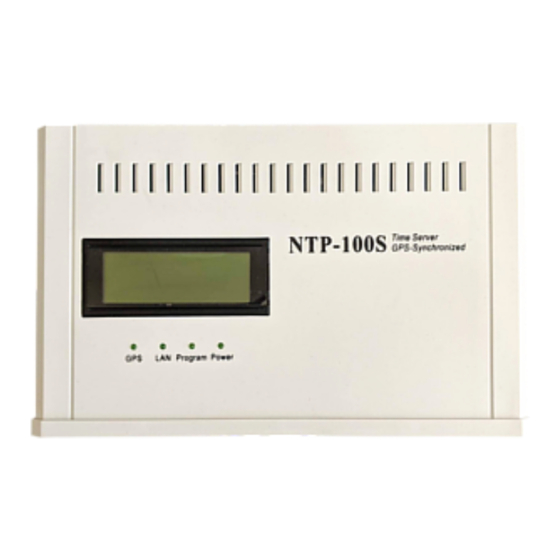
Panel Descriptions Top Panel Display Color Status Indicating - Solid - Power On Power Green - Off - Power Off - Solid - System is ready Program Green - Off - System is not ready - Network link established - Solid - Network data activity Green - Flashing... - Page 5 Rear Panel LAN: RJ-45 Ethernet jack RS-232: Pin5 & Pin9 output 1PPS signals for time correction Reset: Reset to factory settings GPS Ant.: GPS Receiver input jack DC 12V: Power jack GPS Receiver...
-
Page 6: Connection Diagram
Connection Diagram Connect the NTP-100S to the network as shown in the following diagram. The NTP-100S Time Server is designed to provide very accurate time obtained from GPS satellites, so that all PCs in the same network can be precisely synchronized... -
Page 7: Installing Ntpclock Client Software
Installing NTPClock Client Software In order to obtain time from the NTP-100S, the PC needs to have the NTPClock client software installed. Insert the installation CD and open the NTP Clock folder. Double-click setup.exe. The following dialog box will appear:... - Page 8 Click Next. Click Next.
- Page 9 NTPClock is installing.. Click Close to finish the installation.
- Page 10 After installation, a NTPClock icon will be created on the Windows desktop. Execution of the NTPClock program requires administrator privilege. If you are not logged in as administrator, you must do the following: Right click on the NTPClock icon and select Properties.
- Page 11 When the following dialog box opens, select the Compatibility tab. Check the box for “Run this program as an administrator”, then click OK. Note that the dialog box may look different on your PC due to different Widows versions.
- Page 12 Double-click the icon and a clock icon will appear: A red clock indicates that the PC has not linked with the NTP-100S. A yellow clock indicates that the PC has linked with the NTP-100S but the GPS is not working properly.
- Page 13 RemoteSNTPServer : Enter the IP address and port number of the NTP-100S. Timeout : If the PC fails to get a response from the NTP-100S within this period then the color of the clock icon will turn red. The default is 5000 milliseconds (5 seconds).
-
Page 14: Lcd Information
A few moments later the following screen will appear showing current Internet protocol version and IP address. About 30 seconds later, following screen will appear showing NTP-100S is searching for GPS signal. Following screen will appear when GPS signal is locked A few moments later the following screen will appear showing UTC and local date and time. -
Page 15: Device Configuration
The first step is to change your PC’s IP address to 192.168.1.xxx, so you can log in the NTP-100S and change its IP address. If you are not sure how to change your PC’s IP address, please consult with your IT personnel. - Page 16 The following screen will appear. IP Address (IPv4) The factory default value is “192.168.1.100” which needs to be changed if it is not in the same subnet as the LAN where the device is to be installed. Net Mask The default subnet mask is “255.255.255.0” which works well in most cases. Gateway The gateway address should be set to the router’s IP address.
- Page 17 Please leave it as default. Password Changing the password from default is recommended. Time Zone Enter an offset value (in minutes) based on your time zone. For example, the time zone for Singapore, which is 8 hours east of UTC, has an offset of +480...
- Page 18 Appendix A: GPS Receiver Specifications Chip MediaTek MT3337 (Rom Version) Frequency GPS, GALILEO, QZSS: L1 1575.42MHz, C/A code Support 66 channels Channels 1Hz default, up to 10Hz Update rate Tracking -162dBm, up to -165dBm (with external LNA) Sensitivity Cold Start -143.5dBm, up to -148dBm (with external LNA) Hot Start <...