
Related Manuals for WatchOvers WG13

Summary of Contents for WatchOvers WG13
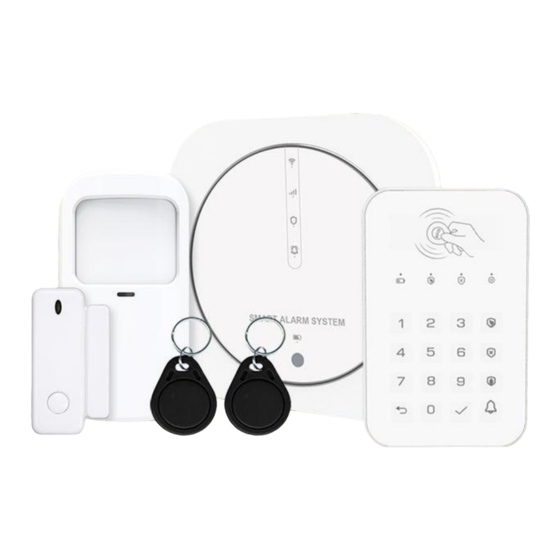
- Page 1 WatchOvers.com WG13 4G & Wi-Fi Alarm System Quick Set Up Guide Quick Set up Guide WG13 Alarm & Keypad 29 03 2022 V1...
- Page 2 Quick set up Guide and also read our User’s Manual first before use. The WatchOvers WG13 4G & Wi-Fi Alarm System is a dual network system that utilises both Wi-Fi (2.4GHz) and 4G cellular (GSM).
- Page 3 What it means Breathing Charging Solid Charged fully Nothing No battery or battery switch is off Powered by battery if Blinking slowly Blinking Low battery if Blinking quickly Quick Set up Guide WG13 Alarm & Keypad 29 03 2022 V1...
- Page 4 8 digits). 4. Enter the phone number or email address used for registration and enter the password, then click “Login”. Quick Set up Guide WG13 Alarm & Keypad 29 03 2022 V1...
- Page 5 “Add Room”. 7. Save – Once you have each room you want to set up, please choose “Save” on the top right of screen. Quick Set up Guide WG13 Alarm & Keypad 29 03 2022 V1...
- Page 6 Firstly, power on the sensors. Door/Window Sensor: Open the back of the Door/Window sensor and turn on the sensor using the black switch below the battery and refit the back. Quick Set up Guide WG13 Alarm & Keypad 29 03 2022 V1...
- Page 7 Pairing button – Press to send a transmission signal for pairing with your base station. Wireless Keypad: When fully charged, remove the USB charger and push the On/Off switch to the On position. Quick Set up Guide WG13 Alarm & Keypad 29 03 2022 V1...
- Page 8 (not to exceed 16 characters) such as “Front door No 10”, then Tap save to save your setting. ➢ Next change the description of the sensor type to one of the following: Quick Set up Guide WG13 Alarm & Keypad 29 03 2022 V1...
- Page 9 The mode is same as 24 Hours but there will be no sound triggered. Silent Home with It is same as Home but with Entry Delay in Home Arm. delay Quick Set up Guide WG13 Alarm & Keypad 29 03 2022 V1...
-
Page 10: Installation
USB port and plug the power adapter into the outlet to power on your base station, then slide the battery switch at the back to the on position. Remove the bracket from the back of the base station. Fit the double-sided adhesive pad to Quick Set up Guide WG13 Alarm & Keypad 29 03 2022 V1... - Page 11 Remove the bracket from the back of the keypad. Fit the double-sided adhesive pad to the back of the bracket and press the bracket firmly onto your chosen location. Once the bracket is secure, fit the keypad onto the bracket. Quick Set up Guide WG13 Alarm & Keypad 29 03 2022 V1...
- Page 12 STEP 1. Enter the admin passcode then press √. STEP 2. Press 3 then press √ to delete all RFID tags. Setting User Passcode STEP 1. Enter the admin passcode then press √. Quick Set up Guide WG13 Alarm & Keypad 29 03 2022 V1...
- Page 13 With the bracket attached to the back of the keypad, slide the bracket up and down 10 times which slides the tamper switch underneath the bracket, this will restart and reset the keypad. Quick Set up Guide WG13 Alarm & Keypad 29 03 2022 V1...
-
Page 14: Specifications
Name/Type/Mode of each sensor. To trigger a Door/Window alarm sensor for pairing - Start with the sensor and magnet closely aligned, then separate them until the blue light comes on. Quick Set up Guide WG13 Alarm & Keypad 29 03 2022 V1... -
Page 15: Wireless Pir Motion Sensor
To trigger the PIR for pairing- Press the black button on the back for 5 seconds and the blue light will flash. STEP 3. Name your device, set the type and mode of your device. Please see above instructions under Name/Type/Mode of each sensor. Quick Set up Guide WG13 Alarm & Keypad 29 03 2022 V1... -
Page 16: Smoke Alarm
STEP 1. Open the back of the Smoke Alarm and remove the plastic covering from the battery. Re insert the batter taking time to ensure you have the battery + and – matched correctly. Quick Set up Guide WG13 Alarm & Keypad 29 03 2022 V1... - Page 17 Fit the battery into the battery holder of the alarm, align the back of alarm and rotate clockwise to lock in place. Gently press the test button to confirm the alarm is working. Note: Removing adhesive pads can remove paint from painted surfaces. Quick Set up Guide WG13 Alarm & Keypad 29 03 2022 V1...
-
Page 18: Carbon Monoxide Alarm
Peel the paper from the other side of the adhesive pads and fit the bracket in the selected location, pressing firmly to ensure a good bond. Quick Set up Guide WG13 Alarm & Keypad 29 03 2022 V1... - Page 19 The water alarm can be reused after it has been wet, by drying it using a soft clean cloth and place it back in the area you wish to monitor. Quick Set up Guide WG13 Alarm & Keypad 29 03 2022 V1...
-
Page 20: Panic Button
Peel the paper from the other side of the adhesive pad and fit the SOS button in the selected location, pressing firmly to ensure a good bond. Note: Removing adhesive pads can remove paint from painted surfaces. SOS Emergency Button Wristband Quick Set up Guide WG13 Alarm & Keypad 29 03 2022 V1... - Page 21 STEP 3. Name the device and rename the Zone Mode – Click on the accessory and you will see the option to rename. Remember to Save when finished. Quick Set up Guide WG13 Alarm & Keypad 29 03 2022 V1...
Need help?
Do you have a question about the WG13 and is the answer not in the manual?
Questions and answers