Table of Contents
Advertisement
Available languages
Available languages
Quick Links
Importé par/Geïmporteerd door/Imported by/ Importado por/ Importiert von:
Euro-Tech distribution
37A Rue César Loridan 59910 Bondues – France
FR VENTILATEUR COLONNE
NL KOLOMVENTILATOR
EN TOWER FAN
ES ABANICO DE COLUMNAS
DE SÄULENVENTILATOR
Modèle/Model/Modelo/Modell : FT75-YG12R
POUR USAGE DOMESTIQUE UNIQUEMENT
ALLEEN VOOR HUISHOUDELIJK GEBRUIK
FOR DOMESTIC USE ONLY
SÓLO PARA USO DOMÉSTICO
NUR FÜR DEN HAUSGEBRAUCH
REF : 002495
Photo non contractuelle
Foto is niet bindend
Non contractual photo
Foto no contractual
Nicht vertragliches Foto
Advertisement
Table of Contents

Subscribe to Our Youtube Channel
Related Manuals for Saneo FT75-YG12R


Summary of Contents for Saneo FT75-YG12R
- Page 1 FR VENTILATEUR COLONNE NL KOLOMVENTILATOR EN TOWER FAN ES ABANICO DE COLUMNAS DE SÄULENVENTILATOR Modèle/Model/Modelo/Modell : FT75-YG12R REF : 002495 Photo non contractuelle Foto is niet bindend Non contractual photo Foto no contractual Nicht vertragliches Foto POUR USAGE DOMESTIQUE UNIQUEMENT...
-
Page 2: Consignes Importantes De Securite
Lisez attentivement cette notice avant l’utilisation de l’appareil et conservez- la pour toute utilisation ultérieure. CONSIGNES IMPORTANTES DE SECURITE Cet appareil peut être utilisé par des enfants âgés d'au moins 8 ans et par des personnes ayant des capacités physiques, sensorielles ou mentales réduites ou dénuées d’expérience ou de connaissance, s'ils (si elles) sont correctement surveillé(e)s ou si des instructions relatives à... - Page 3 adressez-vous à votre service après-vente pour écarter tout danger. Cet appareil est destiné à un usage domestique et doit être utilisé pour l’usage décrit dans le mode d’emploi. Ne laissez jamais votre appareil sans surveillance lorsque celui-ci est sous tension ou en fonctionnement. Ne le laissez ni à...
- Page 4 Toute utilisation inappropriée dangereuse pour l’utilisateur, le fabricant ne saurait être tenu responsable des dommages éventuels qui en résulteraient. Ne laissez pas tourner votre ventilateur pendant des périodes prolongées en votre absence. Veillez à l’éteindre avant de partir. ...
-
Page 5: Caracteristiques Techniques
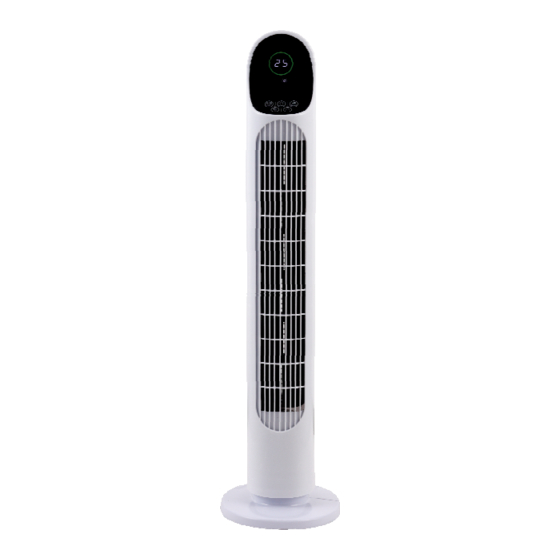
CARACTERISTIQUES TECHNIQUES Alimentation : 220-240V ~ 50Hz Puissance : 45W Description Symbole Valeur Unité Débit d'air maximal 25.29 m3/min Puissance absorbée 37.78 Valeur de service 0.14 (m3/min)/W Consommation d'électricité en 0.45 mode « veille » Consommation d’électricité en Poff mode « arrêt » Niveau de puissance 53.20 dB(A) - Page 6 DESCRIPTION DETAILLEE 1. Affichage LED 2. Panneau de contrôle 3. Sortie d’air 4. Support 5. Poignée/Rangement pour la télécommande 6. Télécommande MONTAGE DU VENTILATEUR ATTENTION : L’appareil doit être débranché avant le montage Votre appareil est de type mobile et peut être déplacé tout en respectant les ...
- Page 7 Guidez le câble à travers le centre des deux plaques de base puis poussez les deux plaques ensemble comme indiqué ci-dessous : Placez l'unité de ventilation sur le dessus de la base : Fixez la base à l'aide de l'écrou, puis faites passer le câble dans la rainure du ...
- Page 8 UTILISATION Cet appareil peut fonctionner à l’aide d’une télécommande ou directement sur le panneau de contrôle ; les fonctionnalités sont identiques sur l’un comme sur l’autre. Panneau de contrôle Télécommande Boutons : A. Marche/Arrêt B. Oscillation C. Vitesse D. Mode de fonctionnement E.
- Page 9 La télécommande fonctionne avec une pile CR2025. Il faut enlever la bande de protection avant utilisation. Bouton ON/OFF (Marche/Arrêt) : Appuyez une fois sur le bouton ON/OFF (A) pour activer le ventilateur. L'appareil commencera à fonctionner à la vitesse la plus basse (les témoins lumineux 3 et 4 s'allumeront sur l'affichage LED).
-
Page 10: Entretien Et Maintenance
ENTRETIEN ET MAINTENANCE Important : avant toute opération de nettoyage et de maintenance, débranchez l’appareil du réseau électrique. Ne jamais tenter d’ouvrir le ventilateur. - Nettoyez votre ventilateur régulièrement. - N’immergez jamais l’appareil dans l’eau ou tout autre liquide pour le nettoyer. - N'utilisez pas de solvants ou tout autre produit chimique pour nettoyer l'appareil. -
Page 11: Belangrijke Veiligheidsinstructies
Lees deze instructies zorgvuldig door voordat u het apparaat gebruikt en bewaar ze voor toekomstig gebruik. BELANGRIJKE VEILIGHEIDSINSTRUCTIES Dit apparaat kan worden gebruikt door kinderen van ten minste 8 jaar oud en door personen met beperkte fysieke, zintuiglijke of geestelijke vermogens of met gebrek aan ervaring of kennis, indien zij onder adequaat toezicht staan of indien zij instructies hebben gekregen over het veilige gebruik van het apparaat en zich bewust zijn van de risico's... - Page 12 contact op met uw plaatselijke servicecentrum om gevaar te voorkomen. Dit toestel is bestemd voor huishoudelijk gebruik en moet worden gebruikt voor het doel dat in de gebruiksaanwijzing is beschreven. Laat uw apparaat nooit onbeheerd achter wanneer het is ingeschakeld of in werking is.
- Page 13 Elk oneigenlijk gebruik is gevaarlijk voor de gebruiker en de fabrikant kan niet aansprakelijk worden gesteld voor schade die daaruit voortvloeit. Laat uw ventilator niet langdurig draaien terwijl u weg bent. Zorg ervoor dat je het uitzet voordat je weggaat. ...
-
Page 14: Gedetailleerde Beschrijving
GEDETAILLEERDE BESCHRIJVING 1. LED-scherm 2. Bedieningspaneel 3. Luchtuitlaat 4. Ondersteuning 5. Handvat/opberging voor afstandsbediening 6. Afstandsbediening VENTILATOR MONTAGE WAARSCHUWING: apparaat moet vóór installatie worden losgekoppeld van de voeding Uw apparaat is mobiel en kan worden verplaatst met inachtneming van de ... - Page 15 Leid de kabel door het midden van de twee basisplaten en duw de twee platen tegen elkaar zoals hieronder aangegeven : Plaats de ventilatoreenheid bovenop de basis : Zet de basis vast met de moer en voer vervolgens de kabel door de groef in de ...
- Page 16 Belangrijk: Gebruik de ventilator nooit zonder de voet! Het apparaat mag alleen rechtop en verticaal worden gebruikt. Gebruik het niet in een horizontale positie. Zodra de ventilator correct is gemonteerd, plaatst u hem op een droge en stabiele ...
- Page 17 3. Loop/Standby 4. « Normale » modus 5. « Natuurlijke » modus 6. Slaapstand De afstandsbediening werkt op één CR2025-batterij. De beschermstrook moet voor gebruik worden verwijderd. AAN/UIT-knop : Druk eenmaal op de AAN/UIT-knop (A) om de ventilator te activeren. Het apparaat begint te werken op de laagste snelheid (indicatielampjes 3 en 4 gaan branden op het LED-display).
-
Page 18: Verzorging En Onderhoud
Om de timer uit te schakelen, drukt u op deze toets totdat het controlelampje (2) op het bedieningspaneel uitgaat. VERZORGING EN ONDERHOUD Belangrijk: Vóór reiniging en onderhoud moet het apparaat van het stroomnet worden losgekoppeld. Probeer nooit de ventilator te openen. - Maak uw ventilator regelmatig schoon. -
Page 19: Important Safety Instructions
Read these instructions carefully before using the appliance and keep them for future reference. IMPORTANT SAFETY INSTRUCTIONS This appliance may be used by children of at least 8 years of age and by persons with reduced physical, sensory or mental capabilities or lacking experience or knowledge, if they are properly supervised or if they have been given instructions on the safe use of the appliance and are aware of the risks involved. - Page 20 Never leave your appliance unattended when it is switched on or in operation. Do not leave it within the reach of children or other unauthorised persons. Never immerse the appliance in water or any other liquid for cleaning or any other reason. Be careful not to splash the appliance.
-
Page 21: Technical Data
Please refer to the « CARE AND MAINTENANCE » section to clean the fan. The guarantee applies if the safety instructions are observed and the product is used in accordance with these instructions. TECHNICAL DATA Power supply: 220-240V ~ 50Hz Power : 45W Description Symbol... -
Page 22: Detailed Description
DETAILED DESCRIPTION 1. LED display 2. Control panel 3. Air outlet 4. Base 5. Handle/Storage for remote control 6. Remote control ASSEMBLING THE FAN CAUTION: The appliance must be disconnected from the mains before installation Your appliance is mobile and can be moved if safety instructions are respected. ... - Page 23 Guide the cable through the centre of the two base plates and then push the two plates together as shown below : Place the fan unit on top of the base : Secure the base with the nut, then feed the cable through the groove in the outer ...
- Page 24 This device can be operated with a remote control or directly on the control panel; the functionality is identical on both. Control panel Remote control Buttons : A. On/Off B. Oscillation C. Speed D. Function mode E. Timer Indicator lights : 1.
- Page 25 The remote control works with one CR2025 battery. The protective strip must be removed before use. ON/OFF button : Press the ON/OFF button (A) once to activate the fan. The appliance will start to run at the lowest speed (indicator lights 3 and 4 will light up on the LED display). To turn off the fan, press the ON/OFF button again.
-
Page 26: Care And Maintenance
CARE AND MAINTENANCE Important: Before cleaning and maintenance, disconnect the appliance from the power supply. Never attempt to open the fan. - Clean your fan regularly. - Never immerse the device in water or any other liquid to clean - Do not use solvents or any other chemicals to clean the unit. - To avoid any risk, clean only the outer surface of your device with a soft, slightly damp cloth. -
Page 27: Instrucciones Importantes De Seguridad
Lea atentamente estas instrucciones antes de utilizar el aparato y consérvelas para un futuro uso. INSTRUCCIONES IMPORTANTES DE SEGURIDAD Este aparato puede ser utilizado por niños de al menos 8 años de edad y por personas con capacidades físicas, sensoriales o mentales reducidas o con falta de experiencia o conocimientos, si están debidamente supervisados o si han recibido instrucciones sobre el uso seguro del aparato y son conscientes de los riesgos que conlleva. - Page 28 Este aparato está destinado al uso doméstico y debe utilizarse para el fin descrito en las instrucciones de uso. No deje nunca su aparato sin vigilancia cuando esté encendido o en funcionamiento. No lo deje al alcance de los niños o de otras personas no autorizadas.
- Page 29 Desenchufe siempre el aparato después de cada uso y antes de limpiarlo. Consulte la sección « CUIDADO Y MANTENIMENTO » para limpiar el ventilador. La garantía se aplica si se respetan las instrucciones de seguridad y se utiliza el producto de acuerdo con estas instrucciones.
-
Page 30: Descripción Detallada
DESCRIPCIÓN DETALLADA 1. Pantalla LED 2. Panel de control 3. Salida de aire 4. Soporte 5. Asa/guardamanos para el mando a distancia 6. Mando a distancia MONTAJE DEL VENTILADOR PRECAUCIÓN: La unidad debe ser desconectada de la red eléctrica antes de la instalación Su aparato es móvil y puede ser trasladado respetando las instrucciones de ... - Page 31 Pase el cable por el centro de las dos placas base y, a continuación, junte las dos placas como se indica a continuación : Colocar el ventilador sobre la base : Fije la base con la tuerca y luego pase el cable por la ranura del borde exterior de ...
- Page 32 USAR Este dispositivo puede manejarse con un mando a distancia o directamente en el panel de control; la funcionalidad es la misma en ambos casos. Panel de control Mando a distancia Botones : A. Activado/desactivado B. Oscilación C. Velocidad D. Modo de funcionamiento E.
- Page 33 El mando a distancia funciona con una pila CR2025. La banda protectora debe ser retirada antes de su uso. Botón ON/OFF : Pulse el botón ON/OFF (A) una vez para activar el ventilador. El aparato comenzará a funcionar a la velocidad más baja (las luces indicadoras 3 y 4 se encenderán en la pantalla LED).
-
Page 34: Cuidado Y Mantenimiento
CUIDADO Y MANTENIMIENTO Importante: Antes de la limpieza y el mantenimiento, desconecte el aparato de la red eléctrica. Nunca intente abrir el ventilador. - Limpie su ventilador regularmente. - No sumerja nunca el aparato en agua ni en ningún otro líquido para limpiarlo. -
Page 35: Wichtige Sicherheitshinweise
Lesen Sie diese Anleitung vor dem Gebrauch des Geräts sorgfältig durch und bewahren Sie sie für den späteren Gebrauch auf. WICHTIGE SICHERHEITSHINWEISE Dieses Gerät kann von Kindern ab 8 Jahren und von Personen mit eingeschränkten physischen, sensorischen oder geistigen Fähigkeiten oder ohne Erfahrung oder Wissen benutzt werden, wenn sie angemessen beaufsichtigt werden oder wenn ihnen Anweisungen zur sicheren Benutzung des Geräts gegeben wurden und sie sich der Gefahren bewusst... - Page 36 Benutzer ausgetauscht werden. Wenden Sie sich an Ihren Kundendienst, um jede Gefahr auszuschließen. Dieses Gerät ist für den Hausgebrauch bestimmt und darf nur für den in der Bedienungsanleitung beschriebenen Zweck verwendet werden. Lassen Sie Ihr Gerät niemals unbeaufsichtigt, wenn es eingeschaltet oder in Betrieb ist.
- Page 37 Gleichgewicht in Frage gestellt ist. Achten Sie darauf, dass das Gerät auf einer glatten Oberfläche steht, um Vibrationen zu vermeiden. Unsachgemäßer Gebrauch ist gefährlich für den Benutzer, der Hersteller haftet nicht für eventuelle Schäden, die daraus entstehen können. Lassen Sie Ihren Ventilator nicht über längere Zeit laufen, wenn Sie nicht zu Hause sind.
- Page 38 TECHNISCHE MERKMALE Stromversorgung: 220-240V ~ 50Hz. Leistung: 45W Beschreibung Symbol Wert Einheit Maximaler Luftdurchsatz 25.29 m3/min Aufgenommene Leistung 37.78 Wert der Dienstleistung 0.14 (m3/min)/W Stromverbrauch im 0.45 « Standby »-Modus Stromverbrauch im Poff « Aus »-Modus Schallleistungspegel 53.20 dB(A) Maximale 3.49 Meter/Sekunde Luftgeschwindigkeit...
- Page 39 AUSFÜHRLICHE BESCHREIBUNG 1. LED-Anzeige 2. Bedienfeld 3. Luftauslass 4. Unterstützung 5. Griff/Aufbewahrung für die Fernbedienung 6. Fernbedienung VENTILATORMONTAGE ACHTUNG: Das Gerät muss vor der Montage vom Stromnetz getrennt werden Gerät mobilen kann unter Beachtung Sicherheitsvorschriften bewegt werden. Bevor Sie das Gerät anschließen, vergewissern Sie sich, dass der Turmsockel ...
- Page 40 Führen Sie das Kabel durch die Mitte der beiden Grundplatten und schieben Sie die beiden Platten dann wie unten gezeigt zusammen : Setzen Sie die Lüftungseinheit auf die Oberseite der Basisstation : Befestigen Sie die Basis mit der Mutter und führen Sie das Kabel durch die Nut in ...
- Page 41 NUTZUNG Dieses Gerät kann mit einer Fernbedienung oder direkt über das Bedienfeld bedient werden; die Funktionen sind bei beiden identisch. Kontrolltafel Fernbedienung Tasten : A. Ein/Aus B. Oszillation C. Geschwindigkeit D. Funktionsweise E. Timer Leuchtanzeigen : 1. Oszillation 2. Timer 3.
- Page 42 ON/OFF-Taste (Ein/Aus) : Drücken Sie einmal auf die Taste ON/OFF (A), um den Ventilator einzuschalten. Das Gerät beginnt mit der niedrigsten Geschwindigkeit zu arbeiten (die Kontrollleuchten 3 und 4 leuchten auf der LED-Anzeige auf). Um den Ventilator auszuschalten, drücken Sie erneut auf die Taste ON/OFF. Oszillations-Taste : Drücken Sie bei eingeschaltetem Gerät die Taste Oszillation (B), damit der Ventilator von links nach rechts oszilliert.
-
Page 43: Pflege Und Wartung
PFLEGE UND WARTUNG Wichtig: Trennen Sie das Gerät vor jeder Reinigungs- und Wartungsarbeit vom Stromnetz. Versuchen Sie niemals, den Ventilator zu öffnen. - Reinigen Sie Ihren Ventilator regelmäßig. - Tauchen Sie das Gerät zum Reinigen niemals in Wasser oder andere Flüssigkeiten ein. - Verwenden Sie keine Lösungsmittel oder andere Chemikalien, um das Gerät zu reinigen.
Need help?
Do you have a question about the FT75-YG12R and is the answer not in the manual?
Questions and answers