Precision Planting 20/20 Operator's Manual
Harvest for gen 3
Hide thumbs
Also See for 20/20:
- Operator's manual (144 pages) ,
- Operator's manual (78 pages) ,
- Setup manual (8 pages)
Table of Contents
Advertisement
Advertisement
Table of Contents

Related Manuals for Precision Planting 20/20


Summary of Contents for Precision Planting 20/20
- Page 1 Operator’s Guide – Harvest For Gen 3 20|20 Displays 955692_2 6/13/19...
-
Page 2: Table Of Contents
Contents 20|20 Monitor Overiew ........................5 Powering the 20|20 On and Off....................8 Cab Installation..........................10 Harvest Mode Overview.........................13 Home Screen Overview........................14 Home Screen Tabs........................18 Customizing the Home Screen ....................19 Notification Center ........................24 Connectivity ..........................24 Speed & GPS..........................24 Cloud Connectivity........................26 20|20 Connect ...........................29 Crop Setup ..........................30 Load List Management......................31 Setup Button ...........................32... - Page 3 Combine Measurements ......................39 Combine Head ..........................40 Salve/Load..........................41 Implement Type........................41 Systems Menu ..........................42 YieldSense Settings ........................42 Display General ........................43 Display — Advanced Setup .....................44 Display — Map Layers ......................45 Display — Date/Time.......................45 Display — Sound ........................45 Display — Brightness.......................46 Display — About........................46 Crops Menu ............................47 Diagnose ............................48 YieldSense Level 2 Screens......................50...
- Page 4 Data — Delete ..........................56 Backup/Restore.........................56 Software Update ........................57 Appendix A ............................58 Appendix B — Harness Layouts....................59 955692_2...
-
Page 5: 20|20 Monitor Overiew
SmartFirmer, vDrive Insecticide, vApplyHD, FlowSense, vSet Select, mSet, SeederForce, Smart Connector, and YieldSense. Software Updates Precision Planting will continue to update and improve the 20|20. Software updates are free of charge and can be downloaded from www.precisionplanting.com/support and installed on the display with a USB drive. - Page 6 20|20 Hardware Overview Two different screen sizes are available with the 20|20, 10” and 16”. Either one or two displays can be connected to the Display Base Module at any time. If two displays from Precision Planting are used, any combination of the two different sizes is acceptable. One of these two displays can be an iPad running the Climate Corporation FieldView Cab app.
- Page 7 Back of Display Display Base Module [DBM] The Power over Ethernet [PoE] ports requires a Shielded Twisted Pair [STP] Ethernet Cable to connect to a display. If only one display is being used, use either port. Both ports will be used if connecting to two displays or one display and a FieldView Module [FVM].
-
Page 8: Powering The 20|20 On And Off
Indicator Light Overview Color Display Base Module Display FieldView Module Good Connectivity Good Connectivity Good Connectivity Green Initializing Downloading Software White Blinking White Firmware Update in Process No Connection between Yellow Initializing Initializing Display and DBM Software Update In Blinking Software Update in Software Update in Progress... - Page 9 User License Agreement Once the 20|20 has booted up, read and agree to the User License Agreement to use the display. This will occur on first boot up and when updates are required for the agreement. Note: If this system is being set up for a third party, the agreement should be reset to appear on next power up for the end user to agree to the document.
-
Page 10: Cab Installation
Mount the display or both displays for optimal visibility and interaction for the operator. There are several mounting options offered by Precision Planting available for the display. The diagram depicts the display with a RAM mount. Refer to Appendix B and the YieldSense Installation Guides... - Page 11 Step 3: Connect the 725150 Power Harness to the DBM into the 4-pin Deutsch Connector on the DBM and then to the power source in the combine cab. A three pin round convenience port connector is provided to plug directly into a standard convenience port. An adapter may be required to connect to power and may be included in the YieldSense base kit or purchased separately.
- Page 12 Step 5: Connect the 725155 Speed Harness to the 8-pin Deutsch connector on the DBM. This will provide you with two 4-pin round connections. The male pin connector will connect to the GPS adapter, while the female pin connector will connect to a Radar adapter (not used for YieldSense).
-
Page 13: Harvest Mode Overview
Harvest Mode Overview Follow the below steps to set up the 20|20 for Harvest mode. Details for each step can be found in the sections of this manual. Step 1: Update display software Step 2: Change Implement Type to “Combine”, page 41 Step 3: Configure Combine and Head Setup, page 38 Step 4:... -
Page 14: Home Screen Overview
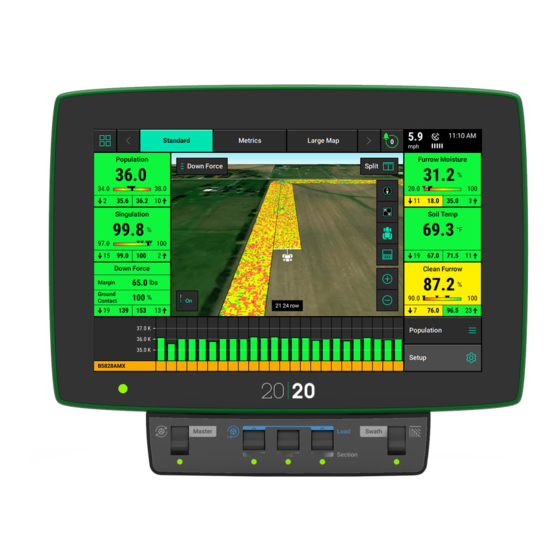
Home Screen Overview The Home Screen displays planting information in an easy to read, easy to navigate format. This information is presented as both metrics and high definition maps. There are three different home screen configurations that can be quickly selected to change the layout of the home screen. All three screens are completely customizable with different types of measurements, button sizes, map sizes, control buttons, and a minichart. - Page 15 Selecting the Map Type name (e.g. Dry Yield) at the top of the map will display the Map Layer Selection screen. All map types are listed on this page (the systems installed and configured will determine which map types will build a map). Map types are categorized by Product Application and Prescription.
- Page 16 Pressing this button will cause the combine icon to stay centered in the screen. Additionally, the zoom level will be reset and zoomed in on the combine icon. The Perspective View button will toggle the map view angle from 0, 65, and 75 degrees. Note: The Perspective View button can only be used once WiFi and background imagery have been enabled.
- Page 17 General Mapping Principles • All maps are mapped at 5Hz, meaning there are 5 data points mapped for each second of time. • Maps are mapped on a combine head wide basis. • A dark line will be mapped on either side of the combine to distinguish the combine passes. •...
-
Page 18: Home Screen Tabs
Summary Information Summary information for the active field can be found by pressing any of the different acre counters on the home screen. When an acre counter is selected, the “Counter Details” page will be selected. On this page summary information will be provided for acres and pounds harvested. At the bottom of the page there are two acre counters (A &... -
Page 19: Customizing The Home Screen
Each of these three tabs can be renamed and the home screen fully customized for three different home screen looks that can be toggled between very quickly. Refer to Customizing the Home Screen below for information on how to do this. Customizing the Home Screen To begin the process of customizing the home screen, select the button in the top left hand... - Page 20 Metrics: The metrics are all of the buttons that display combine information on the home screen. Metrics can be displayed in five different sizes: Small (1x1), Wide (2x1), Tall (1x2), Large (2x2), Extra Large (3x3), and XXL (4x3). Not all metrics are available in Large and Extra Large.
- Page 21 Placing a Widget on the Home Screen Once a widget has been selected from any of the four categories, it can be placed anywhere on the home screen. After selecting a widget, that widget will be placed directly in the center of the screen.
- Page 22 At the top of the page is a “Settings” button that can be used to rename the layout and reset all screen layouts back to the factory default. To begin editing the home screen, select “Add Widget” from the bottom right corner. There are four different types of widgets that can be added to the home screen: Metrics: The metrics are all of the buttons that display combine information on the home screen.
- Page 23 Dashboard Minichart: Add a Swath Control bar here. Once a selection has been made, press “Apply DMC Size to Layout”. Map: Select the size of map to display on the home screen. There are five sizes of maps available: Large (6x6), Small (3x3), Wide (6x7), Extra Wide (6x8), or Full (7x10).
-
Page 24: Notification Center
Notification Center The Notification Center is designed to alert the operator of issues. The Notification Center button on the home page will give a number indicating the number of Event Codes that have taken place since the last reset. Press the button to display all event codes and a description of the issue. - Page 25 GPS Communication GPS logs may be Enabled at the bottom of this page if requested by Precision Planting Support. Additionally, a “Reacquire GPS” button is located in the bottom center of the screen. Press this button to force the system to try to reacquire the GPS signal.
-
Page 26: Cloud Connectivity
GPS Corrections The GPS Correction page can be used to configure how the system handles the GPS signal. Bad GPS Correction — This can be changed between Calculated and GPS speed. Use Calculated for lower grade GPS systems. Heading Mode — This can be changed between Calculated and GPS. - Page 27 Wifi Setup To connect to WiFi, press the Speed button from any page and select Cloud Connection. Select the Connected Network button to begin the process of connecting to WiFi. Select the WiFi network you would like to join, and enter the password. The scan button at the bottom of the page can be used to refresh the available networks.
- Page 28 Cloud Setup The 20|20 Cloud can be used to backup field map data and send support data to our Product Support team. Before logging into the 20|20 Cloud on the display, sign up for the Cloud at 2020.ag. Select the Cloud Username box, and enter your cloud Username and Password.
-
Page 29: 20|20 Connect
20|20 Connect 20|20 Connect is a mobile app available through the App Store and Google Play that connects locally to the on-board DBM WiFi. This app can be used for Calibrations, Health Checks and other system controls. Once the app has been downloaded, follow the on-screen instructions to pair it to your device. -
Page 30: Crop Setup
Crop Setup Step 1: A crop setup must be completed once per season for each crop. With an empty hopper, press “Start” to begin accumulating measured weight. Step 2: Once at least 25,000 lbs. is harvested, press ”Next”, then “Actual LBS” on the screen to enter the actual weight. -
Page 31: Load List Management
Load List Management Load List management can be found on the Home Screen by pressing “Load List”. The Load List screen presents all of the loads taken for the active field and crop. For each load except the active load, both actual and measured weights are displayed along with other metrics. -
Page 32: Setup Button
Setup Button Press the Setup button on the home screen to access the main navigation screen for equipment and control systems’ setup, diagnostic, and data pages. This page is divided into information about the system including diagnostics, information about products being applied, and the main navigation pane. - Page 33 When navigating through different screens, there will always be a “Back” button that will navigate the user to the previously viewed page. The “Home” button will navigate the user to the main home screen. 955692_2...
- Page 34 Basic Overview of the Main Navigation Menu Fields: Change the active field name, assign a boundary to the field, and create or edit Client, Farm, & Field names. Products: Assign the active crop and hybrid being harvested. Equipment: Configure the combine profile, combine measurements, and head setup.
-
Page 35: Fields
Example of a bread crumb trail: Fields Precision Planting uses a three tiered naming structure for field names: Client, Farm, & Field. Each tier of the naming architecture becomes more specific. At all times there will be an active field. The active field (a field consists of a Client, Farm, and Field name) is the field in which all data and map is being created for and stored under. - Page 36 To view different field names, select a different Client or Farm name. Select either the Client or Farm name displayed towards the top of the page to select a different Client or Farm. When the Client box is selected, a list of all Client names is displayed.
-
Page 37: Products
Below the Boundary option are entries for Tillage, Field Number, and Field Acres. This is optional information that can be entered for record keeping. Products The Products menu on the Navigation Pane is used for assigning a crop and hybrid/variety name to the product being harvested. -
Page 38: Equipment Menu
Equipment Menu The Equipment menu is where the combine and combine head are configured. It is important to ensure that all information is entered correctly in the Equipment Pages. Equipment — Profile Press the “Combine Make” button. Select the appropriate make of the combine. Choosing the Combine Make will define some of the choices available in later selection screens. -
Page 39: Combine Measurements
Precision Planting — If a Precision Planting moisture sensor is installed, select this option. Aftermarket AL Analog — If an AgLeader moisture sensor is installed and Precision Planting is connected through an analog harness, select this option. Note: Auto will attempt to determine the AgLeader moisture sensor type and will work in most scenarios. -
Page 40: Combine Head
Combine Head To configure the display for the combine head, press “Setup” on the Home Screen, then press “Equipment”. Select the “Combine Head” to enter the settings. To begin entering the head information, enter the Head Make and Head Type at the top of the screen. -
Page 41: Salve/Load
Salve/Load Both Combine and Head configurations can be saved in the 20|20. Once a Combine and or Head has been configured press the Save/Load button to save these setup configurations. Press the “Save Current Combine Head (or Combine) Configuration” button to create a name for the current configuration on the 20|20. -
Page 42: Systems Menu
Systems Menu The Systems menu contains setup for YieldSense and the Display. YieldSense Settings The YieldSense settings can be edited to configure the YieldSense system. Refer to each setting below for a description on each setting. • Flow Sensor Lag- Flow Sensor lag defines the number of seconds that pass between when the grain enters the head and the grain hits the paddle. -
Page 43: Display General
• Automatic Swatch Sensitivity- Refers to the percentage that a row needs to be off center before it is automatically swathed off. A setting of 0.2 means if there is less than 20% of the row between two rows of corn (combine has shifted over more than 80% of the row width into an already harvested row) then the outside row will swath off. -
Page 44: Display - Advanced Setup
Home Screen map background between the standard grid to a background map. Display — Advanced Setup Debug Code - if a code has been provided from a Precision Planting representative for a specific support issue, it must be entered in this location. Demo Mode - Enables the demo mode which will display planting or harvest data on the display. -
Page 45: Display - Map Layers
Display — Map Layers Use the Map Layer option to enable or disable map layer availability on the Home screen. Select a map layer to disable it. Active map layers will be highlighted in Green, inactive map layers will turn grey. Display —... -
Page 46: Display - Brightness
Display — Brightness Select the Brightness option in the navigation pane when in the Display menu to configure the brightness of the display and the LED lights on the Cab Control Module (switch box connected to the display). The default setting is “Automatic” for both the Display Brightness and LED Brightness. -
Page 47: Crops Menu
Crops Menu The Crops Menu is used to change the active crop for harvesting. Press “Active Crop” to change the crop. Use the Add and Delete Crop button at the bottom of the screen to modify which crops are available to select as an active crop. -
Page 48: Diagnose
Diagnose The Diagnose Menu is the primary location for trouble shooting issues related to the operation of the 20|20 system itself and all products configured on the monitor. The schematic on this page shows each component including the Base Module that the display screen connects to. Each product that is configured is displayed along with a combine showing a drawing of the product (s). - Page 49 “Enable Detailed Log” so that it turns Green. Detailed Logs are taken when requested by the Precision Planting Support Team. A detailed log will run for one minute and then automatically be disabled. Once a log is captured, select the “Export –...
-
Page 50: Yieldsense Level 2 Screens
YieldSense Level 2 Screens Flow Sensor The Flow Sensor Tab on the diagnose page is showing the information gathered from the impact sensor in the clean grain elevator. It will show the following: Connected Crud Build Up Missing Broken Paddle Flow Rate NH Frequency Elevator Frequency... - Page 51 Moisture Sensor There will be a moisture sensor tab displayed if the moisture sensor selected is not OEM CAN. It will display the following: Connected Analog Moisture Analog Temperature Moisture Temperature Voltage Moisture A and B Voltage Motor Status Motor State Grain Present Proximity Sensor Voltage Detected Harness...
-
Page 52: Fieldview Info
The DBM (Display Base Module) on the diagnose page is showing all the information that the module is sending and receiving. It includes the following: Coprocessor Precision Planting CAN OEM CAN Temperature Battery Voltage Ethernet Ports Module Software Versions FieldView Info Select the FVM option on the diagnose page to view the FieldView Module settings. - Page 53 FieldView Connected — Indicates if the system is communicating with the FieldView Cab app. DBM Connected — Indicates if the Display Base Module is communicating with the FVM. The FieldView Username displays the username that the 20|20 is linked to. This username is saved when an operator selects “Yes”...
-
Page 54: Data
If dual displays are being used only the Display Config for the display that the USB is connected to will export the Display Config. Each display will have its own config. Support Data – Uploads Field Map data and diagnostic logs to Precision Planting Product Support. -
Page 55: Data - Import
Field and Crop Config – Import Client, Farm, and Field names as well as the crop and hybrid configurations from another 20|20 or a Generation 1 & 2 20/20 SeedSense monitor Prescription / Boundary – Imports prescription and boundary files from a USB Drive. Files must be in the form of Shape Files and include the .shp, .shx, and .dbf file extensions. -
Page 56: Data - Delete
Field Map Data – Import Field data onto the display to view maps, and field information from previously exported data or from other Gen 3 20|20 displays. Demo Files – Import Demonstration files into the monitor that will run when the monitor is in Demo Mode (See Display Settings –... -
Page 57: Software Update
Display Base Module and Display. Install from USB – Software can be downloaded for free from the Precision Planting website and saved to a USB drive. Ensure the software file is on the root directory on the USB drive. Place the USB drive in the side of the display and then select “Install from USB”. - Page 58 Appendix A Yield — The Yield box displays two values of dry yield in bushels per acre (bu/ac). The “Instant” value represents yield at your current position and is based on a three second average. Field Average is the average dry yield for the entire field. Moisture —...
-
Page 59: Appendix B - Harness Layouts
Appendix B — Harness Layouts John Deere 50/60/70/S YieldSense Electrical System Overview GPS/Radar Gen3 725155 Radar Connection (Not Used for Harvest) DBM Power Harness 725150 Internal GPS Connection. OEM CAN Connect together if using Harness the external GPS 725151 connection Cab Harness 751200 Flow Sensor... - Page 60 John Deere 9x00/9x10 Gen3 YieldSense Electrical System Overview GPS/Radar Gen3 725155 Radar Connection (Not Used for Harvest) JD 9X00/10 Cab Harness 751227 Flow Sensor Internal GPS Connection. 751153 Connect together if using the external GPS connection Gen3 YieldSense Module (YSM2) Flow Sensor Harness 750217...
- Page 61 Case IH Flagship Gen3 YieldSense Electrical System Overview Cab Power Harness Adapter 750529 GPS/Radar Gen3 *Only required on pre 2013 725155 machines Radar Connection DBM Power (Not Used for Harvest) Harness 725150 Relay Internal GPS Connection. OEM CAN Harness Connect together if using 725151 the external GPS connection...
- Page 62 Case IH Midrange Gen3 YieldSense Electrical System Overview Cab Power Harness Adapter GPS/Radar Gen3 750771 725155 Radar Connection DBM Power (Not Used for Harvest) Harness 725150 Relay Internal GPS Connection. OEM CAN Harness Connect together if using 725151 the external GPS connection Flow Sensor 751160/751161...
- Page 63 Case IH 2x77/2x88 Gen3 YieldSense Electrical System Overview Cab Power Harness Adapter 750771 DBM Power GPS/Radar Gen3 Harness 725155 725150 Radar Connection Relay (Not Used for Harvest) Internal GPS Connection. Connect together if using the external GPS Flow Sensor connection 751162 Cab Harness 751203...
- Page 64 Lexion 700 YieldSense Gen3 Electrical System Overview GPS/Radar Gen3 725155 3 Pin Power Radar Connection Adapter DBM Power (Not Used for Harvest) (725719) Harness 725150 Internal GPS Connection. Connect together if using OEM CAN the external GPS In Harness connection 751208 Flow Sensor 751164...
- Page 65 Lexion 400/500 YieldSense Gen3 Electrical System Overview GPS/Radar Gen3 725155 Radar Connection DBM Power (Not Used for Harvest) Harness 725150 Internal GPS Connection. Lexion 400/500 Connect together if using Power Adapter OEM CAN the external GPS 751226 In Harness connection 751208 Flow Sensor 751164(9")/...
Need help?
Do you have a question about the 20/20 and is the answer not in the manual?
Questions and answers
When I go to export data on my field map data page, it does not show acres....it just has Date/ Data Size/ Season/ Pass