Table of Contents
Advertisement
Available languages
Available languages
Advertisement
Table of Contents

Related Manuals for Siser Juliet


Summary of Contents for Siser Juliet
- Page 1 OPERATION MANUAL MANUEL D'UTILISATION MANUAL DEL USUARIO...
- Page 2 READ SAFETY INSTRUCTIONS PRIOR TO SETUP OR USE LIRE LES INFORMATIONS DE SÉCURITÉ AVANT LA MISE EN PLACE OU L'UTILISATION LEA LA INFORMACIÓN DE SEGURIDAD ANTES DE CONFIGURAR O USAR...
-
Page 3: Table Of Contents
TABLE OF CONTENTS OVERVIEW SETUP TOUCH SCREEN 6 10 SAFETY INFORMATION 11 12 FCC STATEMENT TABLE DES MATIÈRES VUE D'ENSEMBLE 14 15 MISE EN PLACE 16 18 ÉCRAN TACTILE 19 23 INFORMATIONS SUR LA SÉCURITÉ 24 25 DÉCLARATION DE LA FCC TABLA DE CONTENIDOS VISIÓN GENERAL 27 28... -
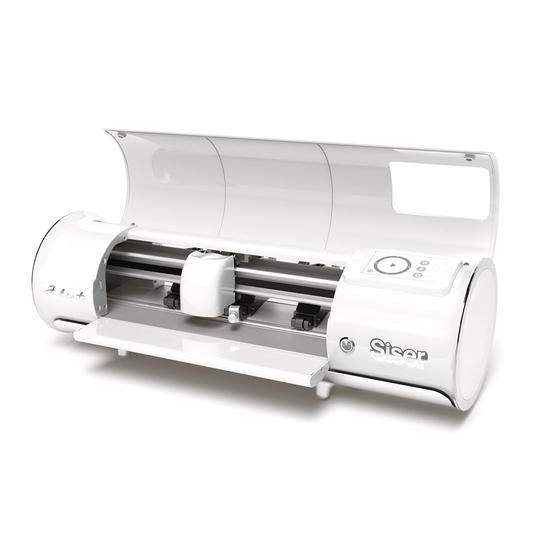
Page 4: Overview 1
OVERVIEW Machine Head Flip Cover Touch Screen Cutting Strip Tool Holder Holds cutting blade housing or marker adapter USB-A Port Feed Tray Used for connecting flash drives Helps stabilize material to cutter Adjustable Pinch Rollers USB-B Port Feeds material in and out of the Used for connecting cutter to a computer cutter... - Page 5 MARKER ADAPTER 45º BLADES 60º BLADE BLADE HOUSING USB CORD POWER CORD AND POWER SUPPLY 12”X12” CUTTING MAT ALSO INCLUDED IN PACKAGING: TWO SHEETS OF 6”X12” SISER HEAT TRANSFER VINYL ® ONE COVER SHEET *Items shown are not to scale...
- Page 6 JULIET SETUP ™ Set up your cutter online at setup.siser.com Download Leonardo™ Design Studio for free with your cutter purchase OR SETUP MANUALLY USING THE FOLLOWING INSTRUCTIONS Remove all protective packaging from cutter and accessories, including plastic wrap. Plug the round end of the power cord into the DC power port on the rear of the machine, then plug the opposite end into a standard electrical outlet.
- Page 7 Insert blade housing into tool holder on the machine head with the blade facing down. Turn the knob on the tool holder clockwise to tighten. Lower the roller bar lever to adjust the pinch rollers and position as desired. Take material or cutting mat and align under the rollers.
- Page 8 Identifying a Good Test Cut Cut not deep enough Material and carrier Material cut and and can’t be weeded cut through carrier not cut through Once you’re ready to cut, plug in the USB flash drive via the USB-A port on the rear of the cutter. Tap the ‘Settings’...
-
Page 9: Touch Screen
TOUCH SCREEN Navigate by tapping the touch screen to select an option or slide along a bar to adjust values. HOME SCREEN SETTINGS CUT SETTINGS TEST CUT WiFi Indicator — Displays WiFi connection status Directional Arrows — Moves material and machine head Play Button —... - Page 10 CUT SETTINGS CUT SETTINGS PRESET CUT SPEED VS FORCE FS Adjust the cut settings of the cutter Back Button — Returns to previous screen Home Button — Returns to the Home Screen Cutting Presets — Opens preset cutting menu Cut Speed — Adjusts how fast the machine head moves Force —...
- Page 11 Sleep — Set how much time of inactivity will put the cutter to sleep Unit — Choose between metric and imperial measurements Language — Select desired language WIFI WIFI SISER 111.222.3.444 CONNECTED: NETWORK NAME NETWORK NAME SCAN PASSWORD123 PASSWORD xxx.xxx.xxx.200...
- Page 12 CAMERA CAMERA Use the camera for accurate tool registration Registration Snapshot — Crosshair overlay offers a visual preview of the tool orientation Zoom — Zooms in or out on the current snapshot Camera Snapshot — Takes a snapshot at the tool’s current position OK —...
- Page 13 SYSTEM INFORMATION SYSTEM INFORMATION MODE: 024 HVER: V7.1201 SVER: V20.0811 MPID: 087C 8726 4644 0768 BAUD: 67800 L DEFAULT ALL SETTINGS Displays cutter system information Default All Settings — Resets all cutter settings to factory settings, including cutting presets *Touch screen in actual product may differ from shown images...
-
Page 14: Safety Information
Use only the power cord and power supply provided with this product or otherwise provided by Siser® for the specific purpose of replacing the provided power cord and power supply. Do not use the power cord or power supply if damaged. - Page 15 Do not disassemble, modify or otherwise alter the product. If product malfunctions or becomes damaged, do not attempt to repair. Please contact Siser® North America by calling 1-866-301-9409 or visit siserna.com for more information.
-
Page 16: Fcc Statement
FCC STATEMENT This equipment has been tested and found to comply with the limits for a Class B digital device, pursuant to Part 15 of the FCC rules. These limits are designed to provide reasonable protection against harmful interference in a residential installation. -
Page 17: Vue D'ensemble
VUE D'ENSEMBLE Tête de la machine Couvercle rabattable Écran tactile Bande de découpe Support d'outil Porte lame ou adaptateur de Port USB-A marqueur Utilisé pour connecter des Plateau d'alimentation lecteurs flash à la machine Aide à stabiliser le matériau Port USB-B Galets de pincement réglables Utilisé... - Page 18 LAME DE 60° PORTE LAME MARQUEURS CORDON D'ALIMENTATION CORDON USB ET ALIMENTATION ÉLECTRIQUE TAPIS DE DÉCOUPE 30CMX30CM ÉGALEMENT INCLUS DANS L'EMBALLAGE: DEUX FEUILLES DE VINYLE DE THERMOCOLLANT SISER® 15CMX30CM UNE FEUILLE DE PROTECTION *Les éléments présentés ne sont pas à l'échelle...
- Page 19 CONFIGURATION DE JULIET ™ Configurez votre machine en ligne sur setup.siser.com Téléchargez gratuitement le logiciel Leonardo Design Studio lors de l'achat de votre machine de découpe. OU CONFIGURER MANUELLEMENT EN SUIVANT LES INSTRUCTIONS SUIVANTES Retirez tous les emballages de protection de la machine et des accessoires, y compris l'emballage plastique.
- Page 20 Insérez la lame dans le porte-outil de la tête de la machine, la lame étant orientée vers le bas. Tournez le bouton du porte-outil dans le sens des aiguilles d'une montre pour le serrer. Abaissez le levier de la barre à rouleaux pour régler les rouleaux et les positionner comme vous le souhaitez.
- Page 21 Reconnaître un bon test de découpe La découpe n'est pas Découpe du matériau Non découpe du assez profonde et ne et du liner matériau et du liner peut pas être échenillée Une fois que vous êtes prêt à découper, branchez la clé USB via le port USB-A à...
-
Page 22: Écran Tactile
ÉCRAN TACTILE Naviguez en touchant l'écran tactile pour sélectionner une option ou en glissant le long de la barre pour ajuster les valeurs. ÉCRAN D'ACCUEIL SETTINGS CUT SETTINGS TEST CUT Indicateur WiFi— Affiche l'état de la connexion WiFi Flèches directionnelles — Déplace le matériau et la tête de la machine Bouton Play —... - Page 23 PARAMÈTRES DE DÉCOUPE CUT SETTINGS PRESET CUT SPEED VS FORCE FS Régler les paramètres de découpe de la machine Bouton Retour — Retourne à l'écran précédent Bouton d'accueil — Retourne à l'écran d'accueil Préréglages de découpe — Ouvre le menu de découpe des préréglages Vitesse de découpe —...
- Page 24 Veille — Définissez le temps d'inactivité qui mettra la machine en veille Unité — Choisissez entre les mesures métriques et impériales Langue — Sélectionnez la langue de conception WIFI WIFI SISER 111.222.3.444 CONNECTED: NETWORK NAME NETWORK NAME SCAN...
- Page 25 CAMÉRA CAMERA Utilisez la caméra pour un enregistrement précis des outils Instantané d'enregistrement — La superposition du réticule offre un aperçu visuel de l'orientation de l'outil Zoom — Zoom avant ou arrière sur l'instantané actuel Instantané de la caméra — Prend un moment instantané de la position actuelle de l'outil OK —...
- Page 26 INFORMATION DU SYSTEME SYSTEM INFORMATION MODE: 024 HVER: V7.1201 SVER: V20.0811 MPID: 087C 8726 4644 0768 BAUD: 67800 L DEFAULT ALL SETTINGS Affiche les informations du système de découpe Tous les Paramètres par Défaut — Réinitialise tous les paramètres de la machine aux paramètres d'usine, y compris les préréglages de découpe *L'écran tactile du produit réel peut différer des écrans présentés...
-
Page 27: Informations Sur La Sécurité 24
Utilisez uniquement le cordon d'alimentation et le bloc d'alimentation fournis avec ce produit ou fournis par Siser® dans le but spécifique de remplacer le cordon d'alimentation et le bloc d'alimentation fournis. N'utilisez pas le cordon d'alimentation ou le bloc d'alimentation s'ils sont endommagés. - Page 28 éliminés de manière appropriée. Ne démontez pas, ne modifiez pas ou n'altérez pas le produit. Si le produit fonctionne mal ou est endommagé, n'essayez pas de le réparer. Veuillez contacter Siser® North America en appelant le 1-866-301-9409 ou visitez siserna.com pour plus d'informations...
-
Page 29: Déclaration De La Fcc
DÉCLARATION DE LA FCC Cet équipement a été testé et déclaré conforme aux limites d'un appareil numérique de classe B, conformément à la partie 15 des règles de la FCC. Ces limites sont conçues pour fournir une protection raisonnable contre les interférences nuisibles dans une installation résidentielle. -
Page 30: Visión General
VISIÓN GENERAL Cabezal de la Máquina Tapa Abatible Pantalla Táctil Tira de Corte Portaherramientas Sostiene la carcasa de la navaja de Puerto USB-A corte o el adaptador del marcador Usado para conectar el dispositivo Bandeja de Alimentación Ayuda a estabilizar el material Puerto USB-B Soportes de Pellizco Ajustables Usado para conectar la cortadora... - Page 31 DE 60° CUCHILLA CABLE USB CABLE DE ALIMENTACIÓN Y FUENTE DE ALIMENTACIÓN TAPETE DE CORTE 30CMX30CM ESTE PAQUETE TAMBIÉN INCLUYE: DOS HOJAS DE 15CMX30CM DE VINIL TERMOTRANS FERIBLE DE SISER ® UNA HOJA PROTECTORA *Los artículos mostrados no están a escala...
- Page 32 CONFIGURACIÓN DE JULIET ™ Configure su cortadora en línea en setup.siser.com Descargue el programa de diseño Leonardo Design Studio gratis con la compra de su cortadora O CONFIGURE MANUALMENTE SIGUIENDO LAS SIGUIENTES INSTRUCCIONES Quite todo el embalaje protector de la cortadora y accesorios, incluyendo la envoltura plástica.
- Page 33 Inserte la carcasa de la cuchilla dentro del portaherra- mientas del cabezal de la máquina con la cuchilla viendo hacia abajo. Gire la perilla del portaherramientas en dirección hacia las manecillas del reloj para apretarla. Baje la palanca de la barra de rodillos para ajustar los rodillos y colóquelos como desee.
- Page 34 Identificando una Prueba de Corte Exitosa No se cortó con El material y trans- Material cortado y suficiente profundi- portador cortados transportador no dad y no se puede cortado Una vez que está listo para cortar, conecte el dispositivo USB via Puerto USB-A detrás de su máquina. Toque el botón de “configuraciones”, luego seleccione su archivo de corte USB en el menú.
-
Page 35: Pantalla Táctil 32
PANTALLA TÁCTIL Navegue tocando la pantalla táctil para seleccionar una opción o deslice a barra para ajustar los valores. PANTALLA DE INICIO SETTINGS CUT SETTINGS TEST CUT Indicador de WiFi — Muestra el estado de la conección a WiFi Flechas Direccionales — Mueven el material y el cabezal de la máquina Botón Play —... - Page 36 CONFIGURACIONES DE CORTE CUT SETTINGS PRESET CUT SPEED VS FORCE FS Ajusta las configuraciones de corte de la cortadora Botón de Regresar — Regresa a la pantalla previa Botón de inicio — Regresa a la pantalla de inicio Preconfiguraciones de Corte — Abre el menú de preconfiguraciones de corte Velocidad de Corte —...
- Page 37 Dormir — Establece cuánto tiempo de inactividad pondrá a la cortadora a dormir Unidad — Elije entre medidas métricas e imperiales Lenguaje — Selecciona el lenguaje a escoger WIFI WIFI CONNECTED: SISER 111.222.3.444 NETWORK NAME NETWORK NAME SCAN PASSWORD123 PASSWORD xxx.xxx.xxx.200...
- Page 38 CÁMARA CAMERA Usa la cámara para el registro exacto de la herramienta Snapshot de Registro — Crosshair superposiciones que ofrecen una vista previa de la orientación de la herramienta Zoom — Acerca o aleja el snapshot actual Snapshot de Cámara — Toma una instantánea de la posición actual de la herramienta OK —...
- Page 39 INFORMACIÓN DEL SISTEMA SYSTEM INFORMATION MODE: 024 HVER: V7.1201 SVER: V20.0811 MPID: 087C 8726 4644 0768 BAUD: 67800 L DEFAULT ALL SETTINGS Muestra la información del sistema de la cortadora Todas las Configuraciones en Automático — Restablece todas las configuraciones a las de la fábrica, incluyendo las preestablecidas *La pantalla táctil del producto actual puede diferir de las pantallas mostradas...
-
Page 40: Información De Seguridad 37
Advertencia: Riesgo de Lesión, Incendio y Choque Elétrico El uso del producto en un modo no descrito en este documento u otro material oficial proporcionado por Siser® puede resultar en daño del producto, daño a propiedad, lesiones, o lesiones fatales. - Page 41 No desarme, modifique o altere este producto. Si el producto no funciona bien o se daña, no intente repararlo. Por favor contácte a Siser® North America llamando al 1-866-301-9409 o visite siserna.com para mayor información.
-
Page 42: Declaración De La Fcc
DECLARACIÓN DE LA FCC Este equipo ha sido probado y se ha comprobado que cumple con los límites de un dispositivo digital clase B, en conformidad con la parte 15 de las reglas de la FCC. Estos límites fueron diseñados para proporcionar protección razonable contra interferencia dañina en una instalación residencial. - Page 44 Visit siserna.com for more information Visitez siserna.com pour plus d'informations Visite siserna.com para mayor información Model No. SNAHDCJ12...
Need help?
Do you have a question about the Juliet and is the answer not in the manual?
Questions and answers
The machine won't power up despite the indicator light is on in the power pack. Is there an internal fuse, or reset button?