Advertisement
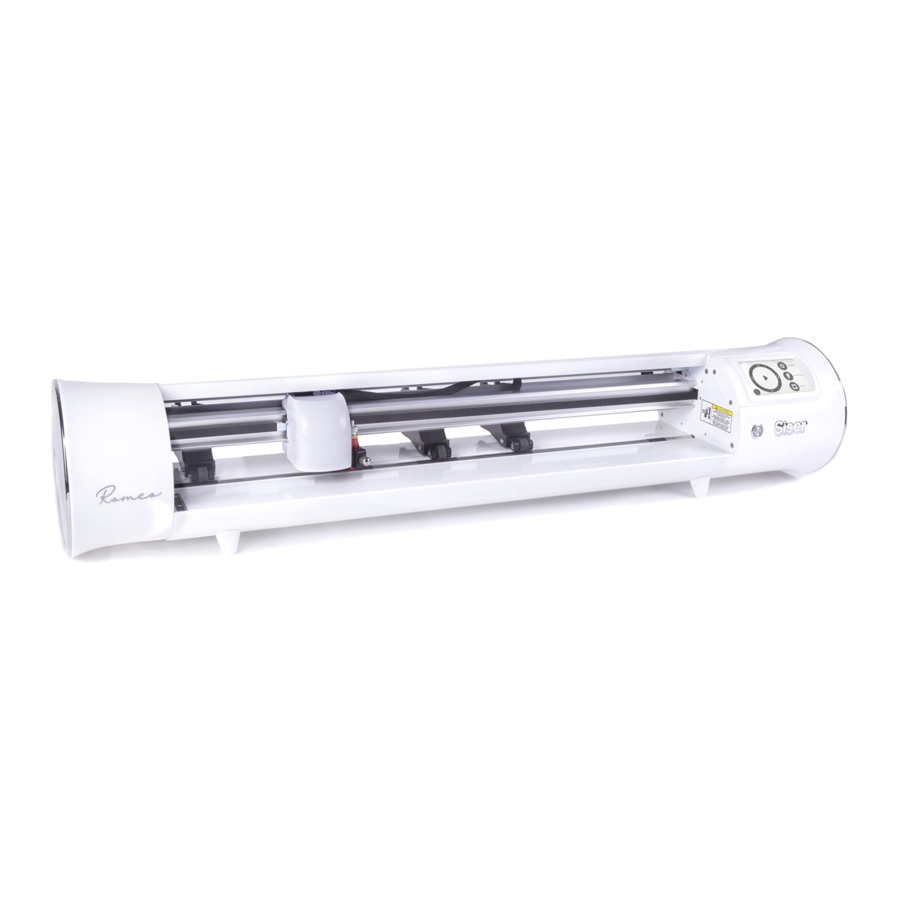
OVERVIEW

- Cutting Strip
- Machine Head
- Tool Holder
Holds cutting blade housing or marker adapter - Touch Screen
- Grit Marks
- Adjustable Pinch Rollers
Feeds material in and out of the cutter - Power Button
- Pinch Roller Levers
Adjusts the tension of the pinch rollers
- DC Power Port
- USB-B Port
Used for connecting cutter to a computer - USB-A Port
Used for connecting flash drives to cutter - Roller Bar Lever
Locks down or releases material under roller bar and allows pinch rollers to be adjusted - Raised Feet

ROMEO ® SETUP
Set up your cutter online at setup.siser.com
Download Leonardo ® Design Studio for free with your cutter purchase
OR SETUP MANUALLY USING THE FOLLOWING INSTRUCTIONS
- Remove all protective packaging from cutter and accessories, including plastic clips from pinch rollers.
- Plug the round end of the power cord into the DC power port on the rear of the machine, then plug the opposite end into a standard electrical outlet. Press the power button to turn the cutter on.
- Carefully remove 45° blade from packaging and insert into socket on blade holder with the pointed side facing outwards.
![]()
- Twist the upper screw of the blade holder clockwise to expose less of the blade, or counterclockwise to expose more of the blade. The ideal length of exposed blade is about a credit card's width. Once the blade is properly adjusted, twist the inner screw to lock in the blade position.
![]()
- Insert blade holder into tool holder on the machine head with the blade facing down. Turn the knob on the tool holder clockwise to tighten.
- Lower the roller bar lever to adjust the pinch rollers and position as desired. Take material or cutting mat and align under the rollers. Raise the roller bar lever to secure the material or mat in place.
![]()
Pinch Rollers
The pinch roller levers can be flipped 'up' to increase the tension of the roller or 'down' to ease the tension.
![]()
Position pinch rollers over the grit marks for optimal traction.
![]()
- Tap 'Cut Settings' on the touch screen then tap the current preset to view the entire menu. Select the preset that matches your material to automatically adjust the cut force and speed.
![]()
- Tap 'Test Cut' to cut a small shape out of your material to ensure the cut settings are correct. After testing, select the 'Home' icon to return to the home screen.
![]()
Identifying a Good Test Cut
Cut not deep enough and can't be weeded
![]()
Material and carrier cut through
![]()
Material cut and carrier not cut through
![]()
- Once you're ready to cut, plug in the USB flash drive via the USB-A port on the rear of the cutter. Tap the 'Settings' button, then 'USB'. Select your cut file* from the drop down.
*Visit siserna.com for info on accepted file types - Move the position of the blade by using the on-screen arrow buttons. Once the blade is in position, tap the play button to begin cutting.
![]()


Congratulations— you've cut your first design! To learn how to apply your design, visit www.siserna.com.
Ready to use your cutter to its full potential?
Access advanced designer tools, inspirational projects, tutorials, and more by downloading Leonardo® Design Studio.
TOUCH SCREEN
Navigate by tapping the touch screen to select an option or slide along a bar to adjust values.
HOME SCREEN

- WiFi Indicator — Displays WiFi connection status
- Directional Arrows — Moves material and machine head
- Play Button — Resumes cut or recuts the last known design
- Tool Reorientation — Moves tool holder back to starting position
- Settings — Opens cutter settings menu
- Cut Settings — Opens presets menu with adjustable cut settings
- Test Cut — Performs a test cut at the tool holder's current position
HOME SCREEN - JOB IN PROGRESS

- Pause Button — Pauses job at current position
- Job Progress Bar — Displays progress of current job based on how far the circle is completed
- Cancel Button — Cancels current job
CUT SETTINGS

Adjust the cut settings of the cutter
- Back Button — Returns to previous screen
- Home Button — Returns to the Home Screen
- Cutting Presets — Opens preset cutting menu
- Cut Speed — Adjusts how fast the machine head moves
- Force — Adjusts how much pressure the machine head exerts
- Update Preset — Overwrites preset with the current settings
SETTINGS

Access the various settings and functions of the cutter
- General Settings — Opens general cutter settings menu
- WiFi— Opens WiFi settings menu
- Camera — Opens camera settings menu
- USB — Opens USB menu for opening files from a USB flash drive
- System Info — Displays system information
GENERAL SETTINGS

Make general adjustments to your cutter
- LED — Turn the LED ON/OFF and adjust the brightness
- Alert — Turn the chime and/or LED ON/OFF that indicates a completed job
- Sleep — Set how much time of inactivity will put the cutter to sleep
- Unit — Choose between metric and imperial measurements
- Language — Select desired language
WIFI

Set up the cutter's wireless connection
- Scan — Searches for available WiFi networks that the cutter can connect to
- Eye Button — Shows or hides the password entered
- IP Address — Manually enter an IP Address
- Apply — Uses the manually entered IP Address to connect
- Default — Switch WiFi to Hotspot mode
CAMERA

Use the camera for accurate tool registration
- Registration Snapshot — Crosshair overlay offers a visual preview of the tool orientation
- Zoom — Zooms in or out on the current snapshot
- Camera Snapshot — Takes a snapshot at the tool's current position
- OK — Sets tool position
- Directional Arrows — Moves the machine head and material for a different camera view
- Camera Light — Changes the brightness of the camera light
USB DRIVE

Access cut files from a connected USB drive
- File selection — Displays folders and files on connected USB flash drive so the desired cut file can be opened
- Start cut — Starts job using current settings
SYSTEM INFORMATION

Displays cutter system information
- Default All Settings — Resets all cutter settings to factory settings, including cutting presets
*Touch screen in actual product may differ from shown images
MATERIAL ROLL HOLDER SETUP

Position the Material Roll Holder behind Romeo ®. Place a roll of material onto the rollers.

Load the material through the back of the cutter, giving the material some slack.

Align the material with the guide strip and place evenly under the pinch rollers for optimal tracking.
SAFETY INFORMATION
Please read all safety information before product use.


Risk of Injury, Fire, and Electric Shock
Use of the product in a manner not outlined in this document or other official material provided by Siser®, may result in damage to the product, property damage, injuries or fatal injury.
For Indoor Use Only
The product is to be used and stored in dry indoor locations only, that are kept between 95°F and 40°F. Do not operate product in or near liquids.
This product is not a toy and is intended to be operated by an adult. Not intended for use by children 12 years or under. Children must be supervised around the product.
Do not operate the product if damaged or malfunctioning.
Use this product on a level and stable surface, allowing for enough space in front of and behind the product for proper operation.
Use only the power cord and power supply provided with this product or otherwise provided by Siser® for the specific purpose of replacing the provided power cord and power supply. Do not use the power cord or power supply if damaged.
The power cord and power supply must be fully inserted into the outlet and cutter. The product should not be placed on the power cord, and the power cord and power supply should be positioned to avoid a tripping hazard or impeding the cutting process.
Disconnect the product from electrical power by unplugging the power cord from the electrical outlet; always grasping the plug and never the cord.
Always turn the product off before unplugging from the electrical outlet.
It is recommended to plug the product into a surge protector to prevent potential damage from electrical malfunctions.
Disconnect the product from electrical power when the product is not in use, before cleaning or servicing the product, and when replacing the cutting blade.
To avoid injury, use caution when handling the cutting blades and do not touch the sharp edge. Cutting blades should be stored and kept out of reach of children.
Do not use a broken blade. Remove the broken blade from the blade holder with tweezers.
Do not load unintended materials onto the cutting mat or into the cutter.
Keep objects, hair, loose jewelry, clothing, and fingers away from the product when it is operating, as injuries may result from the rapid movements.
Do not touch the cutting mat or materials when the product is operating until the cutting mat or materials are unloaded from the product.
Do not place fingers or other objects inside the product, or near any moving parts, while powered on, connected to electrical power, or while operating.
Do not use solvents, such as thinner, alcohol, or nail polish remover to clean the product as it may damage the product's finish or touch screen. Clean the product with a soft, dry cloth.
Any plastic bags used in packaging of this product should be kept out of reach of children or properly disposed of.
Do not disassemble, modify or otherwise alter the product.
If product malfunctions or becomes damaged, do not attempt to repair. Please contact Siser® North America by calling 1-866-301-9409 or visit siserna.com for more information.
Documents / Resources
References
http://setup.siser.com
Home for Heat Transfer Vinyl - Siser North America
Home for Heat Transfer Vinyl - Siser North America
Download manual
Here you can download full pdf version of manual, it may contain additional safety instructions, warranty information, FCC rules, etc.
Advertisement


Need help?
Do you have a question about the Romeo and is the answer not in the manual?
Questions and answers