Table of Contents
Advertisement
Quick Links
Studer Solartechnik
User and Installation Manual
This document has been produced to accompany the
For any further information regarding installation or using this range of COMPACT inverters/chargers
please contact the engineering dept. at Morven Electronics Ltd.
Combination Inverters/Chargers
COMPACT C1312
COMPACT C2324
COMPACT C3048
Studer User and Installer Manual.
Tel. +44 (0) 141 8103100
Fax. +44 (0) 141 8103111
Email
Sales@morven.co.uk
Sinewave Inverter, Battery Charger
- 1 -
Advertisement
Table of Contents

Related Manuals for Compact C1312

Summary of Contents for Compact C1312
- Page 1 This document has been produced to accompany the Studer User and Installer Manual. For any further information regarding installation or using this range of COMPACT inverters/chargers please contact the engineering dept. at Morven Electronics Ltd. Tel. +44 (0) 141 8103100 Fax.
-
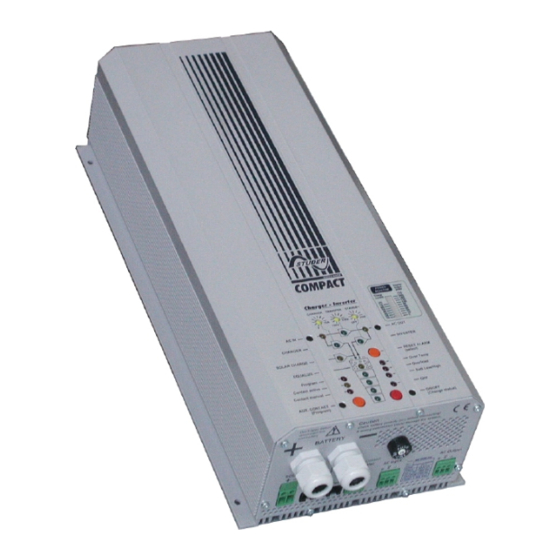
Page 2: General Description
ON if it detects a load present at the AC OUTLET. 2. The Transfer System The COMPACT can be connected to an AC source at the AC INPUT connector. (e.g. grid system or generator). The transfer system monitors this voltage and if it is within pre-set limits switches OFF the inverter and transfers it to the AC OUT connector. - Page 3 Prior to starting Installation 1. Important:- Ensure that the model of Compact is compatible with the battery voltage The last two digits in the model number denotes the battery voltage. (e.g. C3548 should only be connected to a 48Volt battery).
- Page 4 If not, press the ‘ON/OFF’ button 19* positioned below to illuminate it. On connecting to a battery the Compact needs 1 – 2 minutes to calculate the actual capacity of the battery. During this time the LEDs 14–17* on the front of the unit indicate the battery condition as 100% charged.
- Page 5 The temperature sensor (CT-35) is connected by simply pushing the RJ11/6 connector located on the end of the cable supplied into the socket marked ‘Temp’ on the end of the COMPACT. The sensor must then be securely fastened to the wall of the battery or close to it. The temperature sensor cable must not be tied to the battery leads or laid into part of a wiring loom.
-
Page 6: Led Indicators
Adjustment for Transfer Voltage. (Voltage COMPACT switches from Transfer to Inverter mode STANDBY Adjustment for Standby level. (load where COMPACT switches from Standby to normal operation) INPUT LIMIT Must be adjusted to the maximum available current of your AC INPUT supply (explained later). - Page 7 Standby Mode When in Inverter Mode the COMPACT continually monitors the load on the AC OUT. If this load falls below a presettable level, set by the ‘Standby’* knob, the Inverter will switch OFF to avoid taking power unnecessarily from the batteries. This load can be adjusted between 1 to 20 Watts using the ‘Standby’* knob.
-
Page 8: The Battery Charger
While the battery charger is operating there will still be AC power delivered to the AC OUTPUT. Cycle of Charge During the pre-installation set-up of the COMPACT the small slider switch ‘Equalize’ should have been set to the OFF position for sealed Gel, or to the ON position for normal lead-acid batteries. The unit has been factory set to accurately fully recharge and maintain both types of batteries. -
Page 9: The Transfer System
Battery 0% - 25% The Transfer system When an AC voltage is at the AC INPUT of the COMPACT, the ‘AC IN’ Led 1* is illuminated. If this voltage is within the presettable voltage and frequency range, adjustable using the ‘TRANSFER’* knob described in the next section, this voltage is switched directly to the battery charger and the output ‘AC... - Page 10 The fast, break-free transfer mode is programmed with the slide switch ‘ Transfer Delay’ located on the side of the COMPACT. With this switch in the OFF position the Inverter will switch ON at once if the voltage at the AC INPUT drops below the set value mentioned in the previous section. This switch -over takes 20mSecs which ensures a break-free change-over for almost all appliances.
-
Page 11: Default Settings
4. If the COMPACT has been turned OFF manually or with a fault. RESETTING When the COMPACT is installed the unit will operate to these default settings. These settings suit most installations and users generally find that they do not need to reprogram these settings. However, in some situations these values may need to be altered. - Page 12 Studer Solartechnik Sinewave Inverter, Battery Charger Programming the Battery charging voltages and absorption time The voltage levels (low voltage, float voltage, end of charge voltage and the equalisation voltage) and the duration of the absorption stage can all be altered. Absorption Low Voltage Float Charge...
- Page 13 Aux. Contacts: 1. Over temperature 2. Overload 3. Battery Over-voltage or Under-voltage 4. If the COMPACT has been turned OFF manually or with a fault. Example 1: Activate the auxiliary contacts only when in the Over Temp condition Press button 21 for a minimum of 2 seconds to enter the Auxiliary Contacts programming mode.
- Page 14 Studer Solartechnik Sinewave Inverter, Battery Charger Disabling some of the functions of the COMPACT Each of the three functions Charger, Inverter and Transfer can be individually disabled. This is required for some installations Press and hold button 20 for more than 2 seconds and you have access to the different possibilities shown in the following diagram.
Need help?
Do you have a question about the C1312 and is the answer not in the manual?
Questions and answers