
Related Manuals for LEO JAYMZ ML

Summary of Contents for LEO JAYMZ ML
- Page 2 Donot un the ability of these toolsandmachineryto causeinjury. Never ope without all guardsin place andalways wear approved safety glasses own safety, please heed this warning. ML electric guitar DIY Kit...
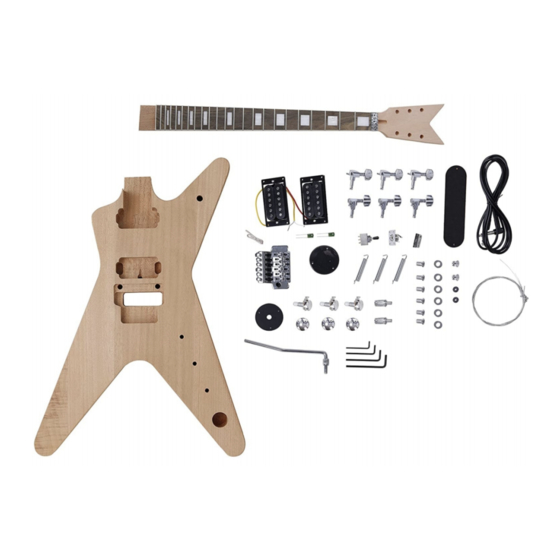
- Page 3 Unboxing and Preparing Assembling 2.1 All the components deliveried 2.2 Assemble instruments preparing Provide the following tools and materialsfor the assemblyof the guitar: Screwdriver Rubbermallet Ring spanner Pliers Paint and accessories Sandpaper Guitar paint spray can ML electric guitar DIY Kit...
- Page 4 Not only one time may can not reach the exactly what you espected, so sand with 320-grit and wipe again and again until got your lovely color. Here we take the natural color as example. ML electric guitar DIY Kit...
- Page 5 3.2.5 Tighten the nut of tunning peg After you fix the screws on the rear side of the headstock, flip the headstock to the top side, use the span for tighten the nut of the tunning pegs. ML electric guitar DIY Kit...
- Page 6 24.75" (648mm) from the nut. In the case that the neck is jointed in correct scale. Now use a pencil for mark position for the bottom line of the neck in the bridge cavity. ML electric guitar DIY Kit...
- Page 7 Leave it for at least 24 hours for waiting for the glue drying. Then you can doing the following process. ML electric guitar DIY Kit...
- Page 8 The top one is the volume Volume control and the bottom 2 are tone control. And fixed by the nuts with the washers on the top side of the body. Tone Tone (Tone controls are all welded a green capacitance) ML electric guitar DIY Kit...
- Page 9 Neck Pickup Spot Put both pickups' cable wire go through the access to the toggle switch back cavity, the position of each pickup please check the right illustration. Bridge Pickup Spot ML electric guitar DIY Kit...
- Page 10 Assembling 3.4.5 The connecting method Neck Pickup Neck Bridge Pickup Toggle switch Ground Bridge Connecting with bridge claw. B500K Volume Tone A500K Output JACK Tone A500K ML electric guitar DIY Kit...
- Page 11 Cut the ball end of the string and insert to the gap and tighten the bottom screw for crab the string tail. 3.4.7 Rolling strings on the machine heads. Rolling the strings on the column of the tunning peg. The position for each string as the illustration. ML electric guitar DIY Kit...
- Page 12 When you got the intonation but bridge raiseup higher then the body surface, you can tighten the screws. Anyway the bridge keep flat as the body finally you got the right intonation. Tunning and drive these screws same operation and adjust little by little. ML electric guitar DIY Kit...
- Page 13 Setup How to tunning. ML electric guitar DIY Kit...
- Page 14 2. Forward bow - Extreme U-Shaped Bow Turn Truss Rod counter clockwise Buzzing near here Buzzing near here 3. Backward bow - Extreme N-Shaped Bow Turn Truss Rod clockwise Buzzing near here Buzzing near here ML electric guitar DIY Kit...
- Page 15 1.3 Repeat #1 & #2 on the 6th wire – note the treble measurement; 2. Neck Pickup: repeat steps 1.1 through 1.3 (above) on the neck pickup, noting measured heights. Pickup Height Guide Pickup String String 2/64” 3/63” Bridge 3/64” 4/64” Neck ML electric guitar DIY Kit...
-
Page 16: String Intonation
From the first string (Thinest String) to 6th: E, B, G, D, A, E Use a Tuner for test the intonation of each strings, if the 0 and 12 stay in same tone that mean the bridge setup is correct. ML electric guitar DIY Kit... - Page 17 Then fix it with screws. Same method for fix the cover for the toggle switch cavity. Install the string lock. Install the tremolo arm onto the bridge. ML electric guitar DIY Kit...
- Page 18 If there is any string lose the tune, can adjust the Fine Tunning screws on the top of the bridges. ML electric guitar DIY Kit...
-
Page 19: Other Hints
We hope you have enjoyed building your own favorite guitar! If you have any questions along the way please email: Company: info@hygent.com, Robert: Robert@hygent.com Or login the web as: www.leojaymz.com for download your required documents. ML electric guitar DIY Kit...
Need help?
Do you have a question about the ML and is the answer not in the manual?
Questions and answers
Tone **** is A500K - what are the size specifications to get a replacement
The LEO JAYMZ ML model uses A500K tone control potentiometers. The exact size specifications (e.g., shaft length, diameter, mounting hole size) are not provided in the context. However, standard A500K potentiometers typically have a 3/8" (9.5mm) mounting shaft diameter and fit in a 3/8" mounting hole. If replacing, match the original pot's shaft type (split or solid) and size.
This answer is automatically generated