Table of Contents
Advertisement
Available languages
Available languages
Quick Links
Advertisement
Chapters
Table of Contents

Related Manuals for Unical RG57A4/BGEF


Summary of Contents for Unical RG57A4/BGEF
- Page 1 TELECOMANDO IR REMOTE CONTROLLER ISTRUZIONI PER L’UTENTE USER MANUAL...
-
Page 2: Table Of Contents
Sommario TELECOMANDO AD INFRAROSSI RG57A / BGEF ............. 3 MODALITÀ AUTOMATICA ....................... 5 MODALITÀ RISCALDAMENTO, RAFFRESCAMENTO, VENTILAZIONE ......6 MODALITÀ DEUMIDIFICAZIONE .................... 7 FUNZIONE TIMER ........................8 FUNZIONE “SLEEP" .......................11 MODALITÀ " (RISPARMIO ENERGETICO) ............. 12 SOSTITUZIONE DELLE BATTERIE E SUPPORTO DEL TELECOMANDO ......13 USO CORRETTO DEL TELECOMANDO ................ -
Page 3: Telecomando Ad Infrarossi Rg57A / Bgef
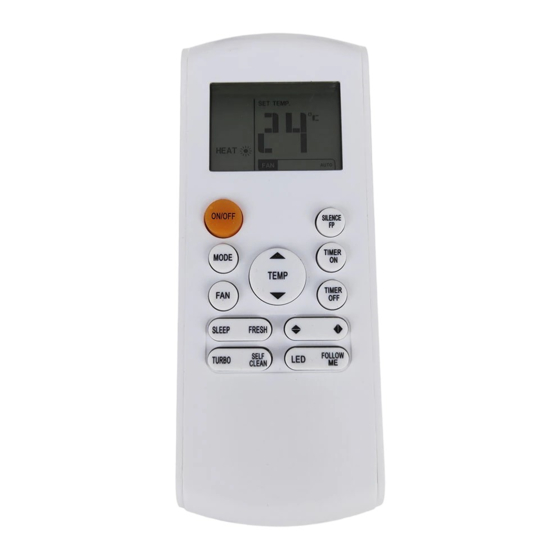
TELECOMANDO AD INFRAROSSI RG57A / BGEF Descrizione dei pulsanti ON/OFF Per avviare/arrestare SILENCE / FP il funzionamento. Per selezionare la modalità di efficienza energetica. e mantenere temp. MODO OPERATIVO ambiente Premere questo pulsante per selezionare il modo di funzionamento. TIMER ON Per impostare l’avvio automatico programmato VELOCITÀ... - Page 4 TELECOMANDO AD INFRAROSSI RG57A / BGEF Descrizione dello schermo LCD Le informazioni sono visualizzate Visualizzazione del modo di funzionamento quando il telecomando viene acceso. AUTO COOL (AUTOMATICA) (RAFFRESCAMENTO) (DEUMIDIFICAZIONE) HEAT (RISCALDAMENTO) (VENTILAZIONE) Visualizzato quando vengono trasmessi i dati. Visualizzato quando il telecomando è acceso. Visualizzato quando la batteria è...
-
Page 5: Modalità Automatica
MODALITÀ AUTOMATICA In caso di selezione del modo di funzionamento “AUTO” (”AUTOMATICO”), il condizionatore si avvia nella modalità operativa più appropriata, in base alla temperatura ambiente. • Avvio del funzionamento: Collegare l’Unità all’alimentazione: il LED “OPERATION” sull’Unità Interna inizierà a lampeggiare. 1. -
Page 6: Modalità Riscaldamento, Raffrescamento, Ventilazione
MODALITÀ RISCALDAMENTO, RAFFRESCAMENTO, VENTILAZIONE • Avvio del funzionamento: Collegare l’Unità all’alimentazione: il LED “OPERATION” sull’Unità Interna inizierà a lampeggiare. 1. Selezionare il modo di funzionamento desiderato, premendo il pulsante “MODE”: • COOL (RAFFRESCAMENTO) • HEAT (RISCALDAMENTO) • FAN (VENTILAZIONE) 2. Selezionare la temperatura desiderata, premendo i pulsanti “UP / DOWN”... -
Page 7: Modalità Deumidificazione
MODALITÀ DEUMIDIFICAZIONE • Avvio del funzionamento: Collegare l’Unità all’alimentazione: il LED “OPERATION” sull’Unità Interna inizierà a lampeggiare. 1. Selezionare il modo “DRY” (”DEUMIDIFICAZIONE”), premendo il pulsante “MODE”. 2. Selezionare la temperatura desiderata premendo i pulsanti “UP / DOWN” L’intervallo di impostazione della temperatura è... -
Page 8: Funzione Timer
FUNZIONE TIMER Modalità TIMER ON (Avvio programmato) La funzione TIMER ON Vi permette di programmare l’avvio automatico del condizionatore secondo le Vostre esigenze di comfort. In questo modo, il condizionatore si avvierà all’orario desiderato. Avvio programmato - TIMER ON Premere il pulsante TIMER ON: lo schermo mostrerà l’indicazione “TIMER ON”, l’ultima impostazione effettuata per l’accensione automatica ed il simbolo “h”. - Page 9 FUNZIONE TIMER Modalità TIMER OFF (Arresto programmato) La funzione TIMER OFF Vi permette di programmare l’arresto del condizionatore secondo le Vostre esigenze di comfort. In questo modo, il condizionatore si arresterà all’orario desiderato. Spegnimento programmato - TIMER OFF Premere il pulsante TIMER OFF: lo schermo mostrerà l’indicazione “TIMER ON”, l’ultima impostazione effettuata per l’arresto automatico ed il simbolo “h”.
- Page 10 FUNZIONE TIMER TIMER ON in combinazione con TIMER OFF La funzione TIMER ON/OFF Vi permette in coppia l’accensione e lo spegnimento del condizionatore secondo le Vostre esigenze di comfort. TIMER OFF / TIMER ON (Arresto automatico seguito dall’avvio automatico) Questa funzione è utile se si desidera che il condizionatore si arresti qualche tempo dopo essersi coricati, e si riavvii al mattino prima del risveglio o alla sera prima del rientro a casa.
-
Page 11: Funzione "Sleep
FUNZIONE “SLEEP" Modalità SLEEP Prima di coricarVi, potete premere il pulsante SLEEP e il condizionatore funzionerà in modo da rendere il Vostro sonno più confortevole, risparmiando energia. Uso della funzione SLEEP Dopo l'avvio dell'Unità, selezionare la modalità operativa COOL, HEAT o AUTO e poi premere una volta il pulsante SLEEP per attivare la funzione. -
Page 12: Modalità
MODALITÀ " SILENCE / FP " Modalità SILENCE / FP Premendo una volta il tasto “SILENCE /FP” si entra nella modalità Silence. Tenendo premuto invece il tasto per più di 2 secondi, si entra nella modalità FP Funzione “Silence”: attivata la funzione, il compressore lavorerà... -
Page 13: Sostituzione Delle Batterie E Supporto Del Telecomando
SOSTITUZIONE DELLE BATTERIE E SUPPORTO DEL TELECOMANDO Inserimento e/o sostituzione delle batterie del telecomando I casi seguenti indicano che le batterie sono scariche. Sostituire le vecchie batterie con batterie nuove. Quando viene trasmesso un segnale, non viene emesso il "bip" di ricezione. Le indicazioni sul display appaiono sbiadite. -
Page 14: Uso Corretto Del Telecomando
USO CORRETTO DEL TELECOMANDO Installazione ed uso corretto del telecomando Distanza massima consentita: 8 metri 1) Assicurarsi che le batterie (2 pile mini-stilo: tipo “AAA”) siano cariche ed inserite correttamente nell’apposito alloggiamento del telecomando, rispettando la polarità indicata sul telecomando stesso. La durata indicativa delle batterie è... - Page 15 NOTE...
- Page 16 CONTENTS Remote controller Specifications........... Operation buttons ................Indicators on LCD ................How to use the buttons ..............Auto operation................. Cooling/Heating/Fan operation............Dehumidifying operation ............... Timer operation................Handling the remote controller ............NOTE: Buttons design is based on typical model and might be slightly different from the actual one you purchased,the actual shape shall prevail.
-
Page 17: Remote Controller Specifications
Remote Controller Speci cations Model RG57A4/BGEF, × 3.0V(Dry batteries R03/LR03 2) Rated Voltage Signal Receiving Range Environment -5 C~60 C ON/OFF SILENCE TIMER MODE TEMP TIMER SLEEP FRESH TURBO SELF CLEAN LED FOLLOW ME RG57A4/BGEF... -
Page 18: Operation Buttons
USER S MANUAL. NOTE: While the unit is running under SLEEP mode, it would be cancelled if MODE, F AN SPEED or ON/OFF button is pressed. FRESH Button (applicable to RG57A4/BGEF) Active/Disable FRESH function. When the FRESH function is initiated, the Ionizer/... - Page 19 Operation of buttons Swing Button (applicable to RG57A4/BGEF) Used to stop or start vertical louver movement and set the desired left/right air flow direction. The vertical louver changes 6 degree in angle for each press. For some units, the temperature...
-
Page 20: Indicators On Lcd
Indicators on LCD Information are displayed when Mode display the remote controller is powered AUTO COOL HEAT Displayed when data transmitted. Displayed when remote controller is ON. Battery display(low battery detection) Not available for this unit Displayed when TIMER ON time is set. Displayed when TIMER OFF time is set. -
Page 21: How To Use The Buttons
How to use the buttons Auto operation Ensure the unit is plugged in and power is available. The OPERATION indicator on the display panel of the indoor unit starts flashing. 1. Press the MODE button to select Auto. 2. Press the UP/DOWN button to set the desired temperature. -
Page 22: Dehumidifying Operation
How to use the buttons Dehumidifying operation Ensure the unit is plugged in and power is available. The OPERATION indicator on the display panel of the indoor unit starts flashing. 1. Press the MODE button to select DRY mode. 2. Press the UP/DOWN buttons to set the desired temperature. -
Page 23: Timer Operation
Timer operation Press the TIMER ON button can set the auto-on time of the unit. Press the TIMER OFF button can set the auto-off time of the unit. To set the Auto-on time. 1. Press the TIMER ON button. The remote controller shows TIMER ON, the last Auto-on setting time and the signal "H"... - Page 24 CAUTION When you select the timer operation, the remote controller automatically transmits the timer signal to the indoor unit for the specified time. Therefore, keep the remote controller in a location where it can transmit the signal to the indoor unit properly. The effective operation time set by the remote controller for the timer function is limited to the following settings: 0.5, 1.0, 1.5, 2.0, 2.5, 3.0, 3.5, 4.0, 4.5, 5.0, 5.5, 6.0, 6.5, 7.0, 7.5, 8.0, 8.5, 9.0, 9.5, 10, 11, 12, 13, 14, 15,16,17, 18, 19, 20,...
- Page 25 TIMER OFF (Auto-off Operation) The TIMER OFF feature is useful when you want the unit to turn off automatically after you go to bed. The air conditioner will stop automatically at the set time. Example: Stop To stop the air conditioner in 10 hours. 1.
- Page 26 → TIMER ON TIMER OFF → → (Off Start Stop operation) This feature is useful when you want to start the air conditioner before you wake up and stop it after you leave the house. Example: Start To start the air conditioner 2 hours after setting, Stop and stop it 5 hours after setting.
-
Page 27: Handling The Remote Controller
Handling the remote controller Location of the remote controller. Use the remote controller within a distance of 8 meters from the appliance, pointing it towards the receiver. Reception is confirmed by a beep. CAUTIONS The air conditioner will not operate if curtains, doors or other materials block the signals from the remote controller to the indoor unit. - Page 28 Replacing batteries The following cases signify exhausted batteries. Replace old batteries with new ones. Receiving beep is not emitted when a signal is transmitted. Indicator fades away. The remote controller is powered by two dry batteries (R03/LR03X2) housed in the back rear part and protected by a cover.
- Page 29 NOTES...
- Page 32 - export@unical-ag.com - www.unical.eu Unical declina ogni responsabilità per le possibili inesattezze se dovute ad errori di trascrizione o di stampa. Si riserva altresì il diritto di apportare ai propri prodotti quelle modifiche che riterrà necessarie o utili, senza pregiudicarne le caratteristiche essenziali.
Need help?
Do you have a question about the RG57A4/BGEF and is the answer not in the manual?
Questions and answers