Advertisement
Trainer Setup for 26", 27" & 700C wheeled bikes w/
*Review and follow instructions prior to each use, and keep with trainer for future reference.
*Review and follow instructions prior to each use, and keep
*Use the product only as described in this manual.
only as described in this manual.
*Before each use, inspect the trainer and bicycle to ensure safety.
*Before each use, inspect the trainer and bicycle to ensure safety.
*Refer to the documentation for any questions. If you are unsure of use or have warranty inquiries,
*Refer to the documentation for any questions. If you are unsure of use or have warranty inquiries,
*Refer to the documentation for any questions. If you are unsure of use or have warranty inquiries,
please visit ConquerEquipment.com
please visit ConquerEquipment.com
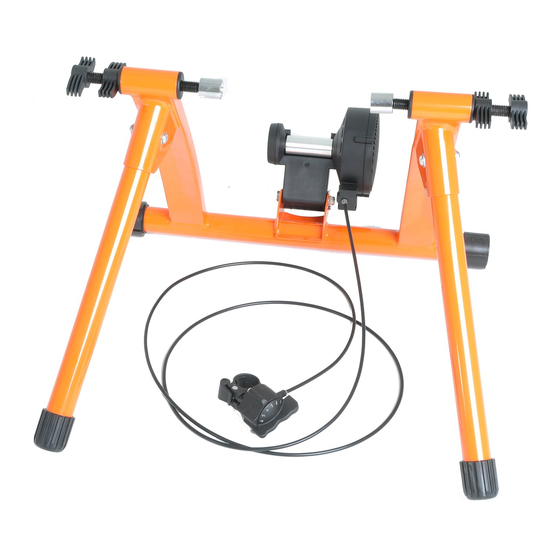
fig 1
fig. 2
1. Remove all packaging unfold the
(numbered 1-5) to level trainer frame with floor, if necessary (fig. 6).
5) to level trainer frame with floor, if necessary (fig. 6).
2. Line up holes, then use screws (A) and
assembly (E) to bracket on frame
3. Use nut and bolt (D in fig. 1) to affix
4. Replace rear wheel skewer on bik
4. Replace rear wheel skewer on bike with included skewer (fig. 6). This is to make your bike fit
properly, for stability and for safety.
properly, for stability and for safety.
5. Install the bike's rear hub between the
5. Install the bike's rear hub between the lever clamps/couplings (fig. 6), and adjust wing nuts
within couplings. Do not over tighten.
Do not over tighten.
fig. 5
EMAIL:
customercare@conquerequipment.com
customercare@conquerequipment.com
, 27" & 700C wheeled bikes w/Quick Release
unfold the trainer's frame, and place on a level floor (fig. 5 below
se screws (A) and Allen wrench/screwdriver (B) pictured in fig.
(fig. 2).
) to affix magnetic resistance unit (fig. 3) to bracket/frame (fig. 4).
WEB: help.conquerequipment.com
Product name: Conquer Pro Indoor Bike
Conquer Pro Indoor Bike Trainer
Exercise Machine 5 Speed Magnetic Resistance
Exercise Machine 5 Speed Magnetic
SKU: 530-TRNR5SPD
EMAIL:
customercare@conquerequipment.com
customercare@conquerequipment.com
TEL: 855-349-4327
help.ConquerEquipment.com
.ConquerEquipment.com
Quick Release Wheels
trainer for future reference.
fig. 3
fig. 4
) to bracket/frame (fig. 4).
This is to make your bike fit in the trainer
, and adjust wing nuts to lock the rear hub
fig.6
below). Twist plastic feet
fig. 1 to attach resistance knob
Plastic foot
Plastic foot
Twist plastic feet on base
Twist plastic feet on base
(if necessary) to level unit
(if necessary) to level unit
on uneven floors.
on uneven floors.
TEL: 855-349-4327
TEL:
Advertisement
Table of Contents

Subscribe to Our Youtube Channel
Related Manuals for Conquer Pro 530-TRNR5SPD


Summary of Contents for Conquer Pro 530-TRNR5SPD
- Page 1 Product name: Conquer Pro Indoor Bike Conquer Pro Indoor Bike Trainer Exercise Machine 5 Speed Magnetic Exercise Machine 5 Speed Magnetic Resistance SKU: 530-TRNR5SPD EMAIL: customercare@conquerequipment.com customercare@conquerequipment.com TEL: 855-349-4327 help.ConquerEquipment.com .ConquerEquipment.com Trainer Setup for 26”, 27” & 700C wheeled bikes w/ , 27”...
- Page 2 Product name: Conquer Pro Indoor Bike Trainer Exercise Machine 5 Speed Magnetic Resistance SKU: 530-TRNR5SPD EMAIL: customercare@conquerequipment.com TEL: 855-349-4327 help.ConquerEquipment.com 6. Ensure that tension knob (E) is fitted correctly through the barrel bolt on the magnetic resistance unit. Adjust tension knob (E) to seat the roller tightly against rear tire (to prevent the tire from slipping). Be sure bike tire is inflated to the proper PSI.
Need help?
Do you have a question about the Pro 530-TRNR5SPD and is the answer not in the manual?
Questions and answers