Table of Contents
Advertisement
Advertisement
Table of Contents

Related Manuals for Oster OGB81101


Summary of Contents for Oster OGB81101
- Page 1 1.1 Cu. Ft. Countertop Microwave Model: OGB81101 GLN030912...
-
Page 2: Table Of Contents
TABLE OF CONTENTS IMPORTANT SAFETY INSTRUCTIONS PRECAUTIONS TO AVOID POSSIBLE EXPOSURE TO EXCESSIVE MICROWAVE ENERGY INSTALLATION GUIDE GROUNDING INSTRUCTIONS PRODUCT DIAGRAM CONTROL PANEL INSTALLING THE TURNTABLE OPERATION INSTRUCTIONS COOKING UTENSILS GUIDE COOKING TECHNIQUES CLEANING AND CARE BEFORE CALLING FOR SERVICE SPECIFICATIONS... -
Page 3: Important Safety Instructions
IMPORTANT SAFETY INSTRUCTIONS READ ALL SAFETY INSTRUCTIONS BEFORE USING THIS MICROWAVE WARNING - to reduce the risk of burns, electric shock, fire, injury to persons, or exposure to excessive microwave energy, basic safety precautions should be followed, including the following: 1. -
Page 4: Precautions To Avoid Possible Exposure To Excessive Microwave Energy
IMPORTANT SAFETY INSTRUCTIONS (continued) 21. Do not operate any heating or cooking under this microwave. 22. Be certain the glass tray and roller rings are in place when using the microwave. 23. Read and follow the specific “Precautions to Avoid Possible Exposure to Excessive Microwave Energy” section found below. -
Page 5: Installation Guide
INSTALLATION GUIDE 1. Make sure all packing materials are removed from inside the microwave door. 2. Check the microwave for damage, such as misaligned or bent door, damaged door seals and sealing surface, broken or loose door hinges and latches, and dents inside the cavity or on the door. If there are any damages, do not operate the microwave and contact Customer Service at 1-866-257-3336. -
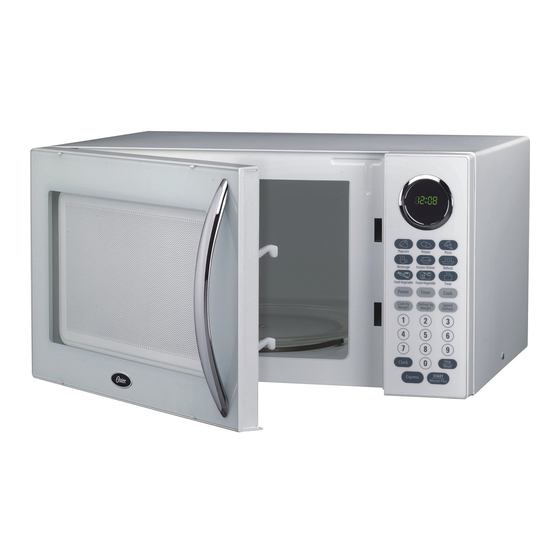
Page 6: Product Diagram
GROUNDING INSTRUCTIONS (continued) RADIO OR TV INTERFERENCE Should there be any interference caused by the microwave oven to your radio or TV, check that the microwave oven is on a different circuit, relocated the radio or TV as far away from the oven as feasible or check position and signal of receiving antenna. -
Page 7: Control Panel
CONTROL PANEL DISPLAY Cooking time, power, indicators and present time are displayed. QUICK COOK BUTTONS Instant settings to cook popular foods. POWER Use to set power levels other than high. TIMER Timer functions independently, even while a cooking program is in process. -
Page 8: Installing The Turntable
INSTALLING THE TURNTABLE Never place the glass tray upside down. The glass tray should never be restricted. Both the glass tray and turntable ring assembly must always be used during cooking. All food and containers of food should always be placed on the glass tray for cooking. If the glass tray or turntable ring assembly cracks or breaks, call customer service 1-866-257-3336. - Page 9 OPERATION INSTRUCTIONS (continued) Use single digits to set a cooking power level: Number pad Cooking power B. Two-stage Cooking Some recipes require different stages of cooking at different temperatures. SET STAGE 1: Follow steps 1 and 2 in “One-stage Cooking”. DO NOT TOUCH START/MINUTE PLUS. SET STAGE 2: Touch COOK then enter proper cooking time and (lower) power level.
- Page 10 OPERATION INSTRUCTIONS (continued) COOK BY WEIGHT Touch COOK BY WEIGHT once. Press number pads 1-3 to select the one digit code. Use the number pad to enter food weight. Touch START/MINUTE PLUS. Cook By Weight Code Description CODE TYPE MAX WEIGHT Beef 5 lbs.
- Page 11 OPERATION INSTRUCTIONS (continued) · After total time elapsed, the system will sound beeps with END in display. The beeps will continue to sound every two minutes automatically until the door is opened or any pad is touched. · Let meat stand a few minutes before carving. DEFROST BY WEIGHT Touch DEFROST BY WEIGHT once.
- Page 12 OPERATION INSTRUCTIONS (continued) SETTING CHILD LOCK The lock prevents unsupervised operation by children. To set, press and hold STOP/RESET for 3 seconds. LOCK is indicated on the display. To cancel, press and hold STOP/RESET for 3 seconds. LOCK indication disappears. POPCORN Touch POPCORN.
- Page 13 OPERATION INSTRUCTIONS (continued) For larger coffee mugs (9 to 11 oz./each): Touch BEVERAGE twice. Enter number of mugs by touching number pads from 1 to 4. Touch START/MINUTE PLUS. REHEAT Touch REHEAT Pad. Press START/MINUTE PLUS to start. FROZEN DINNER For small frozen dinners (7 to 9 oz./each): Touch FROZEN DINNER once.
-
Page 14: Cooking Utensils Guide
OPERATION INSTRUCTIONS (continued) SOUP To prepare soup (7 to 9 oz./serving): Touch SOUP once. Enter number of servings by touching number pads from 1 to 4. Touch START/MINUTE PLUS. COOKING UTENSILS GUIDE This section lists which utensils can be used in this microwave, which have limited use for short periods, and which should not be used in this microwave. -
Page 15: Cooking Techniques
COOKING UTENSILS GUIDE (continued) Plastic storage and food containers -- Containers such as margarine tubs can melt in the microwave. Metal utensils -- These can damage your microwave. Remove all metal before cooking. Note: Should you wish to check if a dish is safe for microwaving, place the empty dish in the microwave and microwave on high for 30 seconds. -
Page 16: Cleaning And Care
COOKING TECHNIQUES (continued) Roasts need this time to complete cooking in the center without overcooking the outer areas. All liquids, such as soup or hot chocolate, should be shaken or stirred when cooking is complete. When heating baby food, stir well after removing from microwave and test temperature before serving. ADDING MOISTURE Microwave energy is attracted to water molecules. -
Page 17: Before Calling For Service
BEFORE CALLING FOR SERVICE Before asking for service, please check each item below: Check to ensure the microwave is plugged in securely. If not, remove the plug from the outlet, wait 10 seconds, and plug it in again securely. Check for a blown circuit fuse or a tripped main circuit breaker. If these seem to be operating properly, test the outlet with another appliance. - Page 18 © 2012 Sunbeam Products, Inc. doing business as Jarden Consumer Solutions. All rights reserved. ® Oster logo is a registered trademark of Sunbeam Products, Inc. used under license. Distributed by Guangdong Galanz Microwave Oven and Electrical Appliances Manufacturing Co., Ltd., Shunde, Foshan, Guangdong, 528305, China.
Need help?
Do you have a question about the OGB81101 and is the answer not in the manual?
Questions and answers