Advertisement
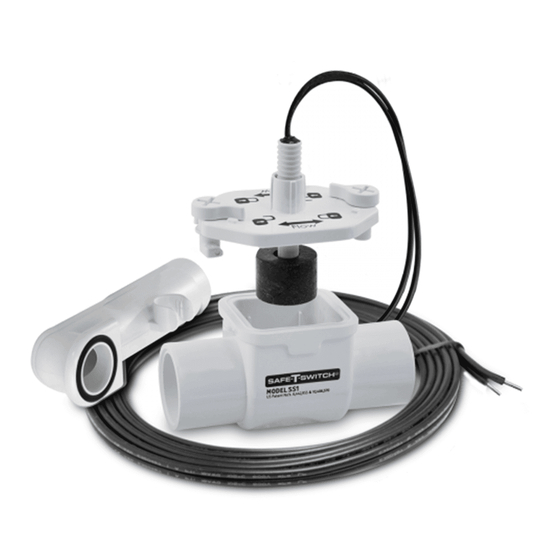
MODEL SS1 - LOW VOLTAGE CONDENSATE OVERFLOW SHUT-OFF SWITCH
NOTICE: Failure to read and comply with all warnings, cautions and instructions prior to starting installation may
cause personal injury and/or property damage and void the warranty.
HORIZONTAL INSTALLATION (see Figs. 1 & 2):
1. Glue ¾" stub onto drain pan outlet adapter.
2. Press switch/cap assembly firmly into top 1" opening in Tee, until the rim is flush against the Tee opening. If more sensitivity is desired, the
switch can be threaded out of the cap. DO NOT GLUE THE SWITCH/CAP INTO THE TEE.
3. Glue 1"x ¾" bushing into remaining 1" Tee outlet.
4. Glue bushed inlet of Tee onto ¾" stub from pan outlet. Tee may be sloped up to 45° from pan outlet. If more slope is needed, see VERTICAL
INSTALLATION, below.
5. For plugged installation on auxiliary outlets, seat plug firmly into ¾" outlet of Tee, ensuring it is water tight. DO NOT GLUE. Pipe tape may
be required to ensure seal.
6. For inline installation, glue ¾" outlet of Tee onto drain line.
7. Wire the switch as per instructions under Wiring, below
8. Test the switch by lifting the float while the unit is running. If wired correctly, the unit will stop.
9. Test all drain and fitting connections for plumbing leaks.
10. Test switch sensitivity: Plug drain downstream from installation point and run unit to fill pan. Float should rise and unit should stop before pan
overflows. If the pan overflows, reposition the float lower by either:
A. plumbing the entire assembly lower, or
B. loosening the jamb nut on the threaded stem and adjust the height of the float as necessary.
Test for proper sensitivity. Retighten jamb nut.
11. Affix warning sticker to air handler or condenser unit.
VERTICAL INSTALLATION (see Figs. 3 & 4)
1. Glue ¾" stub onto drain pan outlet adapter.
2. Remove switch/cap assembly from top 1" Tee inlet and insert into remaining 1" Tee inlet so that rim is flush against the Tee opening. If more
sensitivity is desired, the switch can be threaded out of the cap. DO NOT GLUE THE SWITCH CAP INTO THE TEE.
3. Glue 1"x ¾" bushing into the open 1" Tee inlet.
4. Glue bushed inlet of Tee onto ¾" stub from pan outlet. Tee may be sloped up to 45° in either direction by rotating on stub.
5. For plugged installation on auxiliary outlets, seat plug firmly into ¾" outlet of Tee, ensuring it is water-tight. DO NOT GLUE. Pipe tape may
be required to ensure the seal. Ensure Tee is level or sloped downward from the pan outlet. If upward slope is unavoidable, adjust float switch
downward out of cap by turning clockwise 1/8".
Figure 3: Vertical (plugged) installation
for auxiliary outlets
Technical Support Call 1-800-231-3345
INSTALLATION:
Connect to auxiliary
drain pan outlet
Figure 1: Horizontal (plugged) installation for
auxiliary drain outlets.
Connect to auxiliary
drain pan outlet
I N S T A L L A T I O N I N S T R U C T I O N S
Safe-T-Switch Model SS1
9 7 6 3 2
P R O D U C T C O D E
Figure 2: Horizontal (Inline) installation.
Connect to primary
drain pan outlet
Figure 4: Vertical (Inline) installation.
Connect to primary
drain pan outlet
Advertisement
Table of Contents

Subscribe to Our Youtube Channel
Related Manuals for RectorSeal SS1


Summary of Contents for RectorSeal SS1
- Page 1 9 7 6 3 2 P R O D U C T C O D E MODEL SS1 - LOW VOLTAGE CONDENSATE OVERFLOW SHUT-OFF SWITCH INSTALLATION: NOTICE: Failure to read and comply with all warnings, cautions and instructions prior to starting installation may cause personal injury and/or property damage and void the warranty.
- Page 2 ® A CSW Industrials Company. RectorSeal, the logos and other trademarks are property of RectorSeal, LLC, its affiliates or its licensor’s and are protected by copyright, trademark and other intellectual property laws, and may not be used without permission. RectorSeal reserves the right to change specifications without prior notice. ©2022 RectorSeal. All rights reserved. R50109 1022...
Need help?
Do you have a question about the SS1 and is the answer not in the manual?
Questions and answers