Table of Contents
Advertisement
Available languages
Available languages
Work Safe, READ THIS!
ATTENTION: FAILURE TO READ AND COMPLY WITH ALL WARNINGS, CAUTIONS AND INSTRUCTIONS PRIOR TO STARTING INSTALLATION MAY
CAUSE PERSONAL INJURY AND/OR PROPERTY DAMAGE AND VOID WARRANTY.
STOP/READ: This device must be installed in accordance with manufacturer's instructions. This unit must be in accordance with all applicable local plumbing, drainage and
electrical codes.
WARNING: Remove electrical shock hazard – DISCONNECT THE POWER BEFORE INSTALLING AQUAGUARD to avoid electrical shock and/or equipment damage.
Do not use on circuits exceeding 24 volts to avoid damage to switch, shock or fire hazard.
CAUTION: In some situations the switch may cause the unit to rapidly cycle on and off as water level rises slowly in pan. After a brief period the unit will turn off completely.
Condensation drain must be serviced if this occurs.
CAUTION: In any installation where property damage and/or personal injury might result from an inoperative switch due to power outages, a back-up system(s) and or alarm
should be installed.
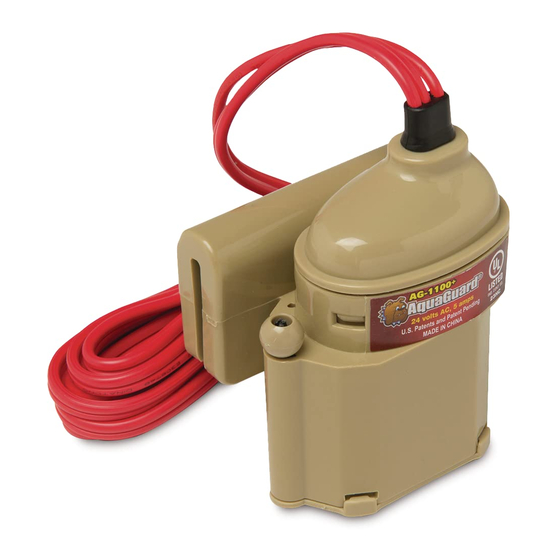
NOTICE: The AquaGuard AG-1100+ must only be installed by a licensed contractor or under the direct supervision of same. Condensation pan must be properly maintained
after installation and be kept free from foreign objects, rust or other obstructions that might interfere with the proper operation of the AquaGuard float switch.
INSTALLATION OF FLOAT SWITCH ON DRAIN PAN:
(To ensure proper performance of product, instructions must be followed.)
1.
Disconnect power to unit at main panel. Disconnect power to the low voltage thermostat circuit.
2.
Slide the float switch onto the side of the pan.
3.
Secure switch wires so they will not affect the operation of the float.
4.
Secure the float switch by tightening thumb screws. (fig.1) Do not over tighten.
(fig.1)
WIRING THE AG-1100+ in a Conventional HVAC System:
(To ensure proper performance of product, instructions must be followed.)
1.
Ensure the power is disconnected to the unit at the main panel prior to moving to step 2.
Refer to the appliance manufacturer's installation and operating instructions and also review wire layout in their instructions.
2.
Locate the red wire coming from the 24 volt thermostat "R" terminal.
3.
Disconnect or cut red wire. Connect the non-ribbed wire of the switch, using a wire nut, to the thermostat side of the circuit. Connect the ribbed wire of the switch,
using a wire nut, to the air handler side of the circuit or to terminal in unit. Incorporating both switch wires in the red circuit will shut the unit completely off.
4.
Test the switch. (At start-up check initial amperage load.)
A. With unit on, test switch by pulling the float pin up. (fig. 2) Unit should stop running if switch is correctly wired.
B. To test switch responsiveness fill pan with water to ensure that the switch stops the unit before the pan overflows. Remove water.
Thumb screws
Advertisement
Table of Contents

Related Manuals for RectorSeal AquaGuard AG-1100+


Summary of Contents for RectorSeal AquaGuard AG-1100+
- Page 1 Work Safe, READ THIS! ATTENTION: FAILURE TO READ AND COMPLY WITH ALL WARNINGS, CAUTIONS AND INSTRUCTIONS PRIOR TO STARTING INSTALLATION MAY CAUSE PERSONAL INJURY AND/OR PROPERTY DAMAGE AND VOID WARRANTY. STOP/READ: This device must be installed in accordance with manufacturer’s instructions. This unit must be in accordance with all applicable local plumbing, drainage and electrical codes.
- Page 2 5. Place the ATTENTION sticker on unit in a clearly visible location. (fig. 3) Pull pin up to test switch (fig. 2) (fig. 3) For wiring the normally open third wire (short wire) refer to the following diagrams: Standard HVAC Installation Standard HVAC Installation w/ optional external alarm or accessory WIRING the AG1100+ in a Communicating HVAC System: See equipment manufacturers recommendations for specific wiring instructions.
- Page 3 PURCHASER MUST PAY ALL LABOR AND SHIPPING CHARGES NECESSARY TO REPLACE PRODUCT COVERED BY THIS WAR- RANTY. This warranty shall not apply to acts of God, nor shall it apply to products which, in the sole judgment of Rectorseal have been subject to negligence, abuse, accident, tampering, misapplication, alteration;...
- Page 4 ¡Trabaje seguro, LEA ESTO! ATENCION: El fracaso de no leer toda las precauciones, advertencias e instrucciones antes de comenzar la instalación puede causar riesgo de lesiones personales y/o daño a su propiedad y podrá perder su garantía. ALTO/LEEA: Este dispositivo debe ser instalado en conformidad con las instrucciones del fabricante. Esta unidad debe estar conforme con todos los códigos de instalación de cañería, desague y códicos eléctricos.
- Page 5 Ponga el stike de ATENCION en una locacion visible y clara. (fig. 3) Pruebe el interruptor jalando el alfiler (fig.2) (fig. 3) Para el tercer cable del cableado normalmente abierto (alambre corto) se refieren a los siguientes diagramas: Norma de Instalación HVAC W estándar de instalación de HVAC / alarma externa opcional o accesorio EL CABLEADO de AG-1100+ en un sistema de comunicación HVAC: Ver las recomendaciones del fabricante para obtener instrucciones específicas del cableado.
- Page 6 (I) aiio a partir de lafecha de compra. Si este producto presenta defectos durante el periodo de un aiio a partir de lafecha de compra, Rectorseal tiene la opcl6n de reparar o reem.plazar el producto seglin los TBRMINOS GENERALES y CONDICIONES a continuacl6n.
Need help?
Do you have a question about the AquaGuard AG-1100+ and is the answer not in the manual?
Questions and answers