Advertisement
Quick Links
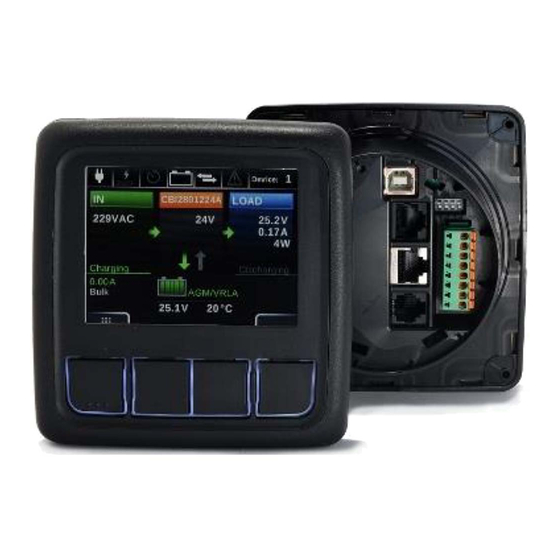
DISPLAY DPY351
Monitor and Control Panel for ADELBus Network
Instruction Manual
Rev.:1
Table of Contents
1
Product Description .............................................................. 2
1.1
Feature ..................................................................................................................................................................................... 2
1.2
Monitoring ................................................................................................................................................................................. 2
1.3
Configuration ............................................................................................................................................................................ 2
1.4
Alarms management ................................................................................................................................................................. 2
1.5
History ...................................................................................................................................................................................... 2
1.6
Event ........................................................................................................................................................................................ 2
2
ADELBus Connections ......................................................... 2
2.1
Event based commands ............................................................................................................................................................ 2
2.2
How to set up an ADELBus network ......................................................................................................................................... 2
2.3
Mains Technical Data................................................................................................................................................................ 2
2.4
Dimensions ............................................................................................................................................................................... 2
3
Installation ............................................................................. 2
3.1
Panel Mounting ......................................................................................................................................................................... 2
3.2
How to Supply DPY351 ............................................................................................................................................................. 2
3.3
Connection Layout (Fig.1) ......................................................................................................................................................... 2
3.3.1
Auxiliary temperature sensor (AUX1) .............................................................................................................................. 3
3.3.2
Ethernet Connection (AUX2) ........................................................................................................................................... 3
3.3.3
PowerBus Connection (AUX3) ........................................................................................................................................ 3
3.3.4
USB Connection (AUX4) ................................................................................................................................................. 3
3.3.5
Auxiliary Input Power (AUX5) .......................................................................................................................................... 3
3.3.6
Wire size (AUX5) ............................................................................................................................................................. 3
3.3.7
Input/Output State Terminal 3,4,7,8 (AUX5) .................................................................................................................... 3
3.4
Ethernet Configuration .............................................................................................................................................................. 3
3.4.1
Accessing the HTTP server for the first time .................................................................................................................... 3
3.4.2
Customizing the ethernet interface and services.............................................................................................................. 3
3.4.3
Enabling / disabling the MQTT ........................................................................................................................................ 4
3.4.4
Saving / resetting the customized ethernet parameters ................................................................................................... 4
4
Functional Use ...................................................................... 4
4.1
Video Link: ................................................................................................................................................................................ 4
5
Welcome Page ...................................................................... 4
5.1
Notification / Alarm .................................................................................................................................................................... 4
Display Configuration "Homepage" ........................................................................................................................................... 4
5.2
5.3
Customize Dashboard............................................................................................................................................................... 4
Customize "Six Values" ............................................................................................................................................................. 4
5.4
Customize "Two Values" ........................................................................................................................................................... 4
5.5
Customize "Single Value" .......................................................................................................................................................... 4
5.6
6
Selection Page ...................................................................... 4
6.1
Monitoring ................................................................................................................................................................................. 4
6.2
History ...................................................................................................................................................................................... 4
6.3
Alarms ...................................................................................................................................................................................... 4
Device "Advanced config – Pin insertion ................................................................................................................................... 4
6.4
Devices "Add new devices" ....................................................................................................................................................... 4
6.5
Display Configuration "Network menu" ...................................................................................................................................... 4
6.6
Advertisement

Related Manuals for ADELSYSTEM DPY351

Summary of Contents for ADELSYSTEM DPY351
- Page 1 How to set up an ADELBus network ............................2 Mains Technical Data................................2 Dimensions ....................................2 Installation ................2 Panel Mounting ..................................2 How to Supply DPY351 ................................2 Connection Layout (Fig.1) ................................. 2 3.3.1 Auxiliary temperature sensor (AUX1) ..........................3 3.3.2 Ethernet Connection (AUX2) ............................
- Page 2 4,41 x 4,57 x 2,09 inches using the DHCP protocol. This makes the connection of a Dimension Display 90 mm; 3,5 inches DPY351 to a LAN very easy. It is possible to connect several devices in chain together, up to 50. Languages IP Degree...
- Page 3 Auxiliary Power, I/O port (AUX5) 3.4.1 Connect HTTP server for the first time Dip-switches (Hardware Config.) The first access to the DPY351 internal webserver must be done by means of a browser at the DPY351 factory-default IP 3.3.1 Auxiliary temperature sensor (AUX1) address, which is 192.168.1.100 using a standard CAT5e or...
- Page 4 The DPY351 supports access using the Virtual LAN protocol. In the case “VLAN ID” checkbox is not selected the “VLAN ID” textbox will be hidden and DPY351 will not operate in the VLAN. If “VLAN ID” checkbox is selected then the “VLAN ID” textbox should be populated with the ID.
Need help?
Do you have a question about the DPY351 and is the answer not in the manual?
Questions and answers