Table of Contents
Advertisement
Quick Links
Advertisement
Table of Contents

Summary of Contents for Prisma Bytes PB02-GY-W
- Page 1 PB02GYW USER MANUAL...
-
Page 2: Table Of Contents
Table of Contents Chapter 1: Product Description ................3 Chapter 2: Installation ..................4 Chapter 3: Software Installation and Configuration .......... 5 3.1 Platform ......................5 3.2 Log in ......................5 3.3 Add Device ..................... 6 3.4 Device Configuration ..................7 3.5 Import Face Library .................. -
Page 3: Chapter 1: Product Description
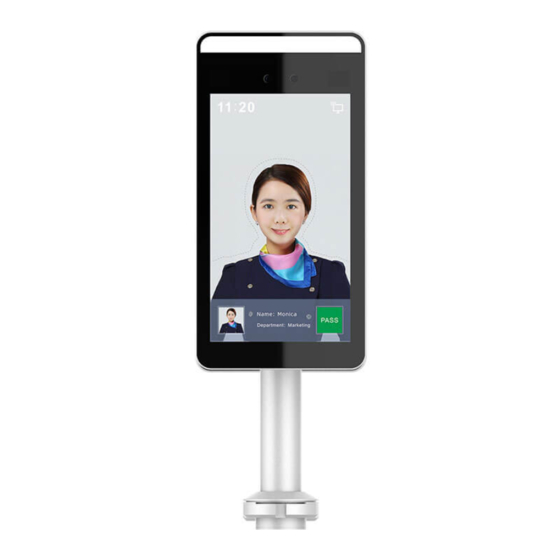
Chapter 1: Product Description 1.1 Product Introduction Front Panel Rear Panel Cabling Interface Use 12V DC - 2 Amp Power supply - Using a wrong PSU will result malfunction of the device and void warranty . Power supply not supplied with the device , To be procured locally. -
Page 4: Chapter 2: Installation
Chapter 2: Installation Gate Installation 2.1.1 Open a hole with a diameter of 35mm on the fate, and the recommended position is 1/3 to ¼ from the entrance end; 2.1.2 Insert the equipment mounting bracket into the opening of the gate and fix the equipment nut from the inside of the gate;... -
Page 5: Chapter 3: Software Installation And Configuration
Chapter 3: Software Installation and Configuration Platform 3.1.1 Under Windows Operating System, double-click “SPD2000_VX.X.X.exe (X is the version number), enter the installation password “123456”, click “Next”, and follow the prompts to perform the installation; 3.1.2 After the installation is complete, the desktop creates shortcut of SDP2000 Server platform icon Log In 3.2.1 Double-click on the desktop... -
Page 6: Add Device
3.3 Add Device 3.3.1 After logging into the platform, select “Device” and “Scan Device”. 3.3.2 Select the device, click “ “ to modify the device IP and click “Submit”. Factory default values of the device as following: • IP Address: 192.168.1.88 •... -
Page 7: Device Configuration
3.3.3 Select the device and click “ ” or “ Add”, select the area, and click Set. 3.4 Device Configuration After logging in to the platform, enter the “Device” interface and click “ “ to configure the basic parameter and other parameter of network, remote, function and delete the device. -
Page 8: Import Face Library
3.5 Import Face Library 3.5.1 Import personnel images in batches. Login into the platform, click “Personnel – Personnel – Import Personnel images in batches” – select pictures – “Upload” and the pictures are added into the device. When importing pictures in batches, the pictures must meet the following requirements: •... -
Page 9: Management Software Download
3.5.3 After the gallery is added into the device, system will start face recognition algorithm to identify the user. Measurement distance between: 0.5 – 1.0 m, 0.75 m is the best. It is recommended to mark the measure level on the floor. Management Software Download: Page 9 of 10... -
Page 10: Contact Reference
CONTACT US: Any further assistance needed pls contact your sales POC , Local Distributor or support@prismabytes.com www.prismabytes.com Page 10 of 10...
Need help?
Do you have a question about the PB02-GY-W and is the answer not in the manual?
Questions and answers