
Related Manuals for Spidertracks Spider 6


Summary of Contents for Spidertracks Spider 6
- Page 1 Version 1.0.1 30 May 2016 Spider 6 Instruction Manual For Spider 6 with Minor MOD Summary Report, Structure Test Procedure, Electromagnetic Compatibility Test Procedure and additional information.
-
Page 2: Table Of Contents
3. Troubleshooting 3.1. Loss of Power 3.2. GPS loss 3.3. Satellite LED turns off Appendix (A) Spider 6 Minor Modification Summary Report (A)1. Description (A)2. Modification Approval Basis (A)3. Configuration Control Data (A)4. Post Installation Testing (A)5. Operation and Limitations (A)6. - Page 3 (C) Spider 6 Electromagnetic Compatibility Test Procedure (C)1. Test Definition (C)2. Special Tools and Equipment (C)3.Test Conditions (C)4.Test Procedure (C)5. Pass/Fail Criteria (C)6. Test Record (D) Wiring Diagram - Power Lead...
-
Page 4: Record Of Revision And Approvals
Record of Revision and Approvals RECORD OF REVISIONS AND APPROVALS Pages Rev. Date Description Released by Approved by Affected 24. Nov. 2015 Initial release S. Ridder D. Blackwell 1.0.1 30. May 2016 Rephrasing of chapter 3.3 S. Ridder L. McCarthy... -
Page 5: Positioning The Spider
1.1. Positioning the Spider 6 We recommend placing the Spider 6 on top of the instrument panel in the aircraft. The Spider needs a clear view of the sky. Spiders have two antenna; one GPS and one Iridium. The GPS antenna is able to receive GPS information at any angle, as long as it is not obstructed by metal (such as the bracket). -
Page 6: Power
1.2. Power The Spider can be powered using the supplied power lead - just plug into your aircraft’s 10 to 28 volt DC (cigarette lighter) power supply. The power supply must be capable of delivering up to 1.5 A peak current. An alternative option to using the cigarette lighter, would be to hard- wire the power supply in your vehicle. -
Page 7: Installing Your Spider
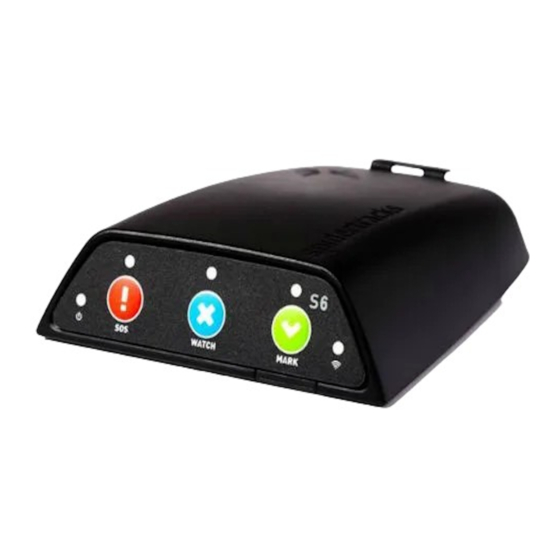
‘What firmware do I have?’. 2.2. GPS Lock The Spider 6 will automatically attempt to get a GPS fix. Once a GPS lock is attained the GPS LED on the Spider (right LED) will turn orange. -
Page 8: Watch
SOS alerts will not be sent to emergency services. For more information on emergency contacts please refer to User Guide and Videos for the spidertracks website within the support website. 2.5. Watch Press the Watch button for the website to actively monitor your flight. Position reporting will immediately go to 2 minutes. -
Page 9: Troubleshooting
• Spider is powered by a battery pack which is unable to deliver enough current, and/or is running flat Spidertracks strongly recommends hard-wiring the Spider to the avionics bus in situations where an installation is permanent. 3.2. GPS loss If the GPS signal is lost, the GPS LED on the Spider will turn off. -
Page 10: Appendix
Appendix... -
Page 11: (A) Spider 6 Minor Modification Summary Report
Civil Aviation Standard 571 Appendix A, Criteria for the Classification of Modifications and Repairs; and (2) Federal Aviation Administration FAR Part 43 Appendix A. Therefore, acceptable data will be employed to support the installation of the Spider 6. Compliance is at owner’s discretion. -
Page 12: (A)7.Electrical Load
(A)7.Electrical Load Installation of the Spider 6 introduces a maximum continuous draw of 1.0A at 12VDC. Update the aircraft electrical load analysis report as required. (A)8.Continuing Airworthiness Maintenance of the modification is in accordance with the applicable OEM maintenance manual. Instructions for Continued Airworthiness (ICA) are not required. -
Page 13: (B) Spider 6 Structure Test Procedure
(B)5.Test Procedure The following procedures detail the methodology for the structural test. 1. Record the serial number of the Spider 6 being used in the test and complete the test record information. 2. Apply the minimum loads listed in Chapter 3.4 to the centre of the Spider 6 in accordance with AC 43.13-2B, Para 105. -
Page 14: (B)6.Pass/Fail Criteria
(B)6. Pass/Fail Criteria When no damage or permanent deformation occurs after 7 seconds of applied static load in all directions, the Spider 6 installation is acceptable. Should permanent deformation occur after 3 seconds, reinforcements are required (e.g. doubler installation) to the affected structure and repeat test. -
Page 15: (C) Spider 6 Electromagnetic Compatibility Test Procedure
The purpose of these test procedures is to demonstrate Electromagnetic Compatibility (EMC) between the aircraft’s electrical or electronic systems, and the Spider 6 being tested. This test procedure is an aircraft-level test to determine if there is any electromagnetic or radio frequency interference (EMI/RFI) to the various critical aircraft systems, radios and installed equipment. -
Page 16: (C)5.Pass/Fail Criteria
2. Record the serial number of the Spider 6 being used in the test and complete the test record information. 3. Power up the Spider 6. The left LED on the keypad of the Spider will glow green and the right LED will turn amber when it has a GPS fix. -
Page 17: (C)6.Test Record
(C)6.Test Record Date of Test Spider 6 S/N Location of Test A/C Registration Aircraft System Test Instructions Passed Observations Under Test Open squelch. Tune to 118, 120, 124, 128, 132, 136MHz. Listen for VHF 1 ☐ noise. Verify transmit and reception. - Page 18 Aircraft System Test Instructions Passed Observations Under Test Tune in to local stations and/or ILS 2 use ramp tester. Verify GS / LOC ☐ display and station audio ident. Tune in to local stations and/or DME 1 use ramp tester. Verify correct ☐...
- Page 19 Aircraft System Test Instructions Passed Observations Under Test Monitor for erratic attitude and AHRS 1 ☐ heading indications. Monitor for erratic attitude and AHRS 2 ☐ heading indications. Run self-test if available. Verify no ☐ flags or lights appear. Run self-test if available. Verify no ☐...
- Page 20 Aircraft System Test Instructions Passed Observations Under Test Monitor for erroneous or erratic FUEL QUANTITY ☐ indications. Monitor for erroneous or erratic FUEL SYSTEM ☐ indications. Cycle hydraulic pumps. Monitor for HYDRAULIC SYS ☐ erroneous or erratic indications. Cycle system to manual and back FUEL CONTROL to auto.
- Page 21 Aircraft System Test Instructions Passed Observations Under Test LONG LINE Verify for normal operation and ☐ RELEASE monitor for inadvertent activation. ☐ ☐ ☐ Comments Indicate any deviations from the test procedure, or observations regarding the test results: LAME conducting testing: PRINT NAME SIGNATURE LICENSE...
-
Page 22: (D) Wiring Diagram - Power Lead
(D) Wiring Diagram - Power Lead "...
Need help?
Do you have a question about the Spider 6 and is the answer not in the manual?
Questions and answers