Advertisement
Advertisement
Table of Contents

Subscribe to Our Youtube Channel
Related Manuals for Vitilan V3

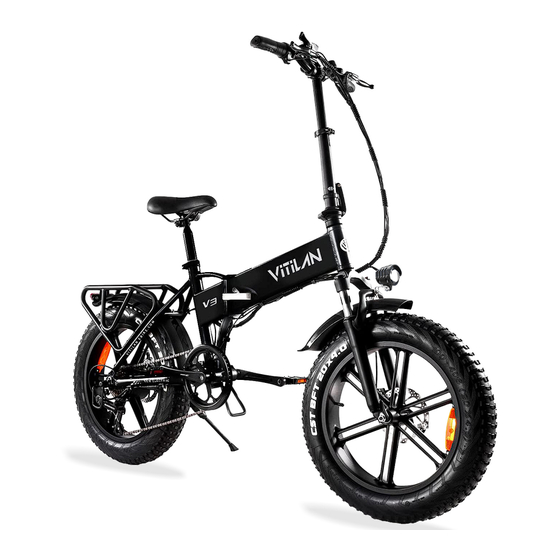
Summary of Contents for Vitilan V3
- Page 1 ...
-
Page 2: Table Of Contents
Importance………………………………………………………………………… P1 Models and Pictures……………………………………………………………… P2,P4 Specifications ………………………………………………………………………... P3,P5 Safety and Compliance with the Law ……………………………… P6 Assembling Your New e-Bike……………………………………………………… P7-P13 Operating Your New e-Bike ……………………………………………………… P14-P16 Intelligent Liquid Crystal Instrument………………………………………… P17-P34 Care and Maintenance……………………………………………………………… P35 Safety …………………………………………………………………………………. -
Page 3: Importance
11. Do not use the bike for other than intended use. 12. Save these instructions. *Note that this is a general manual. VITILAN reserves the right to make changes to products and designs. The e-bike you own may not be the same style as the pictures shown in this manual. - Page 4 2 ...
-
Page 5: Specifications
Specifications ● MODEL: V3 ● Frame Construction: Aluminum Alloy ● Wheelbase: 1117mm ● Gear Range: 7-speed type ● Tire Size: 20" (565mm) ● Climb Grade: 30 degree ● Max load: 150kg (330 lb) ● Max Speed: 31mph ● Power: 750W ●... - Page 6 4 ...
- Page 7 Specifications ● MODEL: i7 ● Frame Construction: Aluminum Alloy ● Wheelbase: 1200mm ● Gear Range: 8-speed type ● Tire Size: 20" (565mm) ● Climb Grade: 30 degree ● Max load: 150kg (330 lb) ● Max Speed: 31mph ● Power: 750W ●...
-
Page 8: Safety And Compliance With The Law
Read This First: Safety and Compliance with the Law Congratulations on your purchasing of your new e-bike. Your new e-bike is an excellent piece of personal transportation equipment that will give you good service for many years. Before you start using your e-bike, we want you to be aware of a few important points. Please read this section carefully. -
Page 9: Assembling Your New E-Bike
Assembling Your New e-Bike If you purchased your e-bike unassembled, please follow these instructions to assemble your e-bike under the guidance of an adult or a qualified technician. Assembly is quite easy as most of the parts are already assembled; you need only to put a few pieces together to complete the job. - Page 10 8 ...
- Page 11 9 ...
- Page 12 Air Shock Absorption Front Fork 10 ...
- Page 13 Check that the Package is Complete and Undamaged Your e-bike comes in a carton containing the following: The main body of the e-bike – consisting of the frame, the front and rear wheel, the gear and chain, the front and rear brake, the battery on the frame, the rear fender....
- Page 14 Assembly - Step 1: Attach the handlebar subassembly Stand the main body of the e-bike on the kickstand. Stand up and lock the steering column that is at the front of the main body frame, insert the stem of the handlebar subassembly into it.
- Page 15 Inflate the tires to proper pressure. At this point, your e-bike is a completely functional bicycle, although without any battery operated to function as yet. Check all tightening points to make sure. Take a short ride. Adjust the height of the handlebar, and the height and the tilt of the seat, if necessary, for maximum comfort.
-
Page 16: Operating Your New E-Bike
Operating Your New e-Bike The method to turn on the bike is: I. Twist the battery lock counterclockwise to the end to turn on the battery; II. Press power button on the left handle bar until the display lights on; III. - Page 17 Cruise Control Cruise Control will be triggered when you holding thumb throttle for 8 seconds, and it will be released by braking/pedaling or throttling. Thumb throttle Control In the hand throttle mode, amount of power assist is determined by the throttle switch controlled by your left hand.
- Page 18 connected to the battery for a very long period of time after charging is complete. (Leaving it connected for an overnight charging is OK.) It is normal for the charger and the battery to be slightly hot while charging is on-going. Removing the Battery from the e-Bike The battery is an important and costly part of the e-bike.
-
Page 19: Intelligent Liquid Crystal Instrument
Intelligent Liquid Crystal Instrument Specification Parameters: ● Model: YL80C. ● 24V/36V/48V power supply ● Rated working current of instrument 10mA ● The maximum working current of the instrument is 30mA ● Shutdown leakage current < 1uA ● The operating current supplied to the controller is 50mA ●... - Page 20 Functional Overview and Functional Area Distribution ◆ Function Overview ● Electricity Display ● Motor power indication ● Boost gear adjustment and indication ● Speed display (including real-time speed, maximum speed and average speed) ● Mileage display (including single mileage and total mileage) ●...
- Page 21 ◆ Button Definition There are five keys on the corresponding operation unit of YL80C instrument, of which the keys are replaced by the words "UP" and "DOWN" respectively in the following instructions. General Operations ◆ Power On/Off After pressing the key for a long time, the instrument starts to work and turns on the working power supply of the controller.
- Page 22 ◆ Assist in Implementation Press the DOWN button for a long time, and the electric vehicle enters the electric assistance pushing state. Electric vehicles run at a constant speed of 6 km/h. At the same time, the screen shows. ...
- Page 23 and 5 gears are the highest power. When the 5rd gear is reached, press the UP button briefly again, and the interface will still display 5. The number 5 will remain unchanged, which is the highest grade. After the power downshift reaches gear 0, press the DOWN button briefly again, and the interface still displays 0.
- Page 24 ◆ Error Code Display When the electric control system of the electric vehicle fails, the instrument will automatically display the error code. See Table 1 for the definition of the detailed error code. ■ When there is an error code in the display interface, please troubleshoot the fault in time.
- Page 25 ◆ Backlight Brightness BL stands for backlight. Parameters 1, 2, 3 can be set to indicate backlight brightness, 1 is the darkest, 2 is the standard brightness, and 3 is the brightest. The default value of the instrument factory is 1. The backlight brightness parameter can be changed through the UP/DOWN key.
- Page 26 General Parameter Settings Press and hold the UP + DOWN key for more than 2 seconds At the same time to enter the normal setting state. Press and hold the DOWN + i key for more than 2 seconds at the same time to enter the wheel diameter setting interface.
- Page 27 Personalization In order to meet the personalized use requirements of customers, personalized settings are set up, including the battery power setting, power parameter setting, current limit value setting, power sensor setting, speed sensor setting, handle function setting, system setting and startup password setting of the instrument, with a total of eight settings.
- Page 28 ◆ Assist Parameter Setting (Option) Boost Gear Selection Eight modes are provided in the booster gear selection: 0-3, 1-3, 0-5, 1-5, 0-7, 1-7, 0- 9, 1-9; Through UP/DOWN switching, press the "i" key briefly to confirm and enter the assistance proportion value setting interface in the corresponding mode.
- Page 29 ◆ Current Limit Value Setting (Option) CUR represents current limit, which can be set in the range of 7.0-25.0 A, and the maximum current value of the controller can be changed through UP/DOWN key. Press the "i" key for a long time to confirm and return to the instrument setting item selection interface.
- Page 30 ◆ Assist Sensor Sensitivity Setting SCN is displayed on the screen, which represents the sensitivity of the booster sensor. The setting range is 2-9, where 2 indicates the highest sensitivity and 9 indicates the lowest sensitivity; Add/subtract settings through UP/DOWN key, press "i" key briefly to confirm and enter the power sensor proportional parameter setting interface.
- Page 31 ◆ Turn Band Function Settings (Options) Turn Handle Assisted Push Enable Setting Hnd means the rotary handle, HL means the rotary handle assists in pushing,HL-N means the rotary handle has no assist in pushing function, and HL-Y means the rotary handle has assist in pushing function.
- Page 32 ◆ System Settings (Options) Electricity Delay Time Setting dLY represents the power delay time, and the power delay time of 3/6/12s can be selected through UP/DOWN key. Press the "i" key briefly to confirm and enter the maximum speed limit setting interface. The instrument factory defaults to 3s.
- Page 33 ◆ Slow Start Settings SSP stands for slow start, with an adjustable range of 1-4, and 4 stands for the slowest. You can select through the UP/DOWN key, press the "i" key for a long time to confirm and exit the setting. Instrument factory default 1.
- Page 34 ◆ Switch-on Password Modification The instrument displays P3. Press the "i" key briefly to shift, and add/subtract the input value through the UP/DOWN key. After modification, press the "i" key for a long time to save and confirm, and exit the setting interface. Restarting the instrument will display P1, 0000, and the instrument will not work normally until the correct password is entered.
- Page 35 automatically start restoring the default settings and display dEF-00 after pressing the "i" key for more than 2 seconds for confirmation. After restoring the default, it will automatically exit and return to the normal display interface. ◆ Lead Connection Diagram Standard connector wire sequence Connecting end ...
- Page 36 ◆ Precautions Pay attention to safety during use, and do not plug and unplug the instrument under the condition of power supply. ◆ Try to avoid bumping on the instrument. ◆ Regarding the background parameter setting of the instrument, please do not change it at will, otherwise normal riding cannot be guaranteed.
-
Page 37: Care And Maintenance
Care and Maintenance for Your New e-Bike You should, in general, take care of your e-bike the way you would with a regular bicycle by keeping it dry, clean and the moving parts well lubricated. You should also avoid parking your e-bike in exposed areas whenever possible. -
Page 38: Safety
Safety These safety precautions are provided for your benefit to protect you and those around you. Please read and follow them carefully to avoid unnecessary injury, damage to the product, or damage to other property. ● Battery ● Battery Charger ... - Page 39 37 ...
-
Page 40: Trouble Shooting
Trouble Shooting As one or more causes of failure might lead to the failure phenomenon, you should find out the true cause(s) and then take the appropriate solution(s) to rectify the problem. In case of doubt, please consult a qualified technician for service, repairs or maintenance.
Need help?
Do you have a question about the V3 and is the answer not in the manual?
Questions and answers
el. dviratis vitilan u3 instrukcijos 13 p prašo įvesti kodą
There is no specific code required for the Vitilan V3 electric bike instructions mentioned in the provided context.
This answer is automatically generated
reikalingas 13p kodas
did you ever figure out what the 13p folloed by four zeros was and how to fix it
Stuck in password mode
Throttle not working display stuck on 10p
To exit the password mode on the Vitilan V3:
- Press the "i" key for more than 2 seconds to save the current setting and exit the setting state.
- Alternatively, press the DOWN key for more than 2 seconds to cancel the current operation and exit without saving.
- If no operation is performed within one minute, the instrument automatically exits the setting mode.
This answer is automatically generated
How do you turn the light on
Press the headlight key briefly to turn on the backlight of the instrument and notify the controller to turn on the headlight. Press the headlight key again to turn off the headlight.
This answer is automatically generated
Koks 13 p kodas
I am having the same issue with the 13p followed by four zeros please respond and let me know what i can do to fix the issue