Table of Contents
Advertisement
Advertisement
Table of Contents

Subscribe to Our Youtube Channel
Summary of Contents for Xiaomi DDL-M1
- Page 1 DDL-M1 Intelligent Microscope Operating Instruction V1.0...
-
Page 3: Table Of Contents
Contents Notice for Use.............................3 Product Introduction........................... 4 Microscope Installation Instructions..................4 Microscope Stand Installation Instruction..................5 Charging Instruction........................6 Microscope Monomer Introduction................... 7 How to Use the Microscope....................... 9 Microscope Base Introduction....................11 How to Use the Microscope Base.................... 13 Accessories and tools....................... 16 APP Usage Guide.......................... -
Page 4: Notice For Use
Notice for Use Please read this manual carefully and use it correctly. Pay attention to the protection of the lens part,be sure to close the lens cover after use,to avoid dust or foreign matter. This microscope can be used by hand,or can be inserted into the base as a table.Pay attention to the strength of the insertion to avoid damaging the components. -
Page 5: Product Introduction
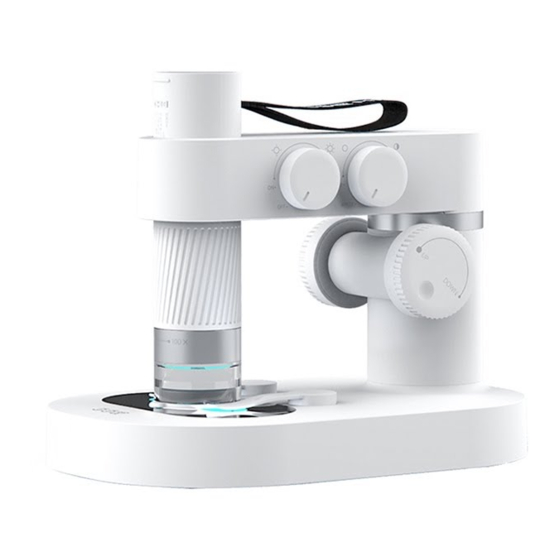
Product Introduction Microscope Installation Instructions Microscope Structure Microscope monomer Microscope base... -
Page 6: Microscope Stand Installation Instruction
Microscope Stand Installation Instruction Step 1. Remove the cover of the Step 2. Hand strap facing the rear,the rear microscope monomer lens. slot should be aligned with the mounting hole. Step 3. Holding the base with one hand, Step 4. Insert it to the bottom insert the microscope monomer vertically (focus wheel is all exposed). -
Page 7: Charging Instruction
Charging Instruction The indicator light on The indicator light on microscope base microscope monomer When the microscope base is low When the microscope monomer is low battery,the power indicator blue light battery,the power indicator light flashes quickly. flashes red. The red light is always on when The red light is always on when charging,and the indicator goes off when charging,and the great light is... -
Page 8: Microscope Monomer Introduction
Microscope Monomer Introduction Focus wheel: Counterclockwise rotation: zoom in Clockwise rotation: zoom out (Notice:There are two magnifications to rotate the focus wheel at the same distance.Lifting knob on the base and magnification /minification button can also be adjusted for multiple,when adjusted the focus wheel,lifting knob and magnification /minification button together,the maximum magnification is 400 times.) - Page 9 Power button: Long press the button for 3s,and the light on the microscope monomer or the light on the microscope base will light up,which means the microscope has been turned on.Press for 3s again,when the light goes out,means the microscope has been turned off. Power/WiFi connection indicator: When the battery is low,the blue light flashes quickly.When charging,the red light is always on.The blue light is always on when WiFi is successfully connected,and...
-
Page 10: How To Use The Microscope
How to Use the Microscope Hold the upper part of the microscope with Turn on the microscope by pressing the one hand, the tip of the finger can be put power button. into the hand strap to avoid falling. Connect the microscope and mobile app Remove the lens cover. - Page 11 Rotate the focus wheel with the other Align the lens of the microscope at hand and observe the display of the the object to be observed. phone.At this time,you can adjust the focus wheel to the best viewing ratio.
-
Page 12: Microscope Base Introduction
Microscope Base Introduction Opening and closing the microscope base Turn the light brightness knob clockwise and hear a “click”,the observation window will light up,which means the microscope base has been opened. Turn the light brightness knob counterclockwise and hear a “click”,the observation window will go out,which means the microscope base has been closed. - Page 13 Specimen holder: Fix the specimen or observe the object. The holder adopts magnetic suction type,which can be adsorbed in place as long as it is close to the mounting part of the base. The bottom of the specimen holder and the adsorption position of the base are cleaned regularly to avoid adsorption of other metal substances.
-
Page 14: How To Use The Microscope Base
How to Use the Microscope Base Place the microscope on a Turn on the microscope monomer stable table and avoid shaking and base. or falling. - Page 15 Adjust the microscope lifting knob,so Connect the microscope and mobile app that the microscope monomer is at a via WiFi. appropriate height,easy to place the object of observation.
- Page 16 Place the observation object Rotate the focus wheel and observe the display on the bottom observation of the phone.At this time,you can slowly adjust panel and place it in the to the best observation magnification.(Adjust center of the reticle of the the observation height and focal length to observation panel.(Be sure to achieve other multiple observations.)
-
Page 17: Accessories And Tools
Accessories and tools (Notice If you purchased the simple version,the accessories only contains 5 biologic section specimens,5 blank slides,data cable and 2 specimen fixation clip.) -
Page 18: App Usage Guide
APP Usage Guide How to Use on Android/iOS Step 1: Download APP IOS: Search iWeiCamera in the App store,download and install it,or scan the following QR code to select IOS version for installation. Android: Scan the following QR code to select Android (Google play) version (international user) or Android (China) version (Chinese user) download and install it;or input the following URL in the browser download and install it. - Page 19 Step 2: Turn on the microscope Long press the Power button 3s,when the blue indicator light is flashing,which means the device is turned on. Step 3: Connect the microscope to IOS/Android device Open the smartphone’s WiFi setting,find the name of WiFi :wifi_camera_wifi30_xxxx,click to connect,then run APP, you will see the main interface at this APP.
-
Page 20: How To Use On Pc
How to Use on PC For Windows Step 1 Download Software Please login https://soft.hvSCam.com,click the third link and download the software,then click the Next step Receive Install Finish. (Notice:If you were Win10 system,this software is not necessary,you can directly search Camera in Windows for find it and click on.For other system,please download the corresponding app) - Page 21 Step 2 Run amcap”,you will see the below interface after enter the app: Step 3 Connect the device with PC via USB cable,then long press Power button 3s to turn on the device. (Notice:do not turn on the device before connect,or you won't be able to see the picture,if you turn on before connect,that means opened the WiFi connect with smartphone)
- Page 22 Step 4 Click “Devices” in menu bar,then click “USB CAMERA” to select the microscope equipment name:...
-
Page 23: For Mac
For MAC Step 1 Download Software Please login https://soft.hvSCam.com,please select the HiViewSetup1.4 for mac.Then, download the software, as shown in the figure... - Page 24 Step 2 Double click and open HiView, The following information will appear. Then, click next step Connect your microscope to a mac computer or laptop via the USB cable. Then,open the software If there are safety tips...
- Page 25 The solution is as follows System Preference Open the Security & Privacy,select General and AppStore and identified developers. Select “Open Anyway” The opening interface of software Allow HiView below to access is as shown in the figure. your camera.
- Page 26 Step 3 Software Home Page...
-
Page 27: Microscope Trouble Shooting
Microscope Trouble Shooting PROBLEM SOLUTION In the process of charging the current is Heating during charging large and the battery calorific value is A normal phenomenon. high,which is a normal phenomenon. Repeat connection at close range The distance is too far Charge the device The APP failed to The equipment is out of power... - Page 28 PROBLEM SOLUTION The interface is not plugged tightly Plug interface again The device cannot connect to the The data cable is damaged Replace the data cable computer software terminal The connecting cable with data Replace the data cable with data transmission transmission function is not used function before connecting to use Ambient temperature changes...
-
Page 29: Product Performance Failure Table
Product Performance failure table Name Performance failure The microscope monomer cannot turn on The microscope monomer light doesn’t work Microscope monomer The microscope monomer cannot be focused The microscope monomer cannot connect with APP Unable to charge properly The base can’t turn on Microscope base Unable to charge properly The illuminating/dimming button doesn’t work properly... -
Page 30: Storage Environment
Storage Environment Story in cool and dry place for daily use,avoid direct sunlight. Avoid storing microscopes in places where there is a risk of falling,which may cause lens deviation or other damage to the microscope,as well as other irreparable damage. Operating Environment Please keep the Please prevent the...
Need help?
Do you have a question about the DDL-M1 and is the answer not in the manual?
Questions and answers