Table of Contents
Advertisement
Quick Links
Advertisement
Table of Contents

Related Manuals for Modena Igienico Series


Summary of Contents for Modena Igienico Series
- Page 1 User Manual Book Water purifier Igienico Series RO 67 SUV...
-
Page 3: Table Of Contents
How to Use Part 4: Maintenance Cleaning and Maintenance Part 5: Troubleshooting Part 6: Specification This guide book explains everything you need to know about your new product. Please contact our Customer Care should you need further assistance through www.modena.com. -
Page 4: Part 1: Safety Information
PART 1: SAFETY INFORMATION Read the user manual book carefully! • Do not try to install or turn on the unit without having read the indicated safety precautions in this manual. • The dispenser heats water to a temperature of 90°C. It can cause severe scalding. -
Page 5: Environmental Notice
• Do not use an extension cord or plug adaptor. Failure may cause electric shock or risk of fire • Choose a place that is near a grounded electrical socket. Keep the appliance at least 20 cm away from walls and other appliances and furniture on all 4 sides. -
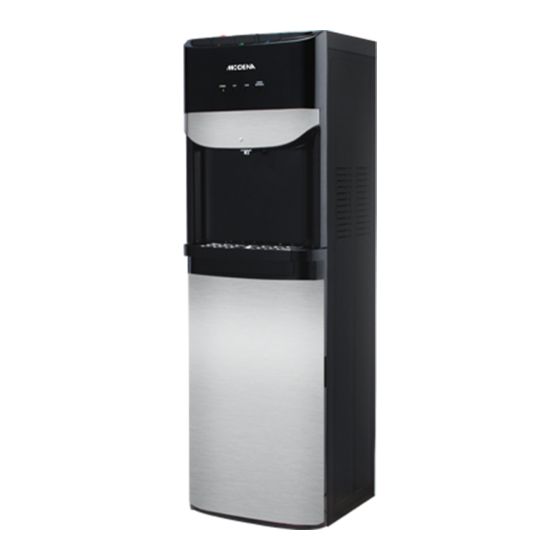
Page 6: Part 2: Name Of Parts
PART 2: NAME OF PARTS Note: Power/UV-C Indicator 8. Cooling switch 2. Heating indicator 9. Heating switch 3. Filter change indicator 10. Power cord 4. Cooling indicator 11. Tank drain valve 5. Water tap 12. Tap water inlet 6. Water collector 13. -
Page 7: Part 3: Quick Start Guide
PART 3: QUICK START GUIDE Installation A. Before first use, leave the appliance for 1 hour to stabilize the refrigerant B. Turn off the water supply valve C. Disconnect the current water supply line D. Connect the T joint with valve to the water supply line as shown E. - Page 8 F. Before using the appliance or after changing the filter, you need to clean the filter for 5 minutes. Use the flushing tip accessory to clean the filters. Insert PE pipe to the quick joint. G. Plug the power cord into the power socket. Make sure that the power source is properly grounded to prevent current leakage.
-
Page 9: How To Use
If the filter change indicator lamp is on, unplug the power plug from the socket before changing the filter. If you don’t know which filter needs to be replaced, contact Service Center. J. Filter must be changed periodically (see table below for reference) to ensure good performance and water purification quality. -
Page 10: Part 4: Maintenance
PART 4: MAINTENANCE Cleaning & Maintenance Ensure the power cord is unplugged before performing cleaning and maintenance activity 2. Dispense the water from the unit until it’s empty 3. Place a big bucket under the water drain hole on the back of the unit, unplug the drain cover and empty the remaining water from the tank 4. - Page 11 Problem Possible Cause Recommended Action Loud noise • • Improper installation Ensure that the unit • Compressor is is placed in an even and stable surface operation • • The compressor may Pump is operating produce sound when operating which is normal •...
-
Page 12: Part 6: Specification
PART 6: SPECIFICATION Model RO 67 SUV Color Stainless Filtering step PP-Carbon-PP-RO Tank & pipe material SUS 304 Hot water 5 L/hour (≥90°C) Cold water 2 L/ hour (≤10°C) Special feature UV-C Lamp Refrigerant R134a Heating power input (Watt) Cooling rated current (Ampere) Rated voltage &... - Page 13 02/21 PT MODENA INDONESIA Jl. Industri Raya I Blok D-8, Jatiuwung, Tangerang 15135...
Need help?
Do you have a question about the Igienico Series and is the answer not in the manual?
Questions and answers