Advertisement
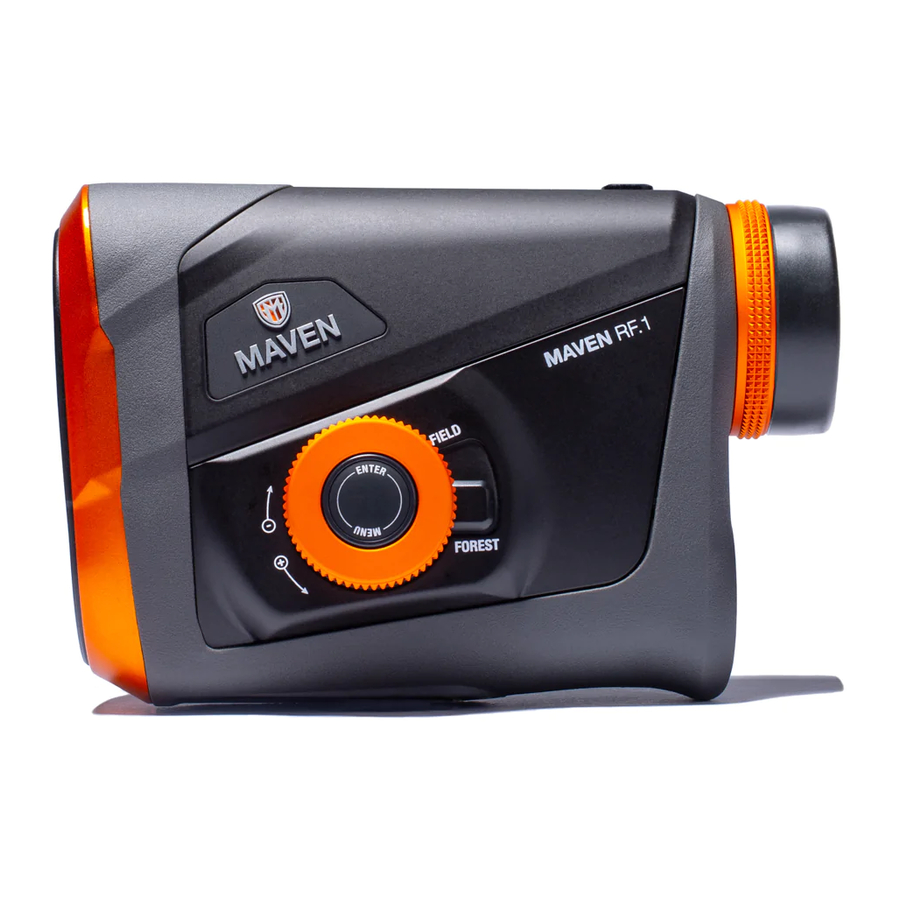
PARTS OF THE RANGEFINDER

- POWER / FIRE Button
- Laser Emission Aperture
- MENU / ENTER Button
- Twist-up Eyecup
- Laser Receiving Aperture
- Battery Compartment
- Ocular Lens
- Menu Dial
- Tripod Mount
- Diopter Focus
- Field / Forest Lever
- Lanyard Lug
GETTING STARTED
Your RF.1 rangefinder comes with a battery already installed. Before using:

- Open the battery cap by lifting the battery door tab and twisting the door counter clock-wise.
- Remove and discard the plastic insert sitting on top of the battery.
- The CR2 battery is already in place.
- Reinstall battery cap and thread on by twisting clockwise.
POWERING UP
Once the battery is installed and the 4 steps are completed, press and release the POWER button. The display will light up to show the unit is on and ready for ranging. The laser will power down automatically after 10 seconds of non-use.
FIRING THE LASER
To fire the laser, simply look through the ocular lens, press and release the POWER button once to turn it on, align the reticle over the object you want distance to, and press again to fire. Within the display is a "Firing Indicator" letting you know the laser is firing. At extended distances holding FIRE button might be required.
FOCUS
Adjust the diopter focus until the image is sharp.
ADJUSTING THE EYECUP
The eyecup on the RF.1 twists in and out so any user can see the full field of view and enjoy comfortable viewing and ranging with or without glasses. For best viewing without glasses we recommend twisting the eyecup such that it is fully extended. For best viewing with glasses, twist the eyecup down.

REPLACING BATTERY
To replace the battery, remove the battery cap by lifting the battery tab. Twist counter clock-wise to open the battery compartment and insert CR2 battery with positive end facing outwards. Once installed, reinstall battery cap and ensure it is threaded tightly.

RF.1 DISPLAY

- Angle Compensated/Line of Sight Indicator (Menu only)
- Angle Compensated/Line of Sight Indicator (Display)
- Degree of Angle (LOS only)
- Aiming Reticle
- Unit of Measure Indicator
- Field/Forest Indicator
- Scan Indicator
- Battery Life Indicator
- Firing Indicator
- Distance Display
Maximum Range (Reflective) 4500 yds*
Accuracy up to 0.5 yds to 300 yds**
*Highly reflective targets will be acquired more quickly while less reflective targets may take longer to acquire
**Accuracy validation completed to a 2ft x 2ft white target at a distance of 300 YDS
ABOUT THE DISPLAY
ADJUSTING DISPLAY BRIGHTNESS:
With the unit on, rotate the Menu Dial clockwise to decrease brightness and counterclockwise to increase brightness (in the menu this displays as BR1-5).
MENU & NAVIGATION
ANGLE MODE:
The RF.1 provides you the ability to measure and display either Line of Sight (LOS) or Angle Compensated distance (COMP). Angle compensated distance is an automatic calculation using the line of sight distance and factors in the degree of elevation angle.
When in Line of Sight Mode and unit is on: "LOS" indicator will be visible in bottom of display.
When in Angle Compensation Mode and unit is on: "COMP" indicator will be visible in bottom of display.
To change Angle Mode:
With RF.1 on, press the MENU/ ENTER button. The current Mode will be displayed at the top of the display as either ANGLE COMPENSATED or LINE OF SIGHT.
To change, rotate the MENU Dial until the desired mode is displayed and then press the MENU /ENTER button.
Exit by pressing the FIRE button. Angle Mode selected will be displayed within bottom of display as "LOS" or "COMP".
DEGREE OF ANGLE:
Displays from -90 to +90 degrees. This indicator will only display angle in Line of Sight mode.
AIMING RETICLE:
Choose from four reticle options (Diamond, Crosshair, Dot, and Crosshair with Diamond).
To change Reticle: With RF.1 on, press the MENU / ENTER button and continue doing so until the current reticle is displayed.
To change, rotate the Menu Dial until the desired reticle is displayed and then press the MENU / ENTER button.
Exit by pressing the FIRE button
UNIT OF MEASURE:
The RF.1 provides distance measurements in yards or meters.
To change unit of measure:
With RF.1 on, press the MENU / ENTER button and cycle through until the current Unit of Measure is displayed.
To change, rotate the Menu Dial until the desired unit of measure is displayed and then press the MENU / ENTER button. Exit by pressing the FIRE button.
FIELD / FOREST LEVER:
This lever allows you to easily and quickly select for your application and environmental setting.
Field – Move the lever to "Field" when you want to acquire small, hard to hit targets and ignore larger objects in the background (e.g. target in front of trees). Displayed as FLD.
Forest – Move the lever to "Forest" when you want to acquire distance to objects located behind trees, bushes, or thicket; or when in rainy or snowy conditions (e.g. target behind cover). Displayed as FOR.
SCAN INDICATOR:
With the laser on, press and hold the FIRE button, scan back and forth to various objects; while doing so, watch for changes in the measurement number displayed as you move the aiming reticle across targeted objects. This is a quick way to get an accurate reading on multiple objects. This will be indicated as SCAN within the display.
BATTERY LIFE INDICATOR:
Within the display, the Battery Life Indicator shows how much battery charge is remaining. The Battery Indicator will display the first time POWER button is pressed and will also display in the MENU. If Battery Indicator blinks - battery needs to be replaced and the unit will not be operable.
RANGEFINDING TIPS
- Unlike mankind, not all objects are created equal.
- Some objects are more reflective than others.
- Larger and more reflective objects are easier to detect.
- Objects that are lighter in color are generally easier to acquire than dark objects.
- Rain, snow and fog are not a laser's friend.
- This type of precipitation hinders ranging performance. In these conditions laser will produce a more accurate reading in Forest mode.
- Ranging in cloudy conditions can improve ranging performance; bright sunshine can decrease ranging performance.
- Ranging over a reflective body of water can cause inaccurate readings.
- Flat and perpendicular surfaces reflect better than curved or angled surfaces.
- Can't get a reading (horizontal hash marks instead of distance)?
- Press and hold the FIRE button while holding the reticle on the target. Ensure that the FIRE button is not released before a distance is displayed.
- Use the SCAN feature and technique. With the laser on, view through the eyepiece and align the aiming reticle onto the object and press and hold the FIRE button and move the laser slowly over the object until distance is displayed.
NOTE:
The RF.1 is designed to reach highly reflective targets out to 4500 yards. If a reading is not displayed, target may not be within the distance threshold, or the size, color, and reflectivity needed to provide an accurate reading.
CARING FOR YOUR RANGEFINDER
CLEANING
- Remove as much dust and dirt as possible from the lenses with a blower or bristled brush.
- Apply a few drops of lens cleaning solution to a lens tissue or microfiber cleaning cloth. Ensure that the cleaning cloth is free from dirt and grit so as not to scratch the lenses. NEVER use a t-shirt, facial tissue or heavy cotton cloth on your lenses as they can scratch the lenses.
- Using a circular motion, gently remove oil, fingerprints, and grime from the lens surface, working from the center outward.
- For cleaning and disinfecting surfaces other than glass, spray a microfiber cloth with Lysol spray and wipe down product or use a disinfectant wipe (e.g. Lysol, Clorox, CaviWipes).
STORAGE
When your RF.1 is not in use for over 3 months, we recommend removing the battery and storing your RF.1 in a dry location at room temperature.
FCC REQUIREMENTS
This device complies with Part 15 of the FCC interference limits for Class B digital devices FOR HOME OR OFFICE USE. These limits are designed to provide reasonable protection against harmful interference in a residential installation, and are more stringent than "outdoor" requirements. Operation of this device is subject to the following conditions:
- This device may not cause harmful interference, and
- This device must accept any interference received, including interference that may cause undesired operation.
This equipment generates, uses and can radiate radio frequency energy, and if not installed and used in accordance with the instructions, may cause harmful interference to radio communications. However, there is no guarantee that interference will not occur in a particular installation. If this equipment does cause harmful interference to radio or television reception, which can be determined by turning the equipment off and on, the user is encouraged to try to correct the interference by one or more of the following measures:
- Reorient or relocate the receiving antenna.
- Increase the separation between the equipment and receiver.
- Connect the equipment into an outlet on a circuit different from that to which the receiver is connected.
- Consult the dealer or an experienced radio/TV technician for help.
The device does not contain any user-serviceable parts. Repairs should only be made by Maven or Authorized Maven agent. Unauthorized repairs or modifications could result in permanent damage to the equipment and will void your warranty and your authority to operate this device under Part 15 regulations. The shielded interface cable which is provided must be used with the equipment in order to comply with the limits for a digital device pursuant to Subpart B of Part 15 of FCC Rules.
DISPOSAL OF ELECTRIC AND ELECTRONIC EQUIPMENT
(Applicable in the EU and other European countries with separate collection systems) This equipment contains electric and/or electronic parts and must therefore not be disposed of as normal household waste. Instead, it should be disposed at the respective collection points for recycling provided by the communities. For you, this is free of charge. Further information about the subject is available at your community administration, your local waste collection company, or in the store where you purchased this equipment.

SAFETY AND PRECAUTIONS
Do not stare into beam or view directly without laser eye protection. Staring continuously into beam for prolonged periods of time could cause harm to your eyes. If used properly, this device is safe for your eyes and laser eye protection is not needed.
- Use the correct battery (CR2) and proper battery orientation.
- Do not look at sun.
- Do not activate buttons while aiming at eye or looking into objective lenses.
FDA SAFETY
Class 1 laser product in accordance with IEC 60825-1: Edition 3 2014-05. Complies with 21 CFR 1040.10 and 1040.11 for laser products except for deviations pursuant to Laser Notice No. 50, dated June 24, 2007.

There are no user controls, adjustments or procedures. Performance of procedures other than those specified herein may result in access to invisible laser light.
UNCONDITIONAL LIFETIME WARRANTY
Maven products are made with a commitment to you, our customer. All Maven laser rangefinders come with an unconditional lifetime warranty*. If your rangefinder becomes damaged or is at all defective, contact us immediately for repair or replacement. We don't care where or when you bought it or if it was your fault or not – if it says Maven, we will take care of it.
*Warranty does not cover loss, deliberate damage, or cosmetic damage that does not hinder optical or electronic performance.
Call us at 800-307-1109 or email us at: customerservice@mavenbuilt.com with any questions.
For warranty/service repairs please visit: mavenbuilt.com/warrantyreturns.
To ensure the fastest and easiest processing of any warranty return, please register your Maven optic. Jump on mavenbuilt.com/warranty-registration to get registered quickly and easily.

Documents / Resources
References
![mavenbuilt.com]() Return Policy / Warranty Returns – Maven Outdoor Equipment Company
Return Policy / Warranty Returns – Maven Outdoor Equipment Company![mavenbuilt.com]() Warranty Registration – Maven Outdoor Equipment Company
Warranty Registration – Maven Outdoor Equipment Company
Download manual
Here you can download full pdf version of manual, it may contain additional safety instructions, warranty information, FCC rules, etc.
Advertisement


Need help?
Do you have a question about the RF Series and is the answer not in the manual?
Questions and answers