Advertisement
Table of Contents
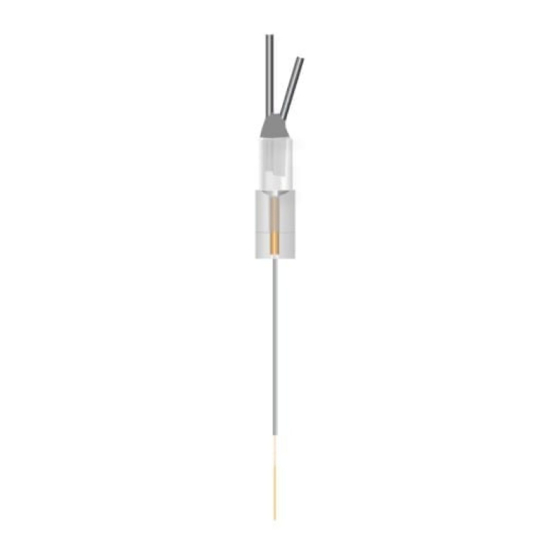
Concentric Microdialysis Probe
Model AZ-X-Y
• All Eicom products are for animal research purpose only.
• Keep the probe away from physical shock.
• Inlet needle is longer than outlet needle.
• Dura must be broken prior to insertion into the brain.
AZ-X-Y Probe
inner 0.150/0.075 mm PFS
outer 0.63/0.33 mm SUS
Inner Dead Volume
inlet: 0.05 µL
outlet: 0.4 µL
X + 5
Y
SUS (Stainless Steel) 316
PFS: Polyimide-Resin
Coated Fused Silica
Model: AZ-X-Y
Perfusion Solution
We are commend using a non-buffered aCSF solution because phosphate
buffer solutions may precipitate calcium phosphate and can result in clogs.
Probe Check
1.
Inject distilled water using a 1 or 2 ml disposable (plastic) syringe.
Connect the syringe to the inlet (longer needle) of the probe using
Biton tubing (JB-30). The probe may become clogged or damaged if
you initially flush with a salt solution. We recommend using distilled
water for the initial probe flush. Do not connect tubing to the outlet
of the probe during flushing. Please confirm there are no leaks from
US:
www.eicomusa.com
inner 0.105/0.040 mm PFS
outer 0.63/0.33 mm SUS
12.0 mm
9.0 mm
0.3/0.2 mm SUS
0.18/0.12 mm SUS
Membrane: Artificial Cellulose
Cut off: MW 50,000
OD/ID: 0.22/0.20 mm
X = (guide cannula length)
Y = (membrane length)
-
info@eicomusa.com |
the probe membrane. After flushing for several minutes (it is not
necessary to flush for an extended period of time) the membrane may
"sweat" or appear wet this is normal, not due to damage or a clog.
2.
If no flow is observed via the outlet needle, soak the probe in distilled
water for a few minutes and repeat instructions in item 1. After
confirming the distilled water flow from the outlet, please remove the
probe from plastic sheath and confirm no leaking.
3.
We test each probe for defect/leaking prior to shipping. If you find
a defective probe after following the above steps Eicom will replace
the probe at no charge. We do not guarantee probes after insertion
to animals.
Removing Air Bubble
1.
If there is an air bubble in the probe, please remove it. Because the
air bubble will cover the active membrane site and keep the perfusate
away. This will result in a lower recovery rate. The air bubble should be
removed before study. If it is small, it will disappear in case of in vivo
study but may not in vitro.
2.
Perfusate needs to be degassed before use.
3.
To remove the air bubble, please introduce a big air to the inlet and
flush out. Do not connect outlet tubing at this time. The big air bubble
will trap and remove a small air bubble.
Connecting Outlet
1.
Confirm neither leaking or air bubbles are present in the membrane.
Set the flow rate on the syringe pump. A standard flow rate is 1-2 μl/
min. A high flow rate coupled with a long outlet tubing can result in
damage of the probe membrane.
2.
Connect Teflon tubing (model JT-10) or other tubing to the outlet.
A long tubing length (more than 150 cm) can cause leaking of the
membrane or the liquid swivel due to the induced high pressure. If you
use tubing longer than 150 cm, please avoid using flow rates higher
than 2 μl/min. Polyethylene tubing can cause confounding peaks
when analyzing samples using HPLC with electrochemical detection.
Cleaning Probes and Storage
Remove the probe from the system and flush with distilled water to wash
out salts. Then put the probe in the distilled water and place at 4°C for
storage. Keep the membrane wet to prevent it from shrinking. Keep the
probe away from physical shock.
Cleaning Lines (Teflon, FEP tubing)
Bacteria generation and protein pollution of tubing can be a cause of low
recovery rates, especially in the outlet tubing. In order to avoid this problem,
wash the lines with 50 times diluted commercial kitchen bleach (chlorine) in
pure water. Perfuse the solution into the lines (not the probe) and leave it for
at least one hour, then thoroughly rinse with water.
EU:
www.eicomeurope.com
-
info@eicomeurope.com
User's ManUal
AD12-0718
Advertisement
Table of Contents

Related Manuals for Eicom AZ-X-Y

Summary of Contents for Eicom AZ-X-Y
- Page 1 User’s ManUal Concentric Microdialysis Probe Model AZ-X-Y AD12-0718 • All Eicom products are for animal research purpose only. the probe membrane. After flushing for several minutes (it is not necessary to flush for an extended period of time) the membrane may • Keep the probe away from physical shock. “sweat” or appear wet this is normal, not due to damage or a clog. • Inlet needle is longer than outlet needle. If no flow is observed via the outlet needle, soak the probe in distilled • Dura must be broken prior to insertion into the brain. water for a few minutes and repeat instructions in item 1. After...
- Page 2 Configuration of Stereo Adaptor (SAG-X), Guide Cannula (AG-X), Dummy Cannula (AD-X) & Cap Nut (AC-1) Clamp of Stereotaxic Apparatus not provided from Eicom Cap Nut (AC-1) Stero Adapter (SAG-X) Guide Cannula (AG-X) Stero Adapter (SAG-X) Guide Cannula crown is After confirming fixation of the guide acrylic resin made and cannula, loose the cap nut and remove stero adhesive to acrylic adaptor from the guide cannula.
Need help?
Do you have a question about the AZ-X-Y and is the answer not in the manual?
Questions and answers