Table of Contents
Advertisement
Quick Links
OwNERS MANUAl
MANUAl DEl USUARIO
NOTICE D'UTIlISATION
Model No.
Modelo No.
Modèle No.
45-0346
Read Rules for
Safe Operation
and Instructions
PRECAUCION:
Lea cuidadosamente
los Procedimientos e
Instrucciones para la
Operación Segura de la
ATTENTION:
Lire et suivre attentivement
les instructions et
consignes de sécurité de
PRINTED IN USA
™
CAUTION:
Carefully
•
•
•
•
•
Máquina.
cette notice.
the fastest way to purchase parts www.speedepart.com
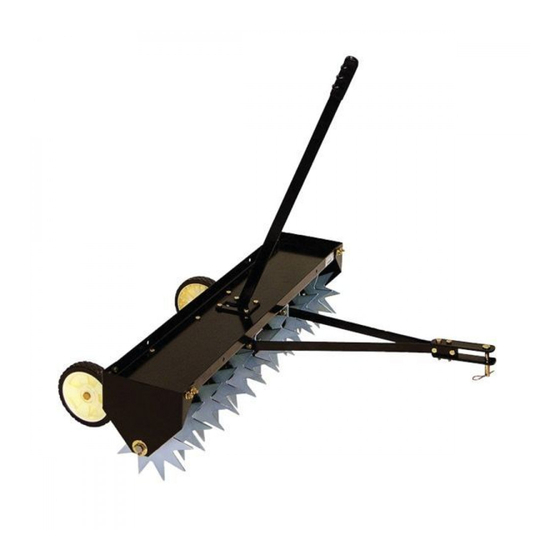
40" SPIKE AERATOR
AIREADOR DE ESPIGAS DE 40" (16 cm)
AÉRATEUR À CRAMPONS DE 1 M (40 POUCES)
Safety
Assembly
Operation
Maintenance
Parts
•
Seguridad
•
Montaje
•
Operación
•
Mantenimiento
•
Piezas de Repuesto
•
Sécurité
•
Assemblage
•
Fonctionnement
•
Maintenance
•
Pièces de Rechange
FORM NO. 48843 (4/25/07)
Advertisement
Table of Contents

Related Manuals for Agri-Fab 45-0346


Summary of Contents for Agri-Fab 45-0346
- Page 1 ™ OwNERS MANUAl MANUAl DEl USUARIO NOTICE D’UTIlISATION Model No. Modelo No. Modèle No. 45-0346 CAUTION: Read Rules for Safe Operation and Instructions Carefully PRECAUCION: Lea cuidadosamente los Procedimientos e Instrucciones para la Operación Segura de la Máquina. ATTENTION: Lire et suivre attentivement les instructions et consignes de sécurité...
- Page 2 CARTON CONTENTS (Loose Parts in Carton) CONTENIDO DE lA CAJA (Partes Sueltas en la Caja) CONTENU DU CARTON (Pièces en Vrac Dans le Carton) ENGlISH 1. Tray 2. Axle 3. Spike Disks (12) 4. End Plates (2) 5. Axle Support Bracket 6.
-
Page 3: Hardware Pack
HARDwARE PACK Qty. Shoulder Bolt, 2"x 2 5/16" Lg. Hex Bolt, 5/16" x 2" Lg. Hex Bolt, 5/16" x 1-1/4" Lg. Hex Bolt, 5/16" x 1" Lg. Carriage Bolt, 5/16" x 1"Lg. Nylock Nut, 3/8" Nylock Nut, 5/16" Flat Washer (6 pcs. extra) Hair Cotter Pin, 1/8"... -
Page 4: Safety Rules
Remember, any power equipment can cause injury if operated improperly or if the user does not understand how to operate the equipment. Exercise caution at all times when using power equipment. Look for this symbol to point out important safety precautions. It means – Attention! Become alert! Your safety is involved. -
Page 5: Tools Required For Assembly
ASSEMBlY INSTRUCTIONS TOOlS REQUIRED FOR ASSEMBlY (2) 1/2" wrenches (1) 9/16" wrenches (1) 3/4" wrench or adjustable wrench Before assembling the aerator, lay out all of the parts and hardware as shown on the previous pages. Spike points are sharp. Exercise caution when handling and working near spike disks. - Page 6 6. Pivot the end plate on your right side up onto the end of the axle. See figure 4. 7. Pivot the end plate on your left side down out of the way. See figure 4. FIGURE 4 8. Assemble the following parts in sequence onto the long end of the axle (as shown in figure 5): a. A flat washer (H) and two short spacers (N).
- Page 7 14. Assemble the axle bracket to the outside of the angle brackets using two 5/16" x 1" hex bolts (D) and 5/16" nylock nuts (G). The ends of the axle bracket must point as shown in figure 8. Tighten and then loosen the nuts 1/4 turn. 15.
- Page 8 20. Turn the aerator right side up and assemble the front ends of the hitch arms together using two 5/16" x 1-1/4" hex bolts (C) and 5/16" nylock nuts (G). Do not tighten yet. See figure 13. 21. Assemble the two hitch brackets to the top and bottom of the hitch arms using two 5/16"...
-
Page 9: Operation
OPERATION Aerating involves cutting small holes in the soil to create small reservoirs that will bring oxygen, fertilizer and water down into the root zone. For best performance of the spike aerator attachment, the following lawn preparation and aerator operation is recommended. Spike points are sharp. -
Page 10: Normas De Seguridad
Cualquier equipo movido por motor puede causar lesiones si se opera inadecuadamente o si el usuario no entiende cómo debe operarlo. Manténgase atento y cauteloso siempre que opere el equipo. Este simbolo indica precauciones importantes de seguridad. Significa – ¡atencion! seguridad esta en riesgo Lea este manual del propietario con mucho cuidado para conocer las instrucciones de operación y servicio antes de tratar de armar u operar este equipo. - Page 11 Gire la placa del extremo que está a su derecha hacia abajo y hacia fuera. Coloque el extremo largo del eje, medido desde el agujero ciego del medio, a través de la placa pivotante que está a su izquierda. (Si existen dos agujeros en el medio, use el agujero que esté...
-
Page 12: Mantenimiento
OPERACION El proceso de aireación requiere abrir un número de agujeros pequeños en el terreno para crear pequeños depósitos que lleven oxígeno, fertilizante y agua hacia la zona de la raíz. Para un mejor rendimiento del accesorio aireador, se recomienda la siguiente preparación del terreno y operación del aireador. - Page 13 Tout appareil mécanique utilisé incorrectement peut être la cause de blessures. L’utilisateur doit bien en maîtriser le fonctionnement. Observez en tout temps la plus grande prudence lorsque vous utilisez un appareil mécanique. Ce symbole attire l’attention sur des mesures de sécurité importantes. Il signifie: «Attention, demeurez vigilant, votre sécurité...
- Page 14 Pivoter la plaque d’extrémité de droite pour la mettre de côté. Placer le côté long de l’essieu, tel que mesuré à partir du trou borgne médian, dans la plaque de pivot gauche (s’il existe deux trous médians, utiliser le trou qui est aligné avec les trous en bout).
- Page 15 FONCTIONNEMENT L’aération consiste à percer de petits trous dans le sol pour créer de petits réservoirs qui amèneront l’oxygène, l’engrais et l’eau dans la zone des racines. Pour obtenir la meilleure performance de l’accessoire d’aérateur à crampons, il est recommandé d’effectuer la préparation du gazon et de faire marcher l’aérateur comme indiqué...
- Page 17 SPIKE AERATOR MODEl 45-0346 REPAIR PARTS REF. PART QTY. DESCRIPTION 24597 Tray 24594 Plate, Lift 23900 Disk, Spike 45148 Hub, Spike Disk 23708 Spacer, 2.13" Long 46838 Spacer, 1/2" Long 24598 Axle 24599 End Plate 43501 Cotter Pin, 9/64" x 1-1/2"...
-
Page 20: Repair Parts
Agri-Fab, Inc. Unauthorized uses and/or reproductions of this manual will subject such unauthorized user to civil and criminal penalties as provided by the United States Copyright Laws.
Need help?
Do you have a question about the 45-0346 and is the answer not in the manual?
Questions and answers