Table of Contents
Advertisement
Quick Links
Advertisement
Table of Contents

Related Manuals for schulink SC1366

Summary of Contents for schulink SC1366
- Page 1 SC1366 3A Wireless Charger /Maintainer 3A Cargador OWNERS MANUAL PLEASE SAVE THIS OWNERS MANUAL AND READ BEFORE EACH USE. This manual will explain how to use the charger safely and effectively. Please read and follow these instructions and precautions carefully.
-
Page 2: Table Of Contents
CONTENTS IMPORTANT SAFETY INSTRUCTIONS ..................4 PERSONAL SAFETY PRECAUTIONS .................... 4 PREPARING TO CHARGE ......................5 CHARGER LOCATION ........................5 DC CONNECTION PRECAUTIONS ....................5 FOLLOW THESE STEPS WHEN BATTERY IS INSTALLED IN VEHICLE ........5 FOLLOW THESE STEPS WHEN BATTERY IS OUTSIDE VEHICLE ..........6 GROUNDING AND AC POWER CORD CONNECTIONS ............... -
Page 3: Important Safety Instructions
1. IMPORTANT SAFETY INSTRUCTIONS PLEASE SAVE THIS OWNERS MANUAL • The wire size is large enough for AC AND READ BEFORE EACH USE. ampere rating of charger, as specified in This manual will explain how to use the section 8. charger safely and effectively. -
Page 4: Preparing To Charge
3. PREPARING TO CHARGE 3.1 If necessary to remove battery from 3.5 Study all battery manufacturer’s vehicle to charge, always remove specific precautions while charging and grounded terminal from battery first. Make recommended rates of charge. sure all accessories in the vehicle are off, 3.6 Determine voltage of battery by referring so as not to cause an arc. -
Page 5: Follow These Steps When Battery Is Outside Vehicle
7. FOLLOW THESE STEPS WHEN BATTERY IS OUTSIDE VEHICLE WARNING! A SPARK NEAR THE connect NEGATIVE (BLACK) charger clip BATTERY MAY CAUSE A BATTERY to free end of cable. EXPLOSION. TO REDUCE THE RISK 7.5 Do not face battery when making final OF A SPARK NEAR THE BATTERY: connection. -
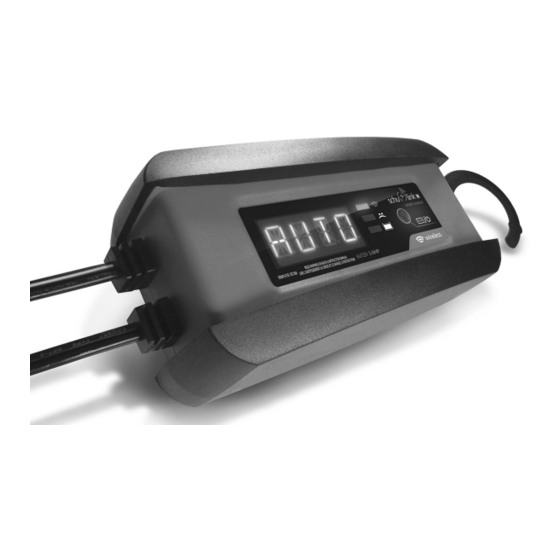
Page 6: Control Panel
When using the App for the first time with a new charger, you must register your • Download and install the SchuLink+ charger(s) to the App. App (Apple store or Google Play). 1. Open the App on your mobile device. -
Page 7: Using The App To Control The Charger
If the blue LED is not lit, refer icon turns gray. Tap the to check the to Troubleshooting. signal strength. 2. Open the SchuLink+ App. Connected to AC – When green, this 3. Log in, using the email address and indicates the charger is plugged into password that you provided when a live 120V AC outlet. -
Page 8: Operating The Charger
CHARGING MODE self-discharge or idle draw of the attached vehicle. Charging mode lets you follow the progress through the 8 stages of charging: 8. Maintain – The charger checks the battery every 12 hours and puts the 1. Auto Voltage Detection – In this mode, charger into float mode to replenish a battery is connected to the charger lost energy from the battery. - Page 9 6. Connect the battery, following the RING TERMINAL QUICK-CONNECT precautions listed in sections 6 and 7. The ring connectors permanently attach to the battery, providing easy access to quickly 7. Connect the charger to a live connect the charger to your battery. This grounded 120V AC outlet.
- Page 10 BATTERY CONNECTION INDICATOR NOTE: The maintain mode technology If the charger does not detect a properly allows you to safely charge and maintain connected battery, charging will not start a healthy battery for extended periods and the digital display will show one of time.
-
Page 11: Display Messages
15. DISPLAY MESSAGES “CONNECT BATTERY” “FULLY CHARGED AUTO MAINTAINING” (Blue LED only, solid*) – Plugged into the (Green LED pulsing) – Plugged into a live AC outlet without the clamps connected to grounded AC outlet and correctly connected a battery. to a fully charged 6V or 12V battery. -
Page 12: Before Returning For Repairs
PROBLEM POSSIBLE CAUSE SOLUTION The display scrolls The clamps are not making a Check for poor connection at “CONNECT BATTERY”. good connection. battery and frame. The fuse is bad. Replace the in-line fuse for the ring connector or 12V accessory plug connector. Charging a 12V battery, Battery may be extremely No problem;...
Need help?
Do you have a question about the SC1366 and is the answer not in the manual?
Questions and answers