Advertisement
Quick Links
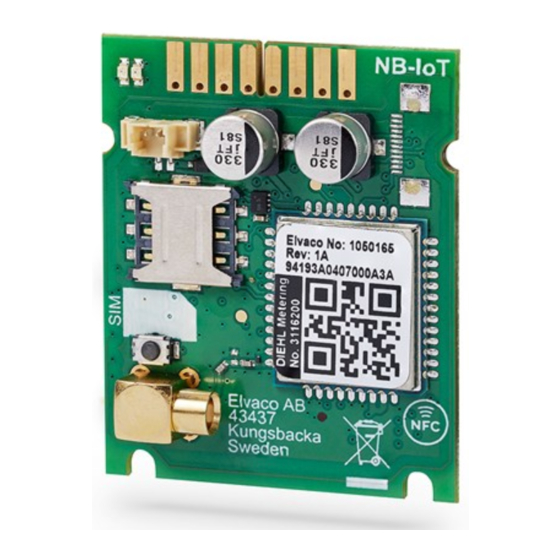
CMi6160
Integrated MCM for Diehl Metering SHARKY 775, SCYLAR INT 8, NB-IoT
INTRODUCTION
CMi6160 is an integrated meter connectivity module mounted inside
a Diehl Metering SHARKY 775 heat/cold meter and SCYLAR INT 8
calculator to deliver meter data to a receiving system via a NB-IoT
network. For a complete description of the product, or for information in
other languages, please visit the Elvaco AB website, https:/ /www.elvaco.
com.
MODULE SPECIFICATION
1. Meter Interface
2. Green LED
3. Red LED
4. Battery Power Connector
5. SIM Card Holder
MOUNTING
Before mounting the module in the meter, make sure that a SIM card is
installed in the SIM card slot (5) as illustrated above.
NOTE! Please note that the SIM card must be inserted as illustrated
below. If it is inserted upside down it can easily damage the SIM slot.
Open the calculator by folding down the side catches.
Lock the module into the appropriate slot (preferable slot 2, mandatory
when internal antenna is used) and carefully connect the pre-formed
ribbon cable at both ends.
Close the lid and check the meter for correct operation by pressing the
push button. Apply tamper evident seal of the housing lid if the meter
functions correctly.
NOTE
•
Electrostatic-sensitive devices. Please observe the
necessary ESD protective measures when installing
the device.
6. Push Button
7. Antenna Connector (MCX)
8. NFC Antenna (around whole
board)
MOUNTING - BATTERY POWER
See manual for external battery pack. Connect power cable from
external battery back to battery power connector (4) of the CMi6160.
ANTENNA CONNECTION
If the CMi6160 is equipped with internal antenna no additional actions
need to be taken. If external antenna is required disconnect the internal
antenna (if it is mounted) from MCX connector of CMi6160. See picture
below for internal antenna positioning.
Connect an external antenna (released by the supplier) with MCX
connector to the module CMi6160 in the meter. Make a hole in rubber
gromets/sealing and push the mcx connector through the gromet/
sealing. Make sure thicker part of antenna cable is in gromet/seal. Push
the connector gently into the antenna connector (7) on the module.
ACTIVATION
Upon delivery, CMi6160 has a standard configuration. To change the
configuration, please download the Elvaco OTC Application (One-
Touch commissioning) for Android, available in Google Play, for iOS
available in app store.
The Elvaco OTC connects to the module via NFC.
NOTE
•
Make sure to locate the NFC antenna on your phone. When you
scan or write new configurations to the module, you should place
the phone's NFC antenna as close as possible to the NFC antenna
of the module (8). The NFC is reachable from back side of the
meter or from top when lid is removed.
Advertisement

Related Manuals for Elvaco CMi6160


Summary of Contents for Elvaco CMi6160
- Page 1 Connect an external antenna (released by the supplier) with MCX connector to the module CMi6160 in the meter. Make a hole in rubber gromets/sealing and push the mcx connector through the gromet/ sealing. Make sure thicker part of antenna cable is in gromet/seal. Push the connector gently into the antenna connector (7) on the module.
- Page 2 E-mail: support@elvaco.com Online: www.elvaco.com © 2021, Elvaco AB. All rights reserved. The documentation and product are provided on an “as is” basis only and may contain deficiencies or inad- CMi6160 Quick manual English equacies. Elvaco AB takes no responsibility for damages, liabilities or other losses by using this product. No part of the contents of this manual Version: 1.0...
Need help?
Do you have a question about the CMi6160 and is the answer not in the manual?
Questions and answers