
Related Manuals for Electromed WellnessPro +


Summary of Contents for Electromed WellnessPro +
- Page 1 User Manual Caution: Federal law restricts this device to sale by or on the order of a practitioner licensed by the law of the State in which he/she practices to use or order the use of the device.
-
Page 2: Table Of Contents
TABLE OF CONTENTS Foreword ................................3 Precautionary Instructions / Definition of Symbols ..................4 Indications, Contraindications & Adverse Effects: ..................5 General information ............................5 Cautions ................................ 5 Indications of use............................5 Contraindications ............................5 Precautions ..............................5 Adverse Effects .............................. 6 Storage/Usage/Transportation ........................ -
Page 3: Foreword
Foreword Thank you for purchasing the WellnessPro 2010 Plus Electrotherapy Unit. This manual contains general safety, operating, maintenance and care instructions for the owners and operators of the WellnessPro 2010 Plus Unit. At the time of publication the information contained herein was current and up to date. However, due to continual technological improvements and increased clinical knowledge in the field of electrotherapy, as well as our policy of continual improvement, Electromedical Technologies, Inc reserves the right to make periodic changes and improvements to their equipment and documentation without any obligation on the part of... -
Page 4: Precautionary Instructions / Definition Of Symbols
Precautionary Instructions / Definition of Symbols Read, understand and practice the precautionary and operating instruction found in this manual. Know the limitations and hazards associated with using any electrical stimulation device. Observe the precautionary and operational decals placed on the unit. DO NOT operate the unit when connected to any unit other than the WellnessPro 2010 Plus. -
Page 5: Indications, Contraindications & Adverse Effects
Indications, Contraindications & Adverse Effects General information This TENS is a lightweight and portable medical device which can help to reduce pain and discomfort. It utilizes low electric-current to stimulate nerves to achieve the symptomatic relief of chronic-intractable, post- traumatic and post-surgical pain. Cautions Federal law (USA) restricts this device to sale by or on the order of practitioners licensed by the State in which they practice to use or order the use of the device. -
Page 6: Adverse Effects
Since the effects of stimulation of the brain are unknown, stimulation should not be applied across the head, and electrodes should not be placed on opposite sides of the head; The safety of electrical stimulation during pregnancy has not been established; ... -
Page 7: Storage/Usage/Transportation
Storage/Usage/Transportation: Storage/Transportation temperature: -10° C ~ +65° C (avoid direct sun exposure) Operating temperature: 0° C ~ +55° C (avoid direct sun exposure) Maintenance & Cleaning Method: Lead Wires and Carbon Rubber Electrodes: Clean with a damp cloth and wipe dry with cloth or towel. Do not use bleach or harsh cleaners. -
Page 8: Waveform Descriptions
Waveform descriptions: WellnessPro 2010 Plus has 2 Modes of waveforms: Continuous and Pre-modulated Continuous mode produces a continuous train of impulses. The stimulation parameters are not automatically interrupted nor varied in any way. The continuous mode is quite versatile because it may be applied with a variety of rate settings. -
Page 9: Type 1
Another variation is a combination of the previously described modes 3 sec 1 sec 3 sec 1 sec These modes and variations are labeled as Wave type 1, 2, 3, 4 and 5. Detailed waveform descriptions: Type 1 Wave type 1 is a continuous symmetrical biphasic pulse, where amplitude depends on the selected intensity level (Max. -
Page 10: Type 3
Type 3 3 - 3.5 sec 0.5-1 sec 3 - 3.5 sec 0.5-1 sec Wave type 3 is a continuous symmetrical biphasic pulse. This wave type is also known as a “Burst” type with duration of 3 – 3.5 seconds and pause of 0.5 – 1 second in between. Amplitude and sampling depends on selected intensity level and selected frequency. -
Page 11: Technical Specifications
Technical specifications Number of output channels: 2 (A and B) Output (both channels) Waveform 1 Continuous symmetrical biphasic pulse. “Continuous mode” Waveform 2 Amplitude modulated (ramp up) symmetrical biphasic pulse “Spectrum mode” with duration of 3 seconds and pause of 1 second in between. Continuous symmetrical biphasic pulse with duration of 3 –... -
Page 12: Package Components And Assembly Instructions
Package components and assembly instructions: Your pack contains: WellnessPro 2010 Plus Unit 7.5 Volt universal power adapter Two (2) input cables Eight (8) lead wires Two (2) rectangular carbon-rubber electrodes Two (2) round carbon-rubber electrodes ... - Page 13 Power adapter plug Output channel A Custom programs Backup and restore STIM card Figures 2 and 3: Back and side view of the unit Output channel B © 2018 Electromedical Technologies, Inc. Phoenix, AZ USA. Any use of editorial, pictorial or layout composition of this publication without express written consent from Electromedical Technologies, Inc.
-
Page 14: Ac Adapter
AC Adapter: ® Plug the WellnessPro+ AC adapter into the back of the unit, Then into a wall outlet. Figure 4: AC Power adapter Voltage requirements: ® The AC adapter included with your WellnessPro+ unit is a universal adapter and can be used in any country all over the world. -
Page 15: How To Connect Wires
How to connect wires: ® comes with cables and receptacles that are equipped with LEMO QUICK-LOK™ Push-Pull WellnessPro+ Self-Latching System. LEMO’s Original QUICK-LOK push-pull, self-latching system is renowned worldwide for its easy and quick connect and disconnect features. It provides absolute security against vibration, shock or pulling of the cable, and facilitates operation in a very limited space offering unique advantages for all applications: Speed –... - Page 16 ™ How QUICK-LOK Works Engaging QUICK-LOK allows the connector to be mated by simply pushing the plug straight into the receptacle. Latched Once firmly latched, connection cannot be broken by pulling on the cable or any other component part other than the outer release sleeve. Disengaging When required, the connector is disengaged by a single straight pull on the outer release sleeve.
- Page 17 Connecting the Input Cable with the WellnessPro+ Connect the steel end of the input cable (image below) into the yellow socket of either “Channel A” or “Channel B” of the unit. Yellow sockets are located on both sides of the unit and are closer to the front of the unit. Make sure the red dot is aligned on the connector and receptacle (see page 16 for quick reference).
- Page 18 Connecting the Lead Wires with the Input Cable Figure 8: Lead wires Connect at least two lead wires into the plastic mold on input cable containing four holes. Figures 9 and 10: Proper color-coded connections shown If only two wires are being used, they will have to be connected to the left or right two holes (see images above).
- Page 19 Connecting the Lead Wires with Accessories Plug the exposed end of the cable into the hole of the electrode (left) or into the Snap-on wire adapter if you are using the self-adhesive electrodes (right). Our electrodes are made with highly durable yet soft silicone material. Their conductive rubber pads feel comfortable on the skin while the low resistance design gives an effective treatment every time.
- Page 20 Certificates: * EN ISO13485, FDA 510K, COFEPRIS. Electrode Specifications: Resistance Under 200 Ohms Highly durable and flexible Conductive Gel can be applied on the conductive surface for uniform conductivity Negative - Cytoxicity - Skin Sensitization - Acute Cutaneous Irritation Electrical Dispersion Test ®...
-
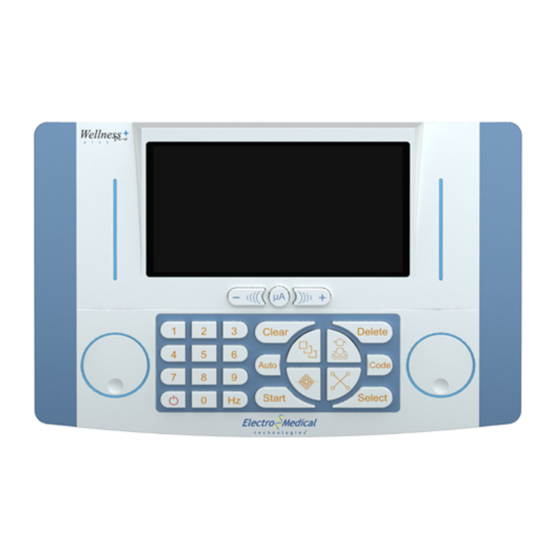
Page 21: Description Of Lcd Display
Description of LCD display: CODE – This field displays the single code or auto code you have selected. FREQUENCY– This field displays Hertz frequency generated by the unit TIME– This field displays the amount of minutes necessary to complete a specific frequency ... -
Page 22: Keyboard Functions
Keyboard functions: Power button (on/off) CLEAR resets the program display for your next program DELETE removes numbers entered by mistake. When you hit this button during an Auto code program repeatedly, DELETE skips through a series of codes/frequencies to the code/frequency you want to begin with. -
Page 23: Intensity Level Controls
Functions: Dual mode, FLUX mode, Multi AUTO and Backup and restore will be explained into detail in the chapter “Functions description” located on page 38 of this manual. Intensity Level Controls: To increase or decrease the intensity level output on the electrodes use the intensity level knobs as follows: ... - Page 24 Method of application of electrodes: Personal application of electrodes can be placed around a target area. The WellnessPro+ generates different waveforms and any of these may be used for symptomatic relief and management of chronic, intractable, post- traumatic and post-surgical acute pain. Special applications When you want to target specific joint or muscle conditions such as a muscle injury, place each electrode on each side of the affected area (knee, elbow and other curved areas).
- Page 25 Electrode placement chart: NOTE: This is an example of electrode placement. Please discuss electrode placement with your practitioner to determine the best placement. © 2018 Electromedical Technologies, Inc. Phoenix, AZ USA. Any use of editorial, pictorial or layout composition of this publication without express written consent from Electromedical Technologies, Inc.
- Page 26 Electrode placement chart (continued): NOTE: This is an example of electrode placement. Please discuss electrode placement with your practitioner to determine the best placement. © 2018 Electromedical Technologies, Inc. Phoenix, AZ USA. Any use of editorial, pictorial or layout composition of this publication without express written consent from Electromedical Technologies, Inc.
-
Page 27: Operating Instructions
Operating instructions: ® You can use your WellnessPro+ unit to run the following: Auto Codes Single Codes Custom programs Custom frequencies NOTE: The method of usage is a matter of convenience and personal preference. NOTE: To complete any of the following examples your unit must be plugged in, turned on and must be in READY mode. -
Page 28: Auto Codes
Auto Codes: The WellnessPro+ has 100 empty memory slots available for the practitioner or user to store custom programs. An Auto code is a single or set of frequencies or codes stored in the memory for later use. NOTE: When programming Auto codes using frequencies you can store up to 24 different frequencies per memory slot. -
Page 29: Single Code Description
Entering 102 (from our example) will expand above screen to: WellnessPro PLUS Enter AUTO Code FLUX: on Multi AUTO: on Pressing “Start” button will initiate Auto code 102 and screen will appear as follows: Single Code description: Single codes are 250 most commonly used frequencies preprogrammed in the memory for convenience and ease of use. - Page 30 NOTE: As soon as you press “Select” button, screen will appear as follows: Entering 28 (from our example) will expand above screen to: Pressing “Start” button will initiate single code 28 and the screen will appear as follows: © 2018 Electromedical Technologies, Inc. Phoenix, AZ USA. Any use of editorial, pictorial or layout composition of this publication without express written consent from Electromedical Technologies, Inc.
-
Page 31: Make Your Own Auto Code Using Single Codes
Make your own Auto Code using single codes Example: Make your own Auto code #3 using codes 1, 9 and 21 The following example will show you how to store codes 1, 9 and 21 into memory slot #3. (Assuming your unit is plugged in, turned on and in READY mode.) Step 1: Press button... - Page 32 Step 3: Press button Screen will appear as follows: Step 4: Press number 1 (first code from our example) Step 5: Press button Screen will appear as follows: © 2018 Electromedical Technologies, Inc. Phoenix, AZ USA. Any use of editorial, pictorial or layout composition of this publication without express written consent from Electromedical Technologies, Inc.
- Page 33 Step 6: Press number 9 (second code from our example) Screen will appear as follows: Step 7: Press button Step 8: Press number 21 (last code from our example) Step 9: Finish programming For this step you have 2 options: Option #1: Pressing CODE will complete your programming procedure.
-
Page 34: Make Your Own Auto Code Using Frequencies
Make your own Auto Code using frequencies Example: Make your own Auto code #5 using frequencies 15, 220 and 750.25 Hz. This example will show you how to store frequencies 15, 220 and 750.25 Hz into memory slot # 5. Make sure your unit is plugged in, turned on and in READY mode. - Page 35 Step 3: Press button Screen will appear as follows: Step 4: Press numbers 1500 (Frequency of 15.00 Hz from our example. Last two digits are decimal points) Screen will appear as follows: Step 5: Press button Screen will appear as follows: ©...
- Page 36 Step 6: Enter desired running time for this frequency by pressing numbers 1 through 60. Step 7: Press button Screen will appear as follows: Step 8: Enter desired wave type by pressing numbers 1 through 5. (Wave type descriptions located on page 9) NOTE: Repeat steps 3 through 8 in order to store the second frequency from our example.
-
Page 37: Mistakes & Errors
Step 18: Enter desired running time for this frequency by pressing numbers 1 through 60. Step 19: Press button Step 20: Enter desired wave type by pressing numbers 1 through 5. Step 21: Finish programming For this step you have 2 options: Option #1: Pressing CODE will complete your programming procedure. -
Page 38: Functions Description
Functions description Dual mode (On/Off) button is pressed, “Dual STIM: on” will appear at the bottom of the screen. When At that point the standard “READY” screen appearance will change from: WellnessPro PLUS Ready FLUX: on Multi AUTO: on To dual Ready style: WellnessPro PLUS Ready Ready... -
Page 39: Dual Mode Operation
Dual mode operation To operate the unit in DUAL mode, press the AUTO button Message on the screen will appear as follows: WellnessPro PLUS Enter AUTO Code (Side A) FLUX: on Dual STIM: on Multi AUTO: on Desired AUTO CODE is selected (we chose 102 as an example by pressing 102) WellnessPro PLUS Enter AUTO Code (Side A) FLUX: on... - Page 40 Desired AUTO CODE is selected (we chose 352 as an example by pressing 352) WellnessPro PLUS Enter AUTO Code (Side B) FLUX: on Dual STIM: on Multi AUTO: on Press the START button - screen will appear as follows: WellnessPro PLUS Side A Side B Code: 102...
- Page 41 Vertical LED stripe on the left (example image on previous page) will continue fade-in/fade-out routine in blue color while vertical LED stripe on the right side will simply glow in orange indicating that side is over with the program. Once the program is complete on the side A, the vertical LED will start glowing orange. WellnessPro PLUS WellnessPro PLUS Program...
-
Page 42: Flux Mode (On/Off)
FLUX mode (On/Off) button is pressed, “FLUX: on” will appear at the bottom left corner of the screen. When WellnessPro PLUS Ready FLUX: on Dual STIM: on Multi AUTO: on This function will work in standard and/or dual mode WellnessPro PLUS Ready Ready FLUX: on... - Page 43 Screen will appear as follows: WellnessPro PLUS Enter FLUX range (1-10 Hz) FLUX: on Dual STIM: on Multi AUTO: on Desired FLUX Value is selected (we chose 1 as an example) WellnessPro PLUS Enter FLUX range (1-10 Hz) FLUX: on Dual STIM: on Multi AUTO: on SELECT button is pressed and confirmation message is displayed...
-
Page 44: Multi Auto Sequence (Standard Ready Mode)
Multi AUTO sequence (STANDARD READY MODE) This feature will allow the user of the WellnessPro+ to run up to 50 consecutive Auto codes of their choice. Auto code used can be any code from memory slot 1 to 1000. button is pressed, “Multi AUTO: on” will appear at the bottom right corner of When screen. - Page 45 Desired AUTO CODE is selected (we chose 102 as an example) WellnessPro PLUS Enter Multiple AUTO Codes FLUX: on Dual STIM: on Multi AUTO: on press SELECT button - unit will ask for the new AUTO Code WellnessPro PLUS Enter Multiple AUTO Codes FLUX: on Dual STIM: on Multi AUTO: on...
- Page 46 The screen will appear as follows: WellnessPro PLUS Side A Side B Code: 102 Code: 102 Frequency: 10,000.00 Hz Frequency: 10,000.00 Hz Time: 3:00 min. Time: 3:00 min. Total time: 60:00 min. Total time: 60:00 min. Wave type: 1 Wave type: 1 Lead intensity level: 20% Lead intensity level: 20% Dual STIM: on...
-
Page 47: Multi Auto Sequence (Dual Ready Mode)
Multi AUTO sequence (DUAL READY MODE) To use Multi AUTO feature in DUAL mode, turn on DUAL and MULTI features (by pressing appropriate buttons outlined on pages 39 and 44). Screen will appear as follows: WellnessPro PLUS Ready Ready FLUX: on Dual STIM: on Multi AUTO: on To start entering multiple AUTO codes, press the AUTO button. - Page 48 WellnessPro PLUS Enter Multiple AUTO Codes (Side A) FLUX: on Dual STIM: on Multi AUTO: on Desired AUTO CODE is selected (we chose 211 as an example) WellnessPro PLUS Enter Multiple AUTO Codes (Side A) FLUX: on Dual STIM: on Multi AUTO: on SELECT button is pressed and new AUTO code is selected, etc.
- Page 49 WellnessPro PLUS Enter Multiple AUTO Codes (Side B) FLUX: on Dual STIM: on Multi AUTO: on Press SELECT button and the unit will ask for the new AUTO Code WellnessPro PLUS Enter Multiple AUTO Codes (Side B) FLUX: on Dual STIM: on Multi AUTO: on Desired AUTO CODE is selected (we chose 444 as an example) WellnessPro PLUS...
- Page 50 The screen will appear as follows: WellnessPro PLUS Side A Side B Code: 102 Code: 352 Frequency: 10,000.00 Hz Frequency: 3,040.00 Hz Time: 3:00 min. Time: 3:00 min. Total time: 60:00 min. Total time: 96:00 min. Wave type: 1 Wave type: 1 Lead intensity level: 20% Lead intensity level: 20% Dual STIM: on...
-
Page 51: Backup And Restore
WellnessPro PLUS Ready Ready FLUX: on Dual STIM: on Multi AUTO: on button. Message “Multi AUTO: on” will To turn off the Multi Auto function from READY mode, press disappear from the screen. Backup and Restore These functions will enable to backup or restore programs stored in custom memory slots (1-100) to a STIM card located on the back of the unit (please refer to page 13 in this manual). - Page 52 Pressing number 3 will allow user to pick any 10 AUTO Codes that will be stored in a STIM card. After pressing number 3, the screen will appear as follows: WellnessPro PLUS Select up to 10 AUTO Codes Desired AUTO CODE is selected (we chose 102 as an example) WellnessPro PLUS Select up to 10 AUTO Codes SELECT button is pressed and screen prompts continue...
- Page 53 WellnessPro PLUS Select up to 10 AUTO Codes SELECT button is pressed and screen prompts continue, etc. To complete the transfer to STIM/FLASH card, press the START button. The following message will appear: WellnessPro PLUS POD transfer completed NOTE: POD transfer feature is designed to transfer data to the upcoming device (not available at the moment of producing this manual).This option saves only 10 auto codes to a special area on the card and has nothing to do with backup/restore function (they will not override each other).
-
Page 54: Turning Led On/Off
All other functions are the same as in standard mode. To stop using programs on the STIM Card memory and return to using programs stored in the memory of the WellnessPro+, from the READY mode press transfer button. Screen will appear as follows: WellnessPro PLUS STIMCARD 1. -
Page 55: Sound On/Off
Sound On/Off Pressing the buttons together at the same time will turn On/Off the sound. Message on the center of the screen will show “Sound off” or “Sound On”. Microcurrent On/Off To give practitioners and users of the WellnessPro+ more control and flexibility when it comes to treatments, the existing feature in the WellnessPro 2010 was expanded, where now it is possible to precisely control the current output of the device. - Page 56 WellnessPro PLUS Microcurrent control: On (Side B) Press CLEAR to return to READY mode. NOTE: buttons will NOT glow until microcurrent control is ON. When turned ON these buttons will glow BLUE Once the Auto code has started, the text “Microcurrent level” on the screen will be available below the “Lead intensity level”...
- Page 57 Microcurrent range is from 10 µA (microamperes) to 600 µA and it is controlled by buttons: (microamperes) and is increased in the following increments by pressing “+” button: Starting level is 10 µA 10 – 15 – 25 – 50 – 75 – 100 – 125 – 150 – 175 – 200 – 225 – 250 – 275 – 300 – 325 – 350 – 375 – 400 – 425 –...
- Page 58 After 5 seconds of inactivity, the black highlight bar will disappear. Once you set your microcurrent level, increase the lead intensity to the desired level. As a safety precaution, as soon as microcurrent level is changed, “Lead intensity level” will drop to zero. To turn off this feature, from READY mode, press the button.
-
Page 59: Single Code Description (Continued)
Single Code description (continued): Single codes are 250 most commonly used frequencies preprogrammed in the memory for convenience and ease of use. List of the frequencies stored in the single codes are: Freq. Freq. Freq. Freq. Freq. Freq. 10000 0.67 854.06 901.14 1050... - Page 60 Freq. Freq. Freq. Freq. Freq. Freq. 1255.53 1373.67 1491.8 1609.93 1728.06 119.99 1285.07 1403.2 1521.32 1639.47 1757.59 399.99 1314.6 1432.73 1550.86 1669 1787.13 1344.13 1462.27 1580.4 1698.75 1816.7 Quick notes for custom auto codes: Document # LBL-UM+ Rev.3 June 2018 ©...
Need help?
Do you have a question about the WellnessPro + and is the answer not in the manual?
Questions and answers
What is a good intensity level for back pain? How do I adjust it up and down; do I use the plus and minus symbols on each side of the us button?
The manual does not specify an exact "good" intensity level for back pain. However, you can adjust the intensity level using the knobs:
- To increase intensity on socket A, rotate the left knob clockwise.
- To decrease intensity on socket A, rotate the left knob counterclockwise.
- To increase intensity on socket B, rotate the right knob clockwise.
- To decrease intensity on socket B, rotate the right knob counterclockwise.
Start at a low level and gradually increase to a comfortable setting.
This answer is automatically generated