Table of Contents
Advertisement
user manual
READ ALL INSTRUCTIONS BEFORE OPERATING UNIT. SAVE THESE INSTRUCTIONS FOR FUTURE REFERENCE.
components
• Base Unit
• Food Hopper
• Bowl
• Lid
• Micro USB Plug
• Universal USB Power Supply
• (4) "AA" Batteries (NOT INCLUDED)
NOTE: Phillips Head Screwdriver is required to insert "AA" Batteries.
This ensures batteries are safely kept away from pet access.
displa y panel & features
CLOCK: Programs the display time.
PRESET MEALS: Choose between (6) pre-programmed meal schedules.
MEAL TIME: Programs custom MEAL TIME, up to (6) per day.
MEAL SIZE: Programs custom MEAL SIZE.
SLOW: Toggles slow feed setting ON/OFF.
MANUAL: Press to dispense food between programmed meals.
12/24: Toggles between 12 and 24-hour CLOCK display.
OZ/G: Toggles displayed food portion between Ounces and Grams.
UP/DOWN BUTTONS: Use to maneuver various program settings.
ENTER: Press confirm program settings.
POWER: Hold to turn unit ON/OFF.
LOW BATTERY: Will light up when battery is low.
ERROR: Will light up when an error is detected.
the right amount of food delivered perfectly every time
The NANO Automated Pet Feeder provides PRECISION PORTION CONTROL using a dual-beam weigh mechanism and digital microprocessor.
Because of this high-performance technology, DO NOT place anything on top of the feeder to avoid affecting the accuracy of the weighing mechanism.
For questions, contact Customer Support: 1-877-PETMATE (1-877-738-6283)
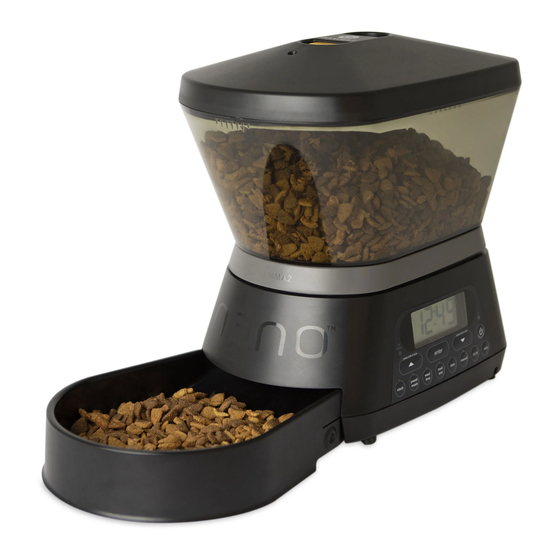
AUTOMATED PET FEEDER
BASE UNIT
LID
FOOD HOPPER
TM
BOWL
UNIVERSAL USB
POWER SUPPLY
MICRO USB PLUG
Advertisement
Table of Contents

Related Manuals for GAMMA2 nano

Summary of Contents for GAMMA2 nano
- Page 1 The NANO Automated Pet Feeder provides PRECISION PORTION CONTROL using a dual-beam weigh mechanism and digital microprocessor. Because of this high-performance technology, DO NOT place anything on top of the feeder to avoid affecting the accuracy of the weighing mechanism.
- Page 2 section 1: product assembl y Remove Battery Door on bottom of BASE UNIT and install (4) new AA batteries. Unpack items. Once complete, reinstall Battery Door. Note: Phillips Head Screwdriver required to remove screw to install Battery Door. Install MICRO USB PLUG. Attach FOOD HOPPER starting on back side.
- Page 3 2: quick start guide The QUICK START GUIDE is the fastest way to program the NANO Automated Pet Feeder. Once complete, no further programming or setup is required. assemble the feeder See page 2 for details. set the clock 1) Press “CLOCK”...
- Page 4 section 3: custom meal programming program meal time 1) Press “MEAL TIME” button 3) Select AM/PM a) Press UP arrow to select AM a) The MEAL TIME LED will illuminate. A MEAL TIME counter will appear in b) Press DOWN arrow to select PM the bottom left.
- Page 5 For questions, contact Customer Support: 1-877-PETMATE (1-877-738-6283) default meal settings To ensure pets are always fed, the NANO is programmed out of the box to dispense the following DEFAULT MEAL SETTINGS. Once custom programming has been added, this will override the DEFAULT MEAL SETTINGS.
-
Page 6: Control Panel Functions
The NANO can program up to (6) Meal Times per day. by battery backup. The unit will retain CLOCK time even if it is turned off. -
Page 7: Manual Feed
manual feed power button The MANUAL FEED function allows the user to instantly feed their pet The POWER BUTTON allows the user to turn off the unit while maintaining between programmed MEAL TIMES. By pressing the MANUAL FEED button, the user defined CLOCK, MEAL TIME and MEAL SIZE Programming. This is food will be dispensed until the MANUAL FEED or ENTER button is pressed. -
Page 8: Low Battery
The LOW BATTERY LED will illuminate if the Backup Batteries are low and The NANO will attempt to dislodge and self correct a Food Jam. In the need to be replaced. event this cannot be done, the ERROR LED will illuminate. Refer to TROUBLESHOOTING for instruction on how to fix a food jam. -
Page 9: Troubleshooting
section 6: troubleshooting 1) If no time is shown on the LCD Display: 4) Error light is flashing, with an overfilled bowl: a) Turn on Power Button. It is possible the unit is in the Off Mode. a) Unit is not able to dispense based on food being unable to fall from the b) Make sure wall outlet is functioning by plugging in a different Base Unit. - Page 10 section 7: warnings warning • DO NOT place anything on top of the feeder to avoid affecting the accuracy of the weighing mechanism. • Base unit should NOT be submerged in water at any time, this will damage electronic components and void the Warranty. •...
-
Page 11: Product Specifications & Warranty
REQUEST FOR WARRANTY ACTION: Please direct all requests for action on this Warranty or any other product inquiries to Doskocil Manufacturing Company, Inc, Warranty Division, P.O. BOX 1246, Arlington, TX USA 76004-1246. U.S. PATENT PENDING. GAMMA2 AND G2 Logo, ARE TRADEMARKS OF PETMATE® P.O. BOX 1246, ARLINGTON, TX 76004-1246 • WWW.PETMATE.COM • 1-877-738-6283 © DOSKOCIL MANUFACTURING COMPANY, INC 2019 • PET3016...
Need help?
Do you have a question about the nano and is the answer not in the manual?
Questions and answers